Workshop 3 Preview: Remote Connectivity & Security (Exercises 4-5)
Part 2 of 3: Cloud Routers and mTLS for Secure Robot Communication
Series Overview
This is Part 2 of the Workshop 3 exercise preview:
| Part | Exercises | Focus |
|---|---|---|
| Part 1 | 1-3 | Fundamentals: Pub/Sub, QoS, Shared Memory |
| Part 2 (This Post) | 4-5 | Remote: Cloud Router, mTLS Security |
| Part 3 | 6-8 | Advanced: Wireless, Congestion, NAT |
Exercise 4: Remote Connectivity & Cloud Router
The Problem: Robots Behind NAT
Most robots operate behind NAT (Network Address Translation) - they have private IP addresses that aren’t directly reachable from the internet.
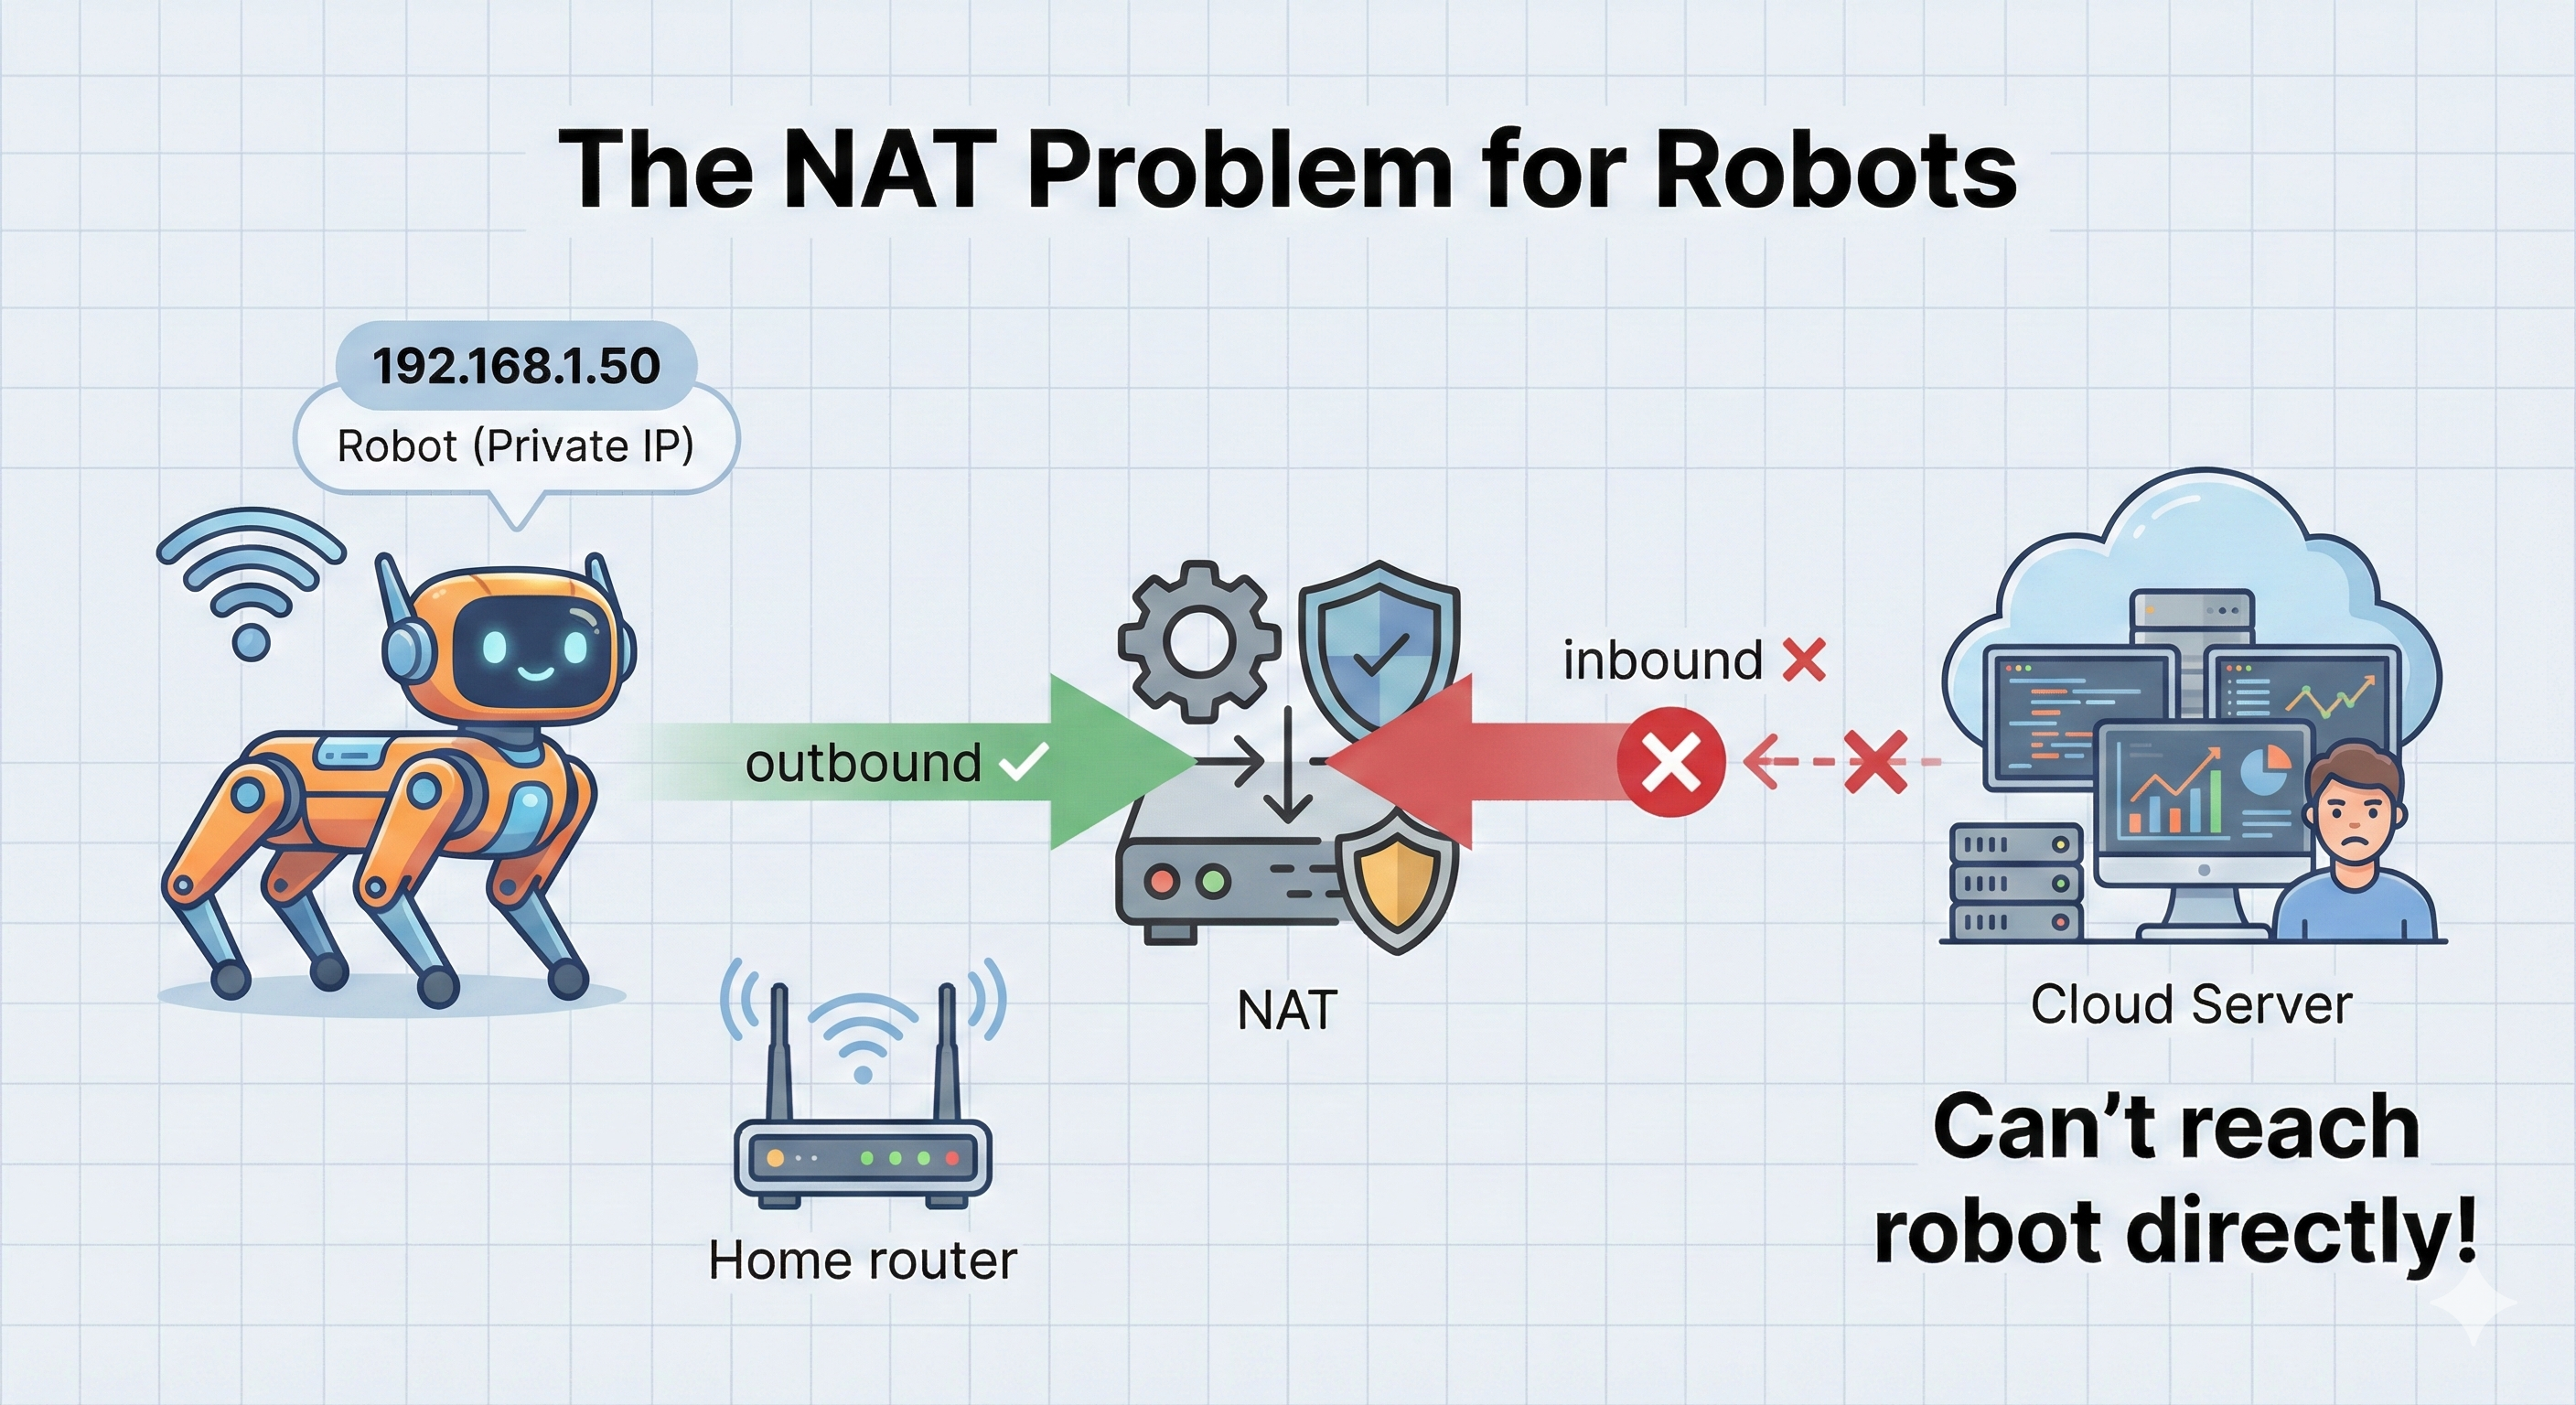
The Short Answer: NAT only knows how to route replies to connections your robot initiated. It has no idea where to send unsolicited incoming packets.
Step-by-Step Explanation:
Your robot has a private IP (e.g.,
192.168.1.50) - this address only works inside your local networkWhen robot sends data OUT:
- Robot sends packet:
192.168.1.50:5000 → 8.8.8.8:80 - NAT router rewrites it:
203.0.113.5:34567 → 8.8.8.8:80(using router’s public IP) - NAT creates a translation entry: “replies to port 34567 go to 192.168.1.50:5000”
- Robot sends packet:
Replies come back successfully:
- Server replies:
8.8.8.8:80 → 203.0.113.5:34567 - NAT looks up port 34567, finds the entry, forwards to robot ✅
- Server replies:
But unsolicited INBOUND fails:
- Cloud server tries:
1.2.3.4:443 → 203.0.113.5:7447 - NAT asks: “Port 7447? I have no translation entry for this!”
- Packet is dropped ❌
- Cloud server tries:
The Key Insight: NAT is like a receptionist who only connects calls if someone inside asked to speak to that caller first. Cold calls get rejected!
DDS limitation: Relies on direct peer-to-peer connections. If peers can’t reach each other, no communication.
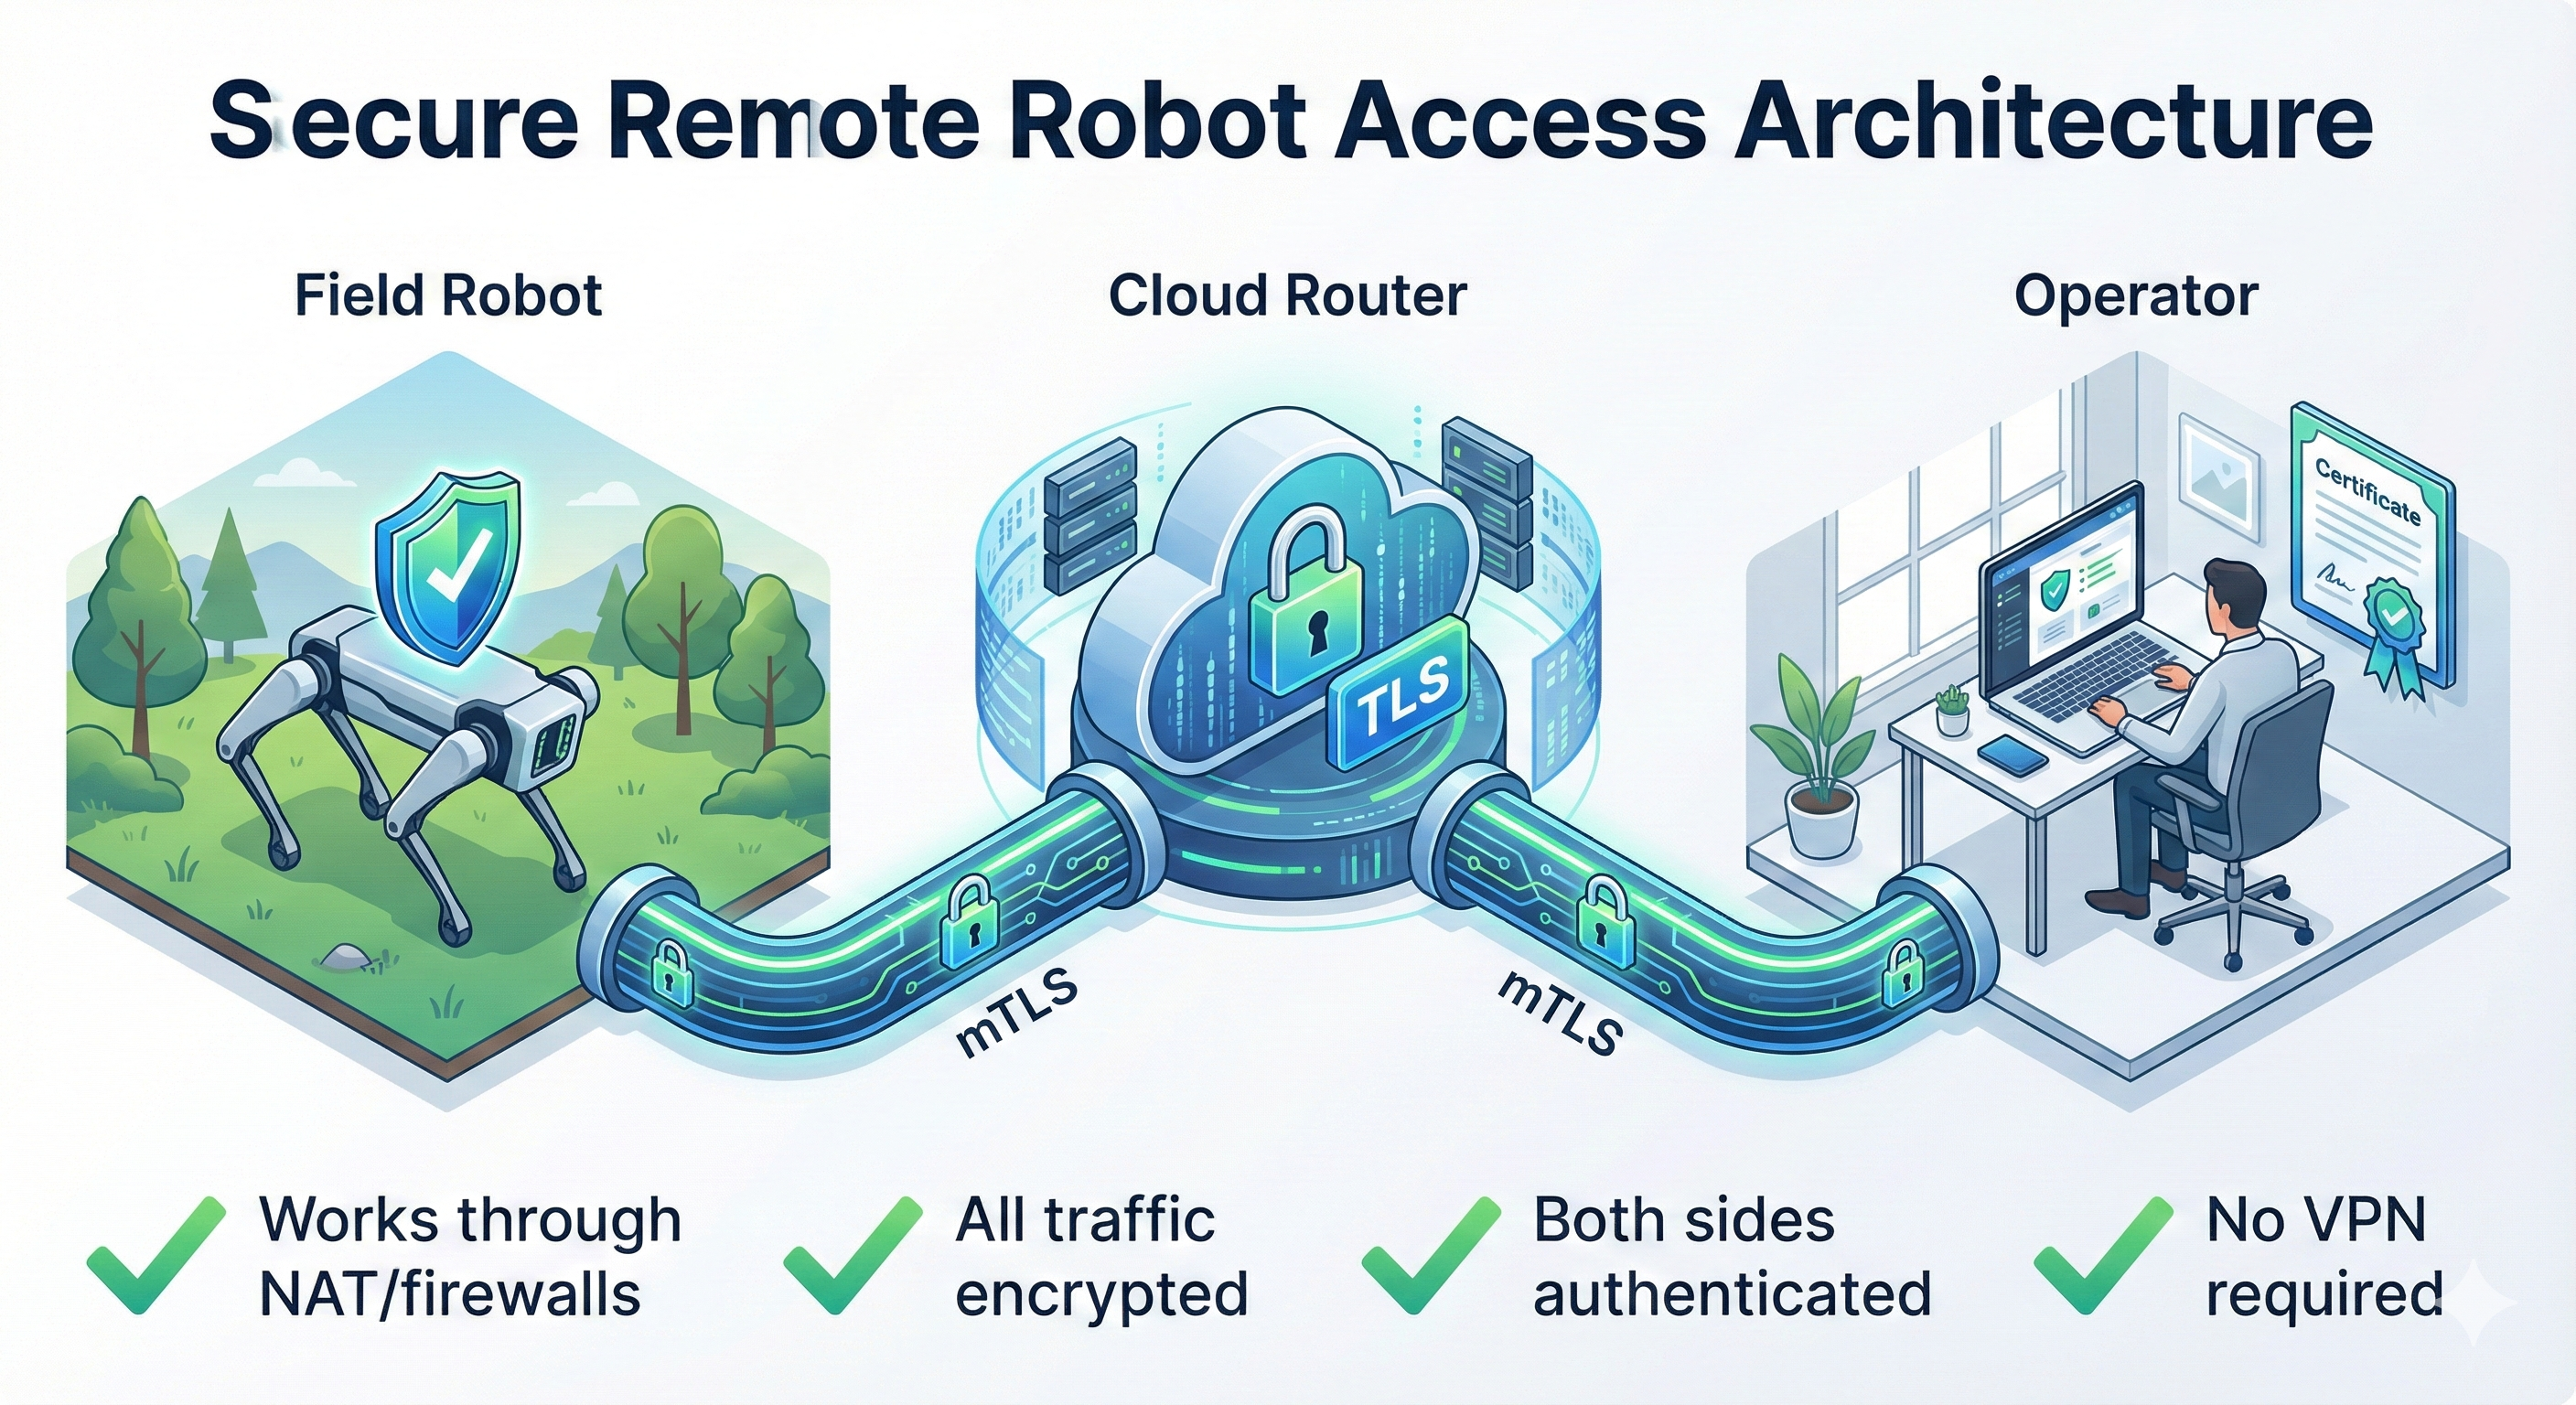
The Solution: Zenoh Cloud Router
Zenoh routers can be deployed anywhere - including cloud servers. Robots connect outbound to the cloud router, establishing a bidirectional channel.
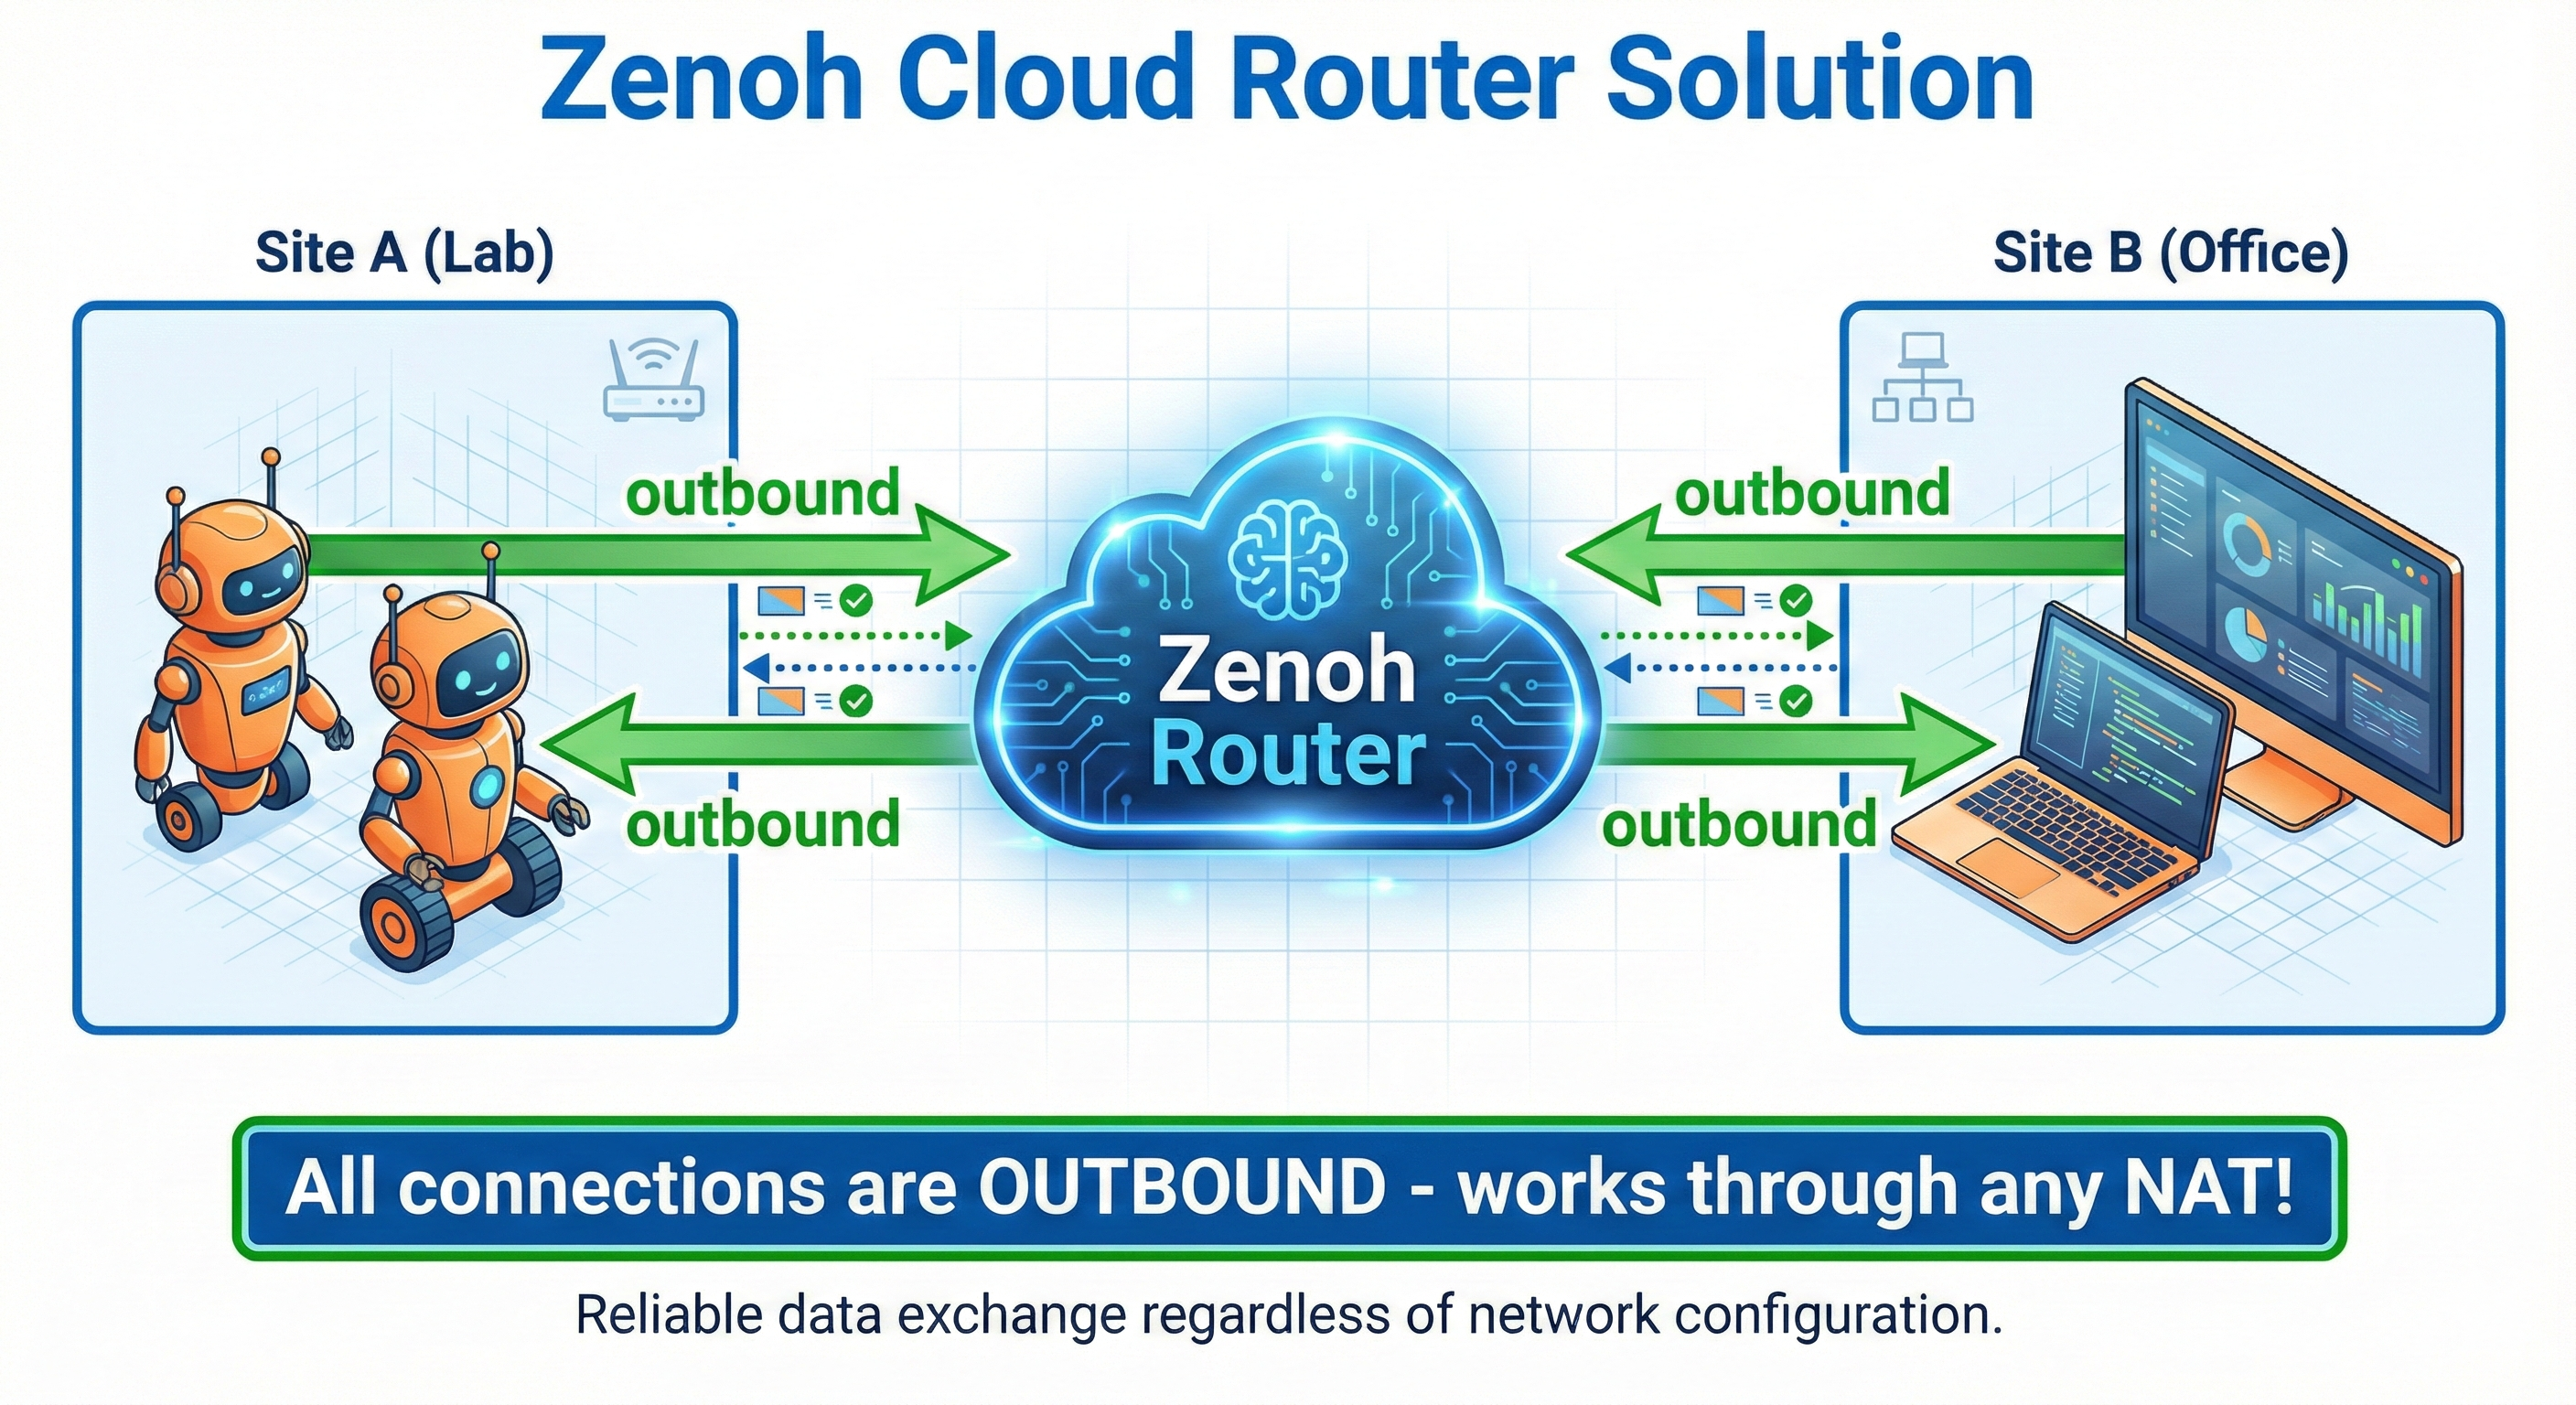
The Short Answer: Everyone connects OUTBOUND to a cloud router. Since all connections are outbound, NAT translation entries exist for everyone, and the router can relay messages between them.
Step-by-Step Explanation:
- Deploy a Zenoh router on a cloud server with a public IP (e.g.,
54.23.45.67)- This server has no NAT - it’s directly reachable from anywhere
- Robot connects OUTBOUND to router:
- Robot initiates:
192.168.1.50:5000 → 54.23.45.67:7447 - NAT creates translation entry ✅
- Connection stays open (bidirectional TCP channel)
- Robot initiates:
- Operator laptop ALSO connects OUTBOUND:
- Laptop initiates:
10.0.0.25:6000 → 54.23.45.67:7447 - Laptop’s NAT creates translation entry ✅
- Another bidirectional channel established
- Laptop initiates:
- Router relays messages between them:
- Laptop publishes
/cmd_vel→ Router receives it - Router forwards to Robot via the already-open channel
- NAT allows it because Robot initiated that connection! ✅
- Laptop publishes
The Key Insight: By having everyone connect OUT to a central point, we flip the problem. Instead of trying to reach robots (impossible through NAT), we let robots reach us and keep the channel open for bidirectional communication.
Why This Is Different From DDS:
| DDS | Zenoh Router |
|---|---|
| Discovery finds peers, then direct P2P | All traffic flows through router |
| Fails if either peer is behind NAT | Works as long as router is reachable |
| Requires multicast or unicast discovery | Explicit connection to known endpoint |
Deployment Options
| Option | Pros | Cons |
|---|---|---|
| Self-hosted VPS | Full control, low cost | Requires setup/maintenance |
| Zenoh Cloud | Managed, easy setup | Monthly cost |
| Peer router | No cloud needed | Both peers must be reachable |
Key Insight: The Three Pillars of Zenoh Configuration
Understanding Zenoh configuration comes down to three essential pillars:
| Pillar | Description | Options |
|---|---|---|
| Mode | Role in the network | client, peer, router |
| Connect/Listen | How to find/accept connections | tcp/127.0.0.1:7447, tcp/0.0.0.0:7447 |
| Transport | How data is moved | SHM, TCP, TLS, QUIC |
Key Insight: Unlike DDS where discovery leads to direct peer-to-peer connections, Zenoh router relays ALL traffic continuously.
DDS:    Discovery → Direct peer-to-peer (fails through NAT)
Zenoh:  All traffic through router (works through ANY NAT)
Why this matters: Both client and server connect OUTBOUND to the router. Neither needs to accept incoming connections. This is why Zenoh works through NAT/firewalls!
Going from local to remote connectivity is literally a one-line change:
// LOCAL
connect: { endpoints: ["tcp/127.0.0.1:7447"] }

// REMOTE (just change the IP!)
connect: { endpoints: ["tcp/cloud-server-ip:7447"] }
No VPN required. No firewall rules. No port forwarding. Just point to a cloud router!
Cloud Router Configuration
// cloud_router.json5 (on cloud server)
{
  mode: "router",
  listen: {
    endpoints: [
      "tcp/0.0.0.0:7447",    // Public TCP endpoint
      "tls/0.0.0.0:7448"     // TLS endpoint (for mTLS)
    ]
  },
  // Optional: Enable admin interface
  plugins: {
    rest: {
      http_port: 8000
    }
  }
}
// client_config.json5 (on robot)
{
mode: "client",
connect: {
endpoints: [
"tcp/your-cloud-server.com:7447"
]
}
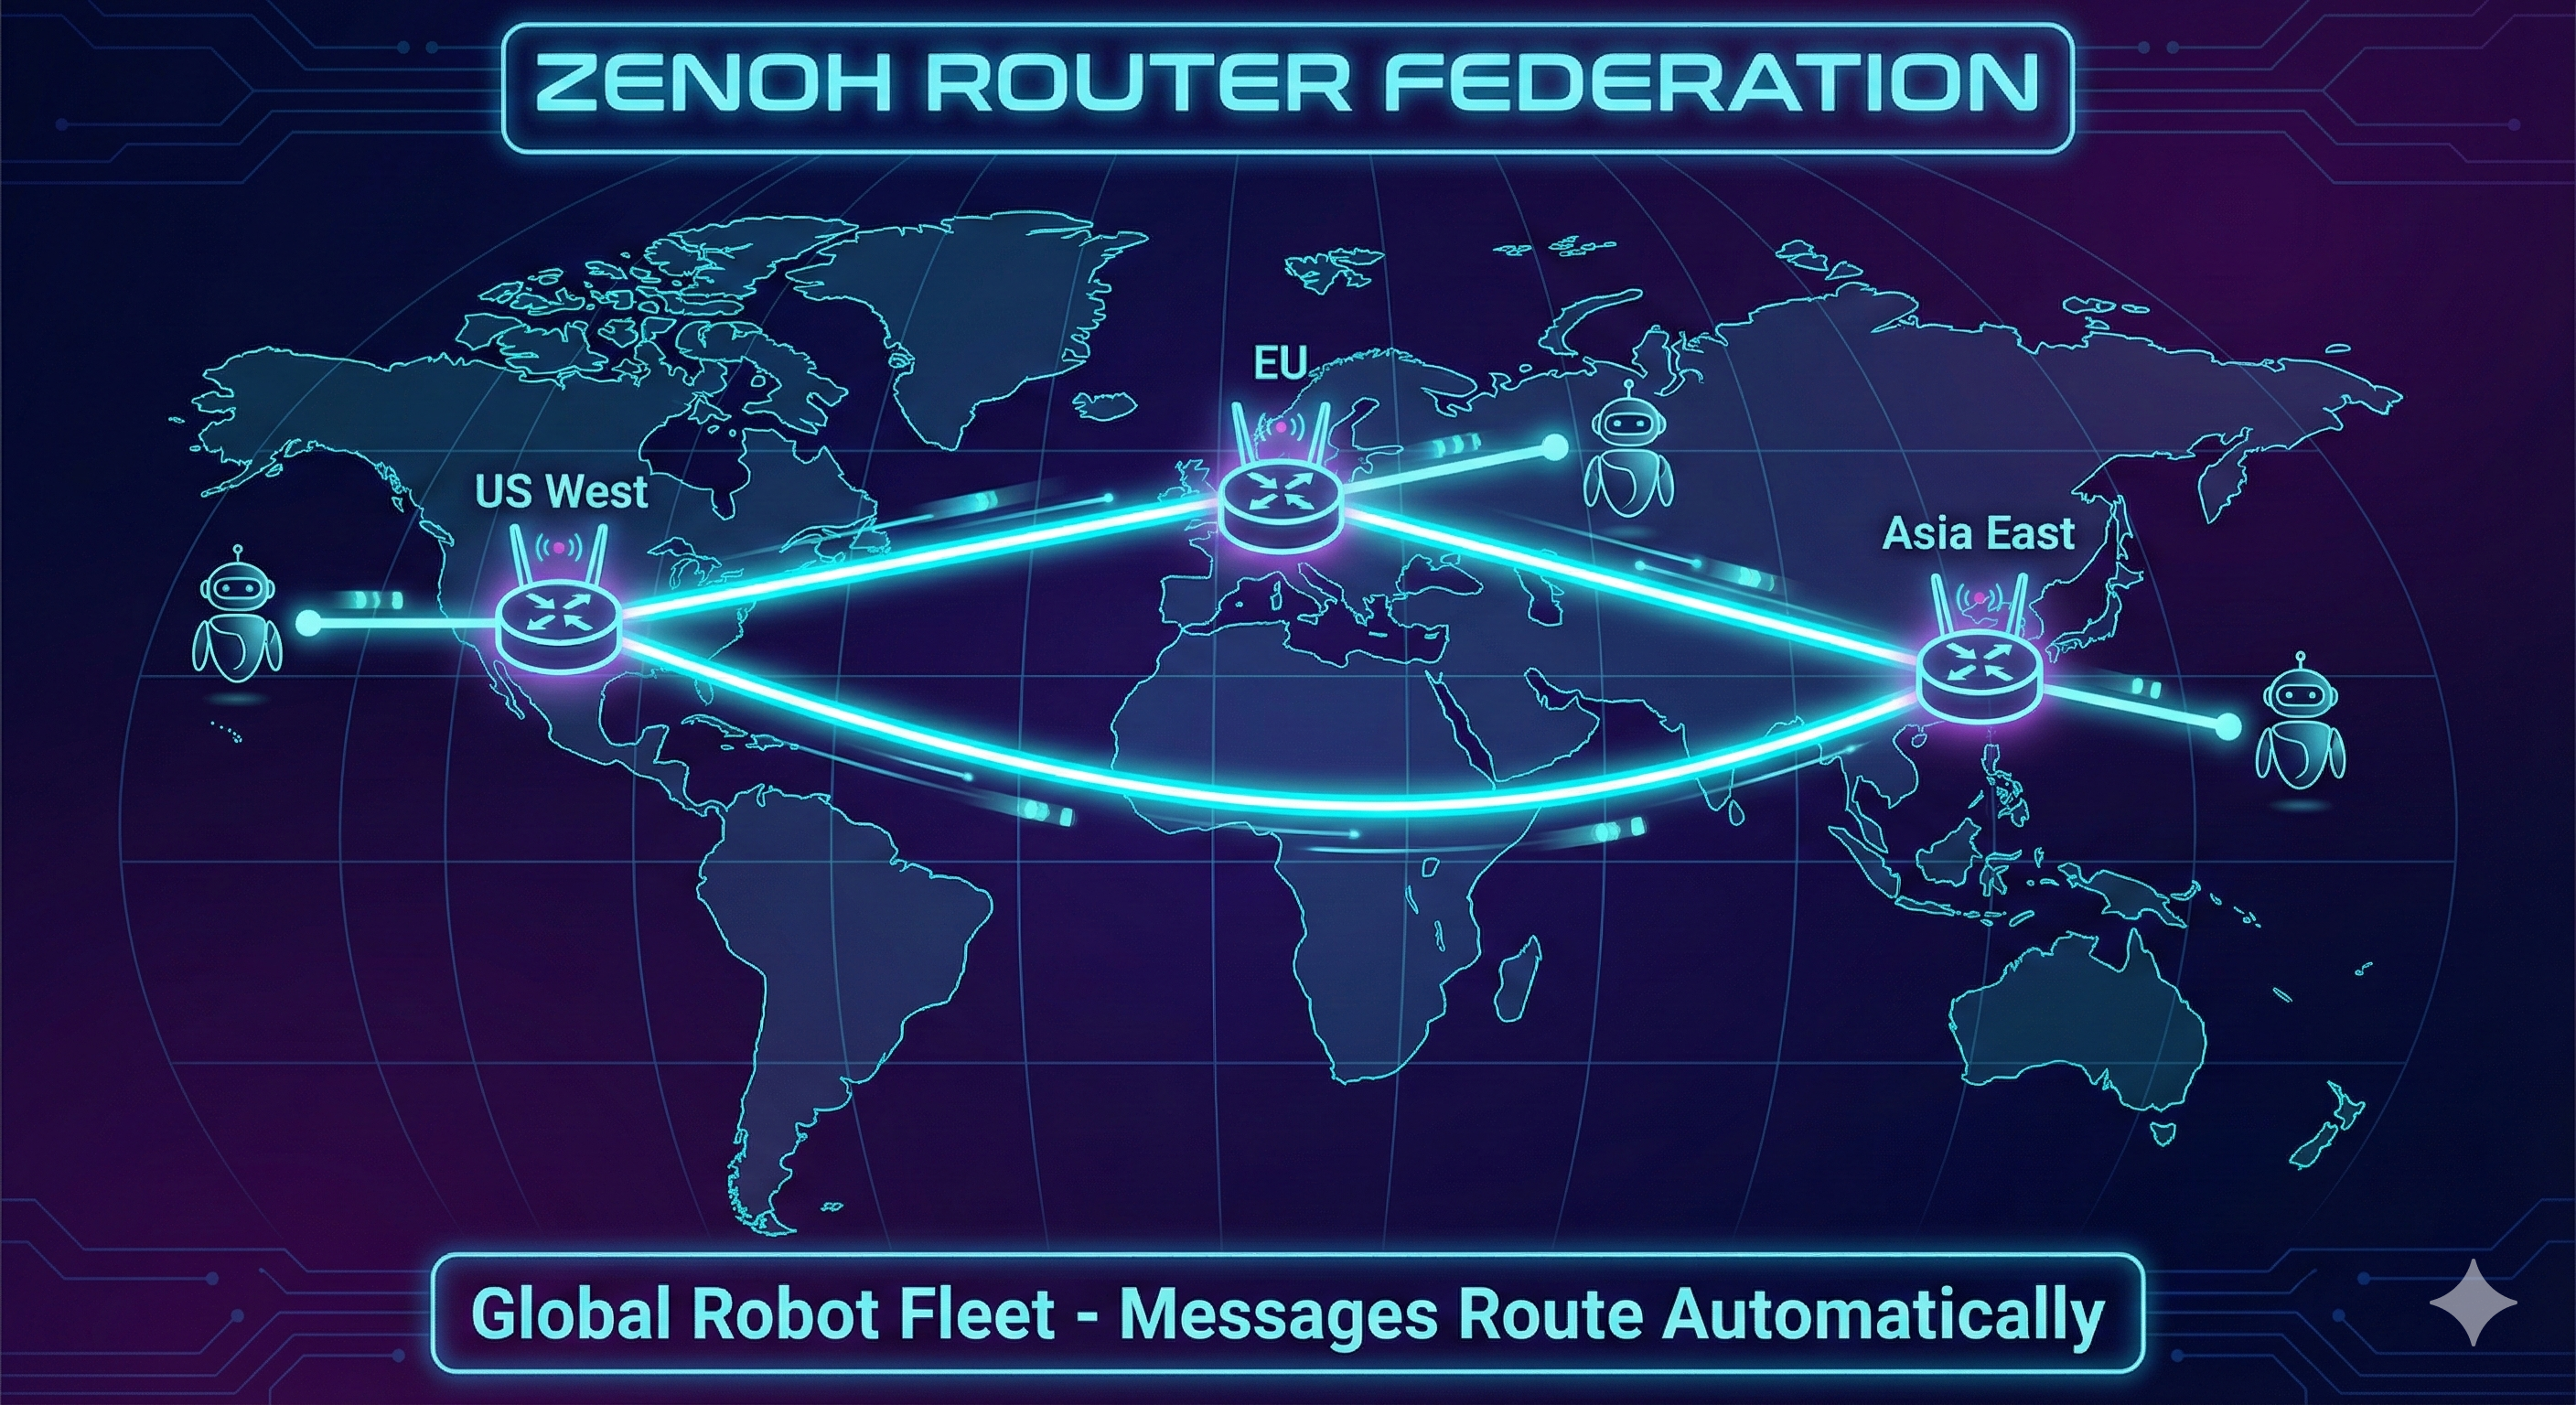
}Router Federation
Multiple routers can connect to each other, creating a mesh network:
Hands-On Commands
# On cloud server: Start router
zenohd --config cloud_router.json5

# On robot: Connect as client
export ZENOH_CONFIG=/workshop3/configs/client_config.json5
ros2 run demo_nodes_cpp talker

# On laptop (different network): Subscribe via cloud
export ZENOH_CONFIG=/workshop3/configs/client_config.json5
ros2 run demo_nodes_cpp listener

# Verify connectivity
zenoh scout --config client_config.json5
Exercise 5: mTLS Security
Why Security Matters
Once your robot is reachable over the internet, anyone can potentially: - Subscribe to your camera feeds - Send commands to your robot - Intercept sensitive data
┌─────────────────────────────────────────────────────────────────────────┐
│                    SECURITY RISKS                                        │
│                                                                          │
│    Legitimate User         Cloud Router         Attacker                │
│    ┌─────────┐            ┌──────┐            ┌─────────┐              │
│    │ Control │────────────│      │────────────│ Eavesdrop│              │
│    │ Station │            │zenohd│            │ & Inject │              │
│    └─────────┘            └──────┘            └─────────┘              │
│                                                                          │
│    Without encryption: Attacker can see ALL messages                    │
│    Without authentication: Attacker can pretend to be legitimate       │
└─────────────────────────────────────────────────────────────────────────┘
mTLS: Mutual TLS Authentication
mTLS (mutual TLS) provides both encryption and authentication:
| Feature | What It Does |
|---|---|
| Encryption | All traffic encrypted with TLS |
| Server Auth | Client verifies router’s identity |
| Client Auth | Router verifies client’s identity |
| Certificate-based | No passwords to manage |
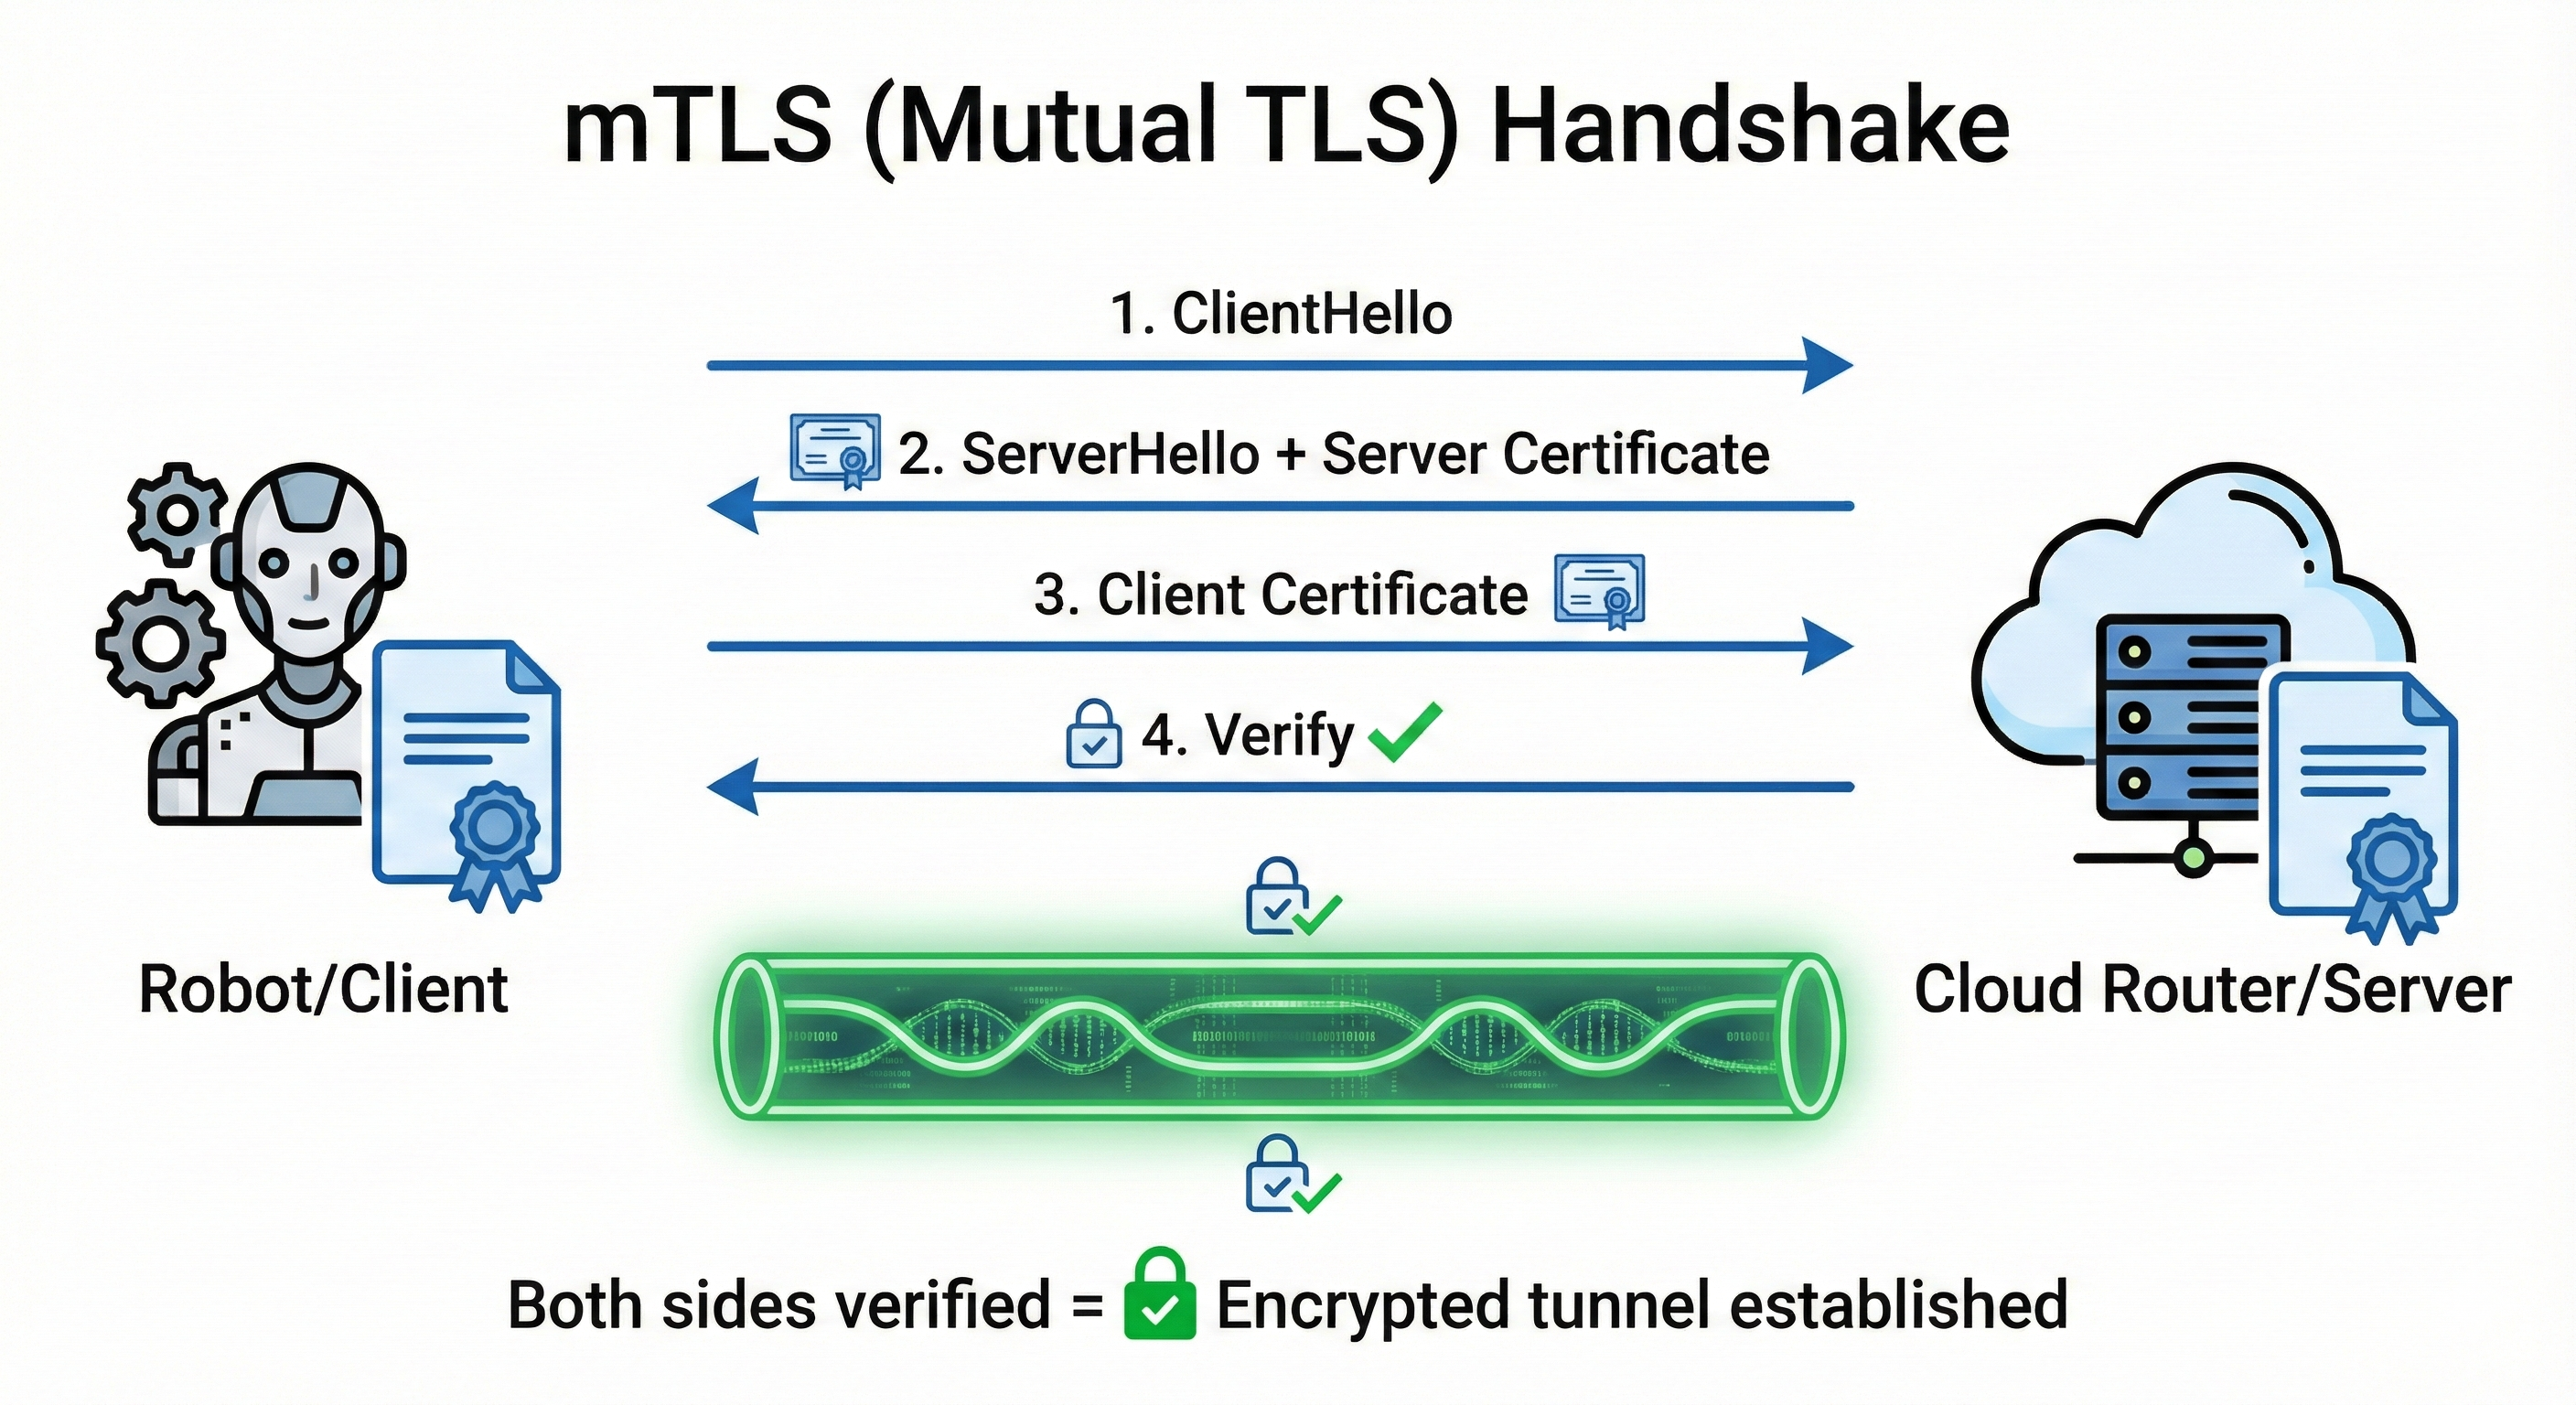
The Short Answer: mTLS gives you encrypted communication where BOTH sides prove their identity using certificates - not just the server (like HTTPS), but the client too.
Understanding the “Mutual” in mTLS:
| Scenario | Server Proves Identity | Client Proves Identity | Example |
|---|---|---|---|
| HTTP (no TLS) | ❌ | ❌ | http://example.com |
| HTTPS (TLS) | ✅ | ❌ | https://amazon.com - you verify it’s really Amazon |
| mTLS | ✅ | ✅ | Robot ↔︎ Router - both verify each other |
Why Do Robots Need mTLS (not just TLS)?
With regular TLS (like HTTPS): - Your robot connects to the cloud router - Robot verifies “yes, this is really my router” ✅ - But router has NO IDEA who connected - could be anyone! ❌
With mTLS: - Robot verifies “this is really my router” ✅ - Router verifies “this is really my authorized robot” ✅ - Attackers without valid certificates are rejected
What Certificates Prove:
- Identity: “I am robot-042 from fleet XYZ” (encoded in certificate)
- Authorization: “I was issued this certificate by a trusted CA” (signature chain)
- Integrity: “This certificate hasn’t been tampered with” (cryptographic signature)
Real-World Analogy: - TLS = Checking the bouncer’s ID badge before entering a club - mTLS = Bouncer checks YOUR ID too, and both IDs must be issued by the same trusted authority
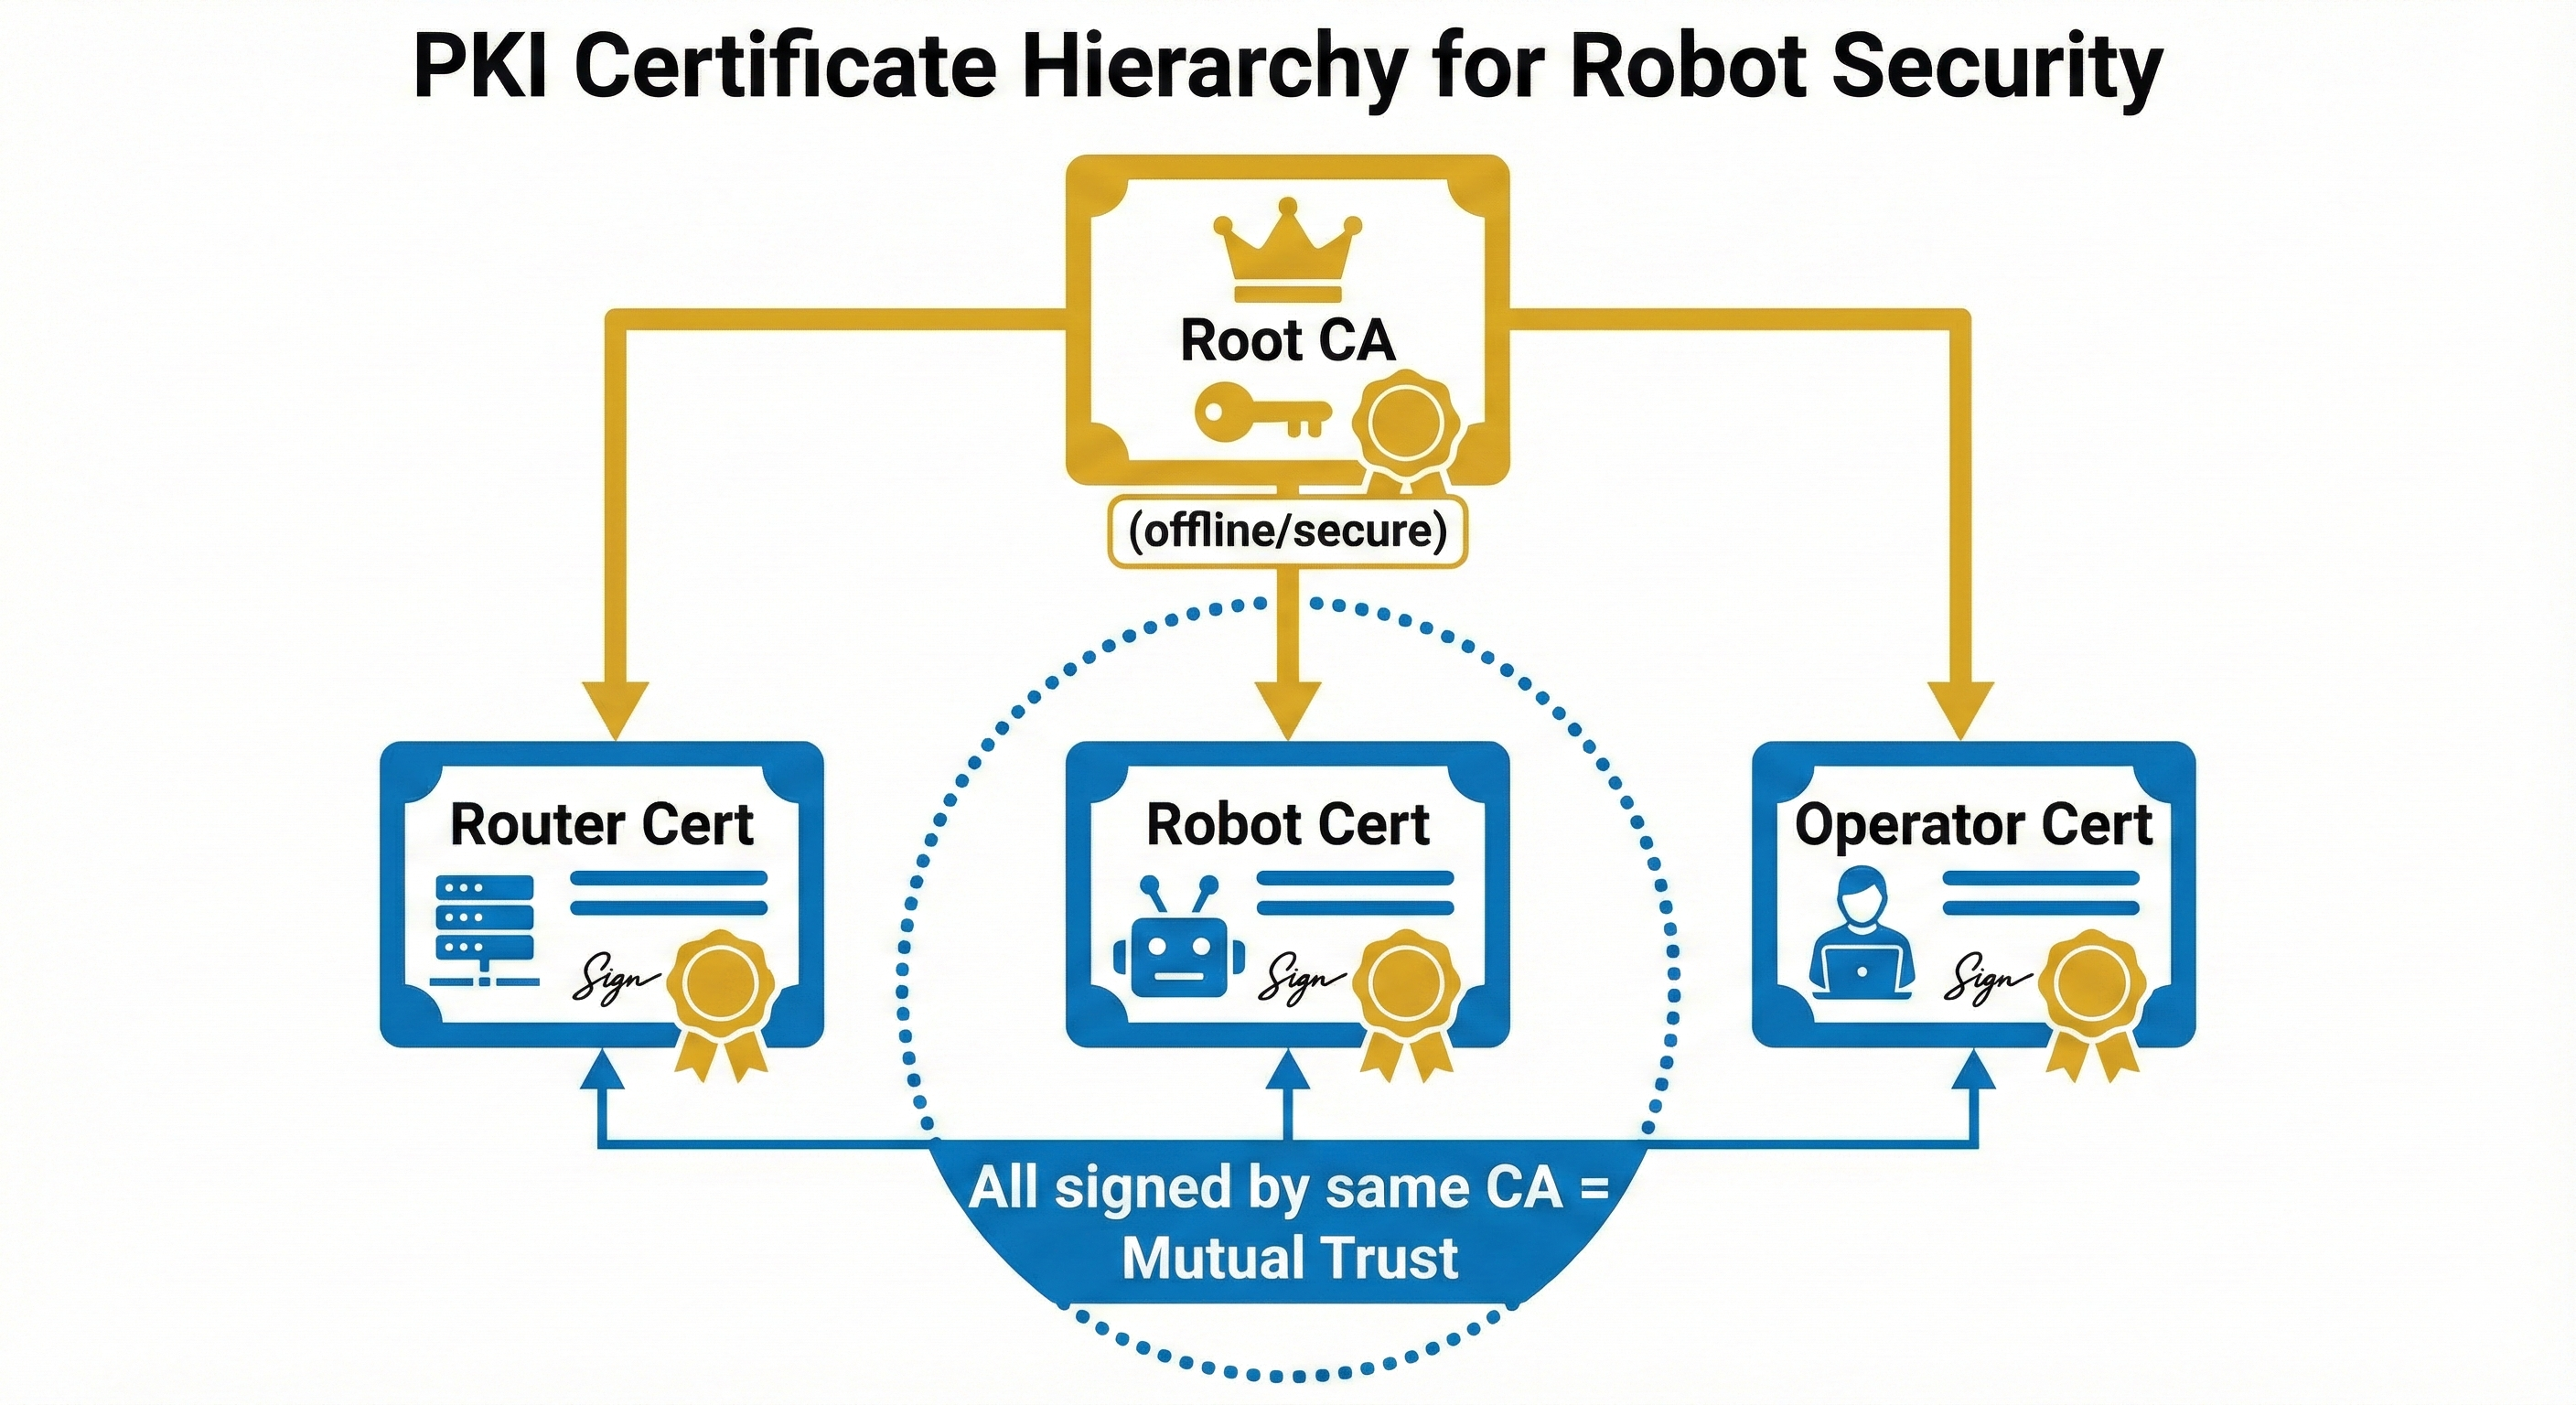
Certificate Structure
Generating Certificates (X.509 v3 Required!)
The Short Answer: You need to create a Certificate Authority (CA), then use it to sign certificates for your router and clients. Think of it as creating your own “ID card issuing office” and then issuing ID cards to authorized devices.
The Three Files You Need Per Device:
| File | What It Is | Who Sees It |
|---|---|---|
*.key |
Private Key - The secret! Used to prove identity | ONLY the device owner |
*.csr |
Certificate Signing Request - “Please sign my public key” | Sent to CA (temporary) |
*.pem |
Certificate - Signed public key + identity info | Everyone (it’s public) |
The Certificate Generation Flow:
Step 1: Create CA (your "ID card office")
┌─────────────────────────────────────────────────┐
│  openssl genrsa → ca.key (CA's secret)          │
│  openssl req -x509 → ca.pem (CA's certificate)  │
└─────────────────────────────────────────────────┘
         │
         ▼
Step 2: For each device (router, robot, operator):
┌─────────────────────────────────────────────────┐
│  openssl genrsa → device.key (device's secret)  │
│  openssl req -new → device.csr (signing request)│
│  openssl x509 -req + CA signs → device.pem      │
└─────────────────────────────────────────────────┘
Why Do We Need a CA?
Without a CA, devices would have to know about every other device’s certificate individually. With a CA: - Devices only need to trust ONE certificate (the CA) - Any certificate signed by that CA is automatically trusted - Adding new devices = just sign a new certificate (no reconfiguration needed)
Basic OpenSSL commands create v1 certificates which will fail with UnsupportedCertVersion error. You must use the -extfile option to create v3 certificates.
# Create working directory
mkdir -p /tmp/zenoh-certs && cd /tmp/zenoh-certs

# Create v3 extension config (REQUIRED for Zenoh!)
cat > v3.ext << 'EOF'
authorityKeyIdentifier=keyid,issuer
basicConstraints=CA:FALSE
keyUsage = digitalSignature, keyEncipherment
EOF

# 1. Generate CA (Certificate Authority) with v3 extensions
openssl genrsa -out ca.key 2048
openssl req -x509 -new -nodes -key ca.key -sha256 -days 365 \
    -out ca.pem -subj "/CN=Zenoh-Workshop-CA" \
    -addext "basicConstraints=critical,CA:TRUE"

# 2. Generate Router certificate (v3)
openssl genrsa -out server.key 2048
openssl req -new -key server.key -out server.csr -subj "/CN=zenoh-router"
openssl x509 -req -in server.csr -CA ca.pem -CAkey ca.key \
    -CAcreateserial -out server.pem -days 365 -sha256 \
    -extfile v3.ext

# 3. Generate Client certificate (v3)
openssl genrsa -out client.key 2048
openssl req -new -key client.key -out client.csr -subj "/CN=ros2-client"
openssl x509 -req -in client.csr -CA ca.pem -CAkey ca.key \
    -CAcreateserial -out client.pem -days 365 -sha256 \
    -extfile v3.ext

# 4. Verify certificate version is v3
openssl x509 -in server.pem -text -noout | grep "Version"
# Expected: Version: 3 (0x2)
Zenoh TLS Configuration
The field names in Zenoh 1.7.1 are different from older documentation. Using old field names will cause “unknown field” errors.
| Old Name (wrong) | New Name (correct) |
|---|---|
root_ca_certificate_file |
root_ca_certificate |
server_private_key_file |
listen_private_key |
server_certificate_file |
listen_certificate |
client_private_key_file |
connect_private_key |
client_certificate_file |
connect_certificate |
client_auth: true |
enable_mtls: true |
// router_tls.json5
{
  mode: "router",
  listen: {
    endpoints: ["tls/0.0.0.0:7448"]
  },
  transport: {
    link: {
      tls: {
        root_ca_certificate: "/certs/ca.pem",
        listen_private_key: "/certs/server.key",
        listen_certificate: "/certs/server.pem",
        enable_mtls: true  // Require client certificates!
      }
    }
  }
}
// client_tls.json5
{
mode: "client",
connect: {
endpoints: ["tls/your-server.com:7448"]
},
transport: {
link: {
tls: {
root_ca_certificate: "/certs/ca.pem",
connect_private_key: "/certs/client.key",
connect_certificate: "/certs/client.pem"
}
}
}
}Hands-On Commands
Global flags (like --config) must come BEFORE the subcommand:
zenoh --config config.json5 subscribe -k "key/**"  # ✅ Correct
zenoh subscribe --config config.json5 -k "key/**"  # ❌ Wrong (unrecognized arguments)
# Start router with TLS (Terminal 1)
zenohd -c /tmp/zenoh-certs/router_tls.json5
# Expected: "Zenoh can be reached at: tls/172.20.10.11:7448"
# Subscribe with TLS using Zenoh CLI (Terminal 2)
zenoh --config /tmp/zenoh-certs/client_tls.json5 subscribe -k "test/**"
# Note: Output will be Base64 encoded
# Publish with TLS (Terminal 3)
zenoh --config /tmp/zenoh-certs/client_tls.json5 put -k "test/secure" -v "Hello via mTLS!"
# Decode Base64 message
echo "SGVsbG8gdmlhIG1UTFMh" | base64 -d
# Output: "Hello via mTLS!"
# Test REJECTION (no certificate - should FAIL!)
zenoh --connect "tls/127.0.0.1:7448" subscribe -k "test/**"
# Expected: Connection fails, router shows "BadCertificate" warningVerified Test Results
Terminal 1 (Router):   ✅ Listening on tls/172.20.10.11:7448
                       ⚠️ "BadCertificate" = blocking unauthorized connections!

Terminal 2 (Subscribe): ✅ Received: SGVsbG8gdmlhIG1UTFMh (base64 encoded)

Terminal 3 (Publish): ✅ Message sent successfullyWhen you see this in the router logs:
received fatal alert: BadCertificate. Hint: increase the system open file limit.This is a SUCCESS indicator! It means:
- An unauthorized client tried to connect without valid certificates
- The router correctly rejected the connection
- Your mTLS security is working as intended
The “open file limit” hint is a generic message and not relevant to certificate validation failures. The BadCertificate alert confirms only clients with valid certificates signed by your CA can connect.
Security Best Practices
| Practice | Why |
|---|---|
| Rotate certificates | Limit exposure if key is compromised |
| Use short-lived certs | 30-90 days recommended |
| Separate CAs per environment | Dev, staging, prod should have different trust |
| Never share private keys | Each device gets unique key pair |
| Monitor certificate expiry | Automate renewal with tools like cert-manager |
We used /tmp/zenoh-certs/ for quick demos - this is temporary storage that gets cleared on reboot!
| Environment | Recommended Location |
|---|---|
| Development | ./certs/ in project directory |
| Linux Production | /etc/zenoh/certs/ (chmod 600) |
| Docker | Mount as volume from secure host path |
| Kubernetes | Mount as Secrets |
Never store production certificates in /tmp!
The workshop provides pre-generated certificates for the exercises. In production, use a proper PKI or managed certificate service.
Combining Remote + Security
The real power comes from combining Exercises 4 and 5:
Fleet Connectivity
This section covers official fleet connectivity patterns presented at Workshop 3.
When managing multiple robots, you have two connectivity patterns to choose from:
Pattern 1: Fleet Manager Connects to All Robots
The Fleet Manager runs a router that connects outbound to each robot:
┌─────────────────────────────────────────────────────────────────────────┐
│                    FLEET MANAGER → ROBOTS                                │
│                                                                          │
│                    ┌─────────────────┐                                  │
│                    │  Fleet Manager  │                                  │
│                    │  (rmw_zenohd)   │                                  │
│                    └────────┬────────┘                                  │
│                             │                                            │
│           ┌─────────────────┼─────────────────┐                         │
│           │                 │                 │                          │
│           ▼                 ▼                 ▼                          │
│    ┌────────────┐   ┌────────────┐   ┌────────────┐                    │
│    │  robot-1   │   │  robot-2   │   │  robot-3   │                    │
│    │ rmw_zenohd │   │ rmw_zenohd │   │ rmw_zenohd │                    │
│    │192.168.1.10│   │192.168.1.11│   │192.168.1.12│                    │
│    └────────────┘   └────────────┘   └────────────┘                    │
│                                                                          │
│    Fleet Manager connects OUT to each robot's router                    │
└─────────────────────────────────────────────────────────────────────────┘
Fleet Manager Configuration:
// fleet_manager.json5 - ZENOH_ROUTER_CONFIG_URI
{
  mode: "router",
  connect: {
    endpoints: [
      "tcp/192.168.1.10:7447",  // robot-1
      "tcp/192.168.1.11:7447",  // robot-2
      "tcp/192.168.1.12:7447"   // robot-3
    ]
  }
}
# Launch Fleet Manager
export ZENOH_ROUTER_CONFIG_URI=/configs/fleet_manager.json5
ros2 run rmw_zenoh_cpp rmw_zenohdPattern 2: Robots Connect to Fleet Manager
Each robot connects outbound to the Fleet Manager:
┌─────────────────────────────────────────────────────────────────────────┐
│                    ROBOTS → FLEET MANAGER                                │
│                                                                          │
│    ┌────────────┐   ┌────────────┐   ┌────────────┐                    │
│    │  robot-1   │   │  robot-2   │   │  robot-3   │                    │
│    │ rmw_zenohd │   │ rmw_zenohd │   │ rmw_zenohd │                    │
│    └─────┬──────┘   └─────┬──────┘   └─────┬──────┘                    │
│          │                │                │                            │
│          └────────────────┼────────────────┘                            │
│                           │                                              │
│                           ▼                                              │
│                    ┌─────────────────┐                                  │
│                    │  Fleet Manager  │                                  │
│                    │  (rmw_zenohd)   │                                  │
│                    │ 192.168.1.100   │                                  │
│                    └─────────────────┘                                  │
│                                                                          │
│    Each robot connects OUT to Fleet Manager's router                    │
└─────────────────────────────────────────────────────────────────────────┘
Robot Configuration:
// robot_config.json5 - ZENOH_ROUTER_CONFIG_URI on each robot
{
  mode: "router",
  connect: {
    endpoints: [
      "tcp/192.168.1.100:7447"  // Fleet Manager address
    ]
  }
}
# On each robot
export ZENOH_ROUTER_CONFIG_URI=/configs/robot_config.json5
ros2 run rmw_zenoh_cpp rmw_zenohdWhich Pattern to Choose?
| Consideration | Fleet Manager → Robots | Robots → Fleet Manager |
|---|---|---|
| NAT/Firewall | Fleet Manager must reach robots | ✅ Robots reach out (NAT-friendly) |
| Dynamic fleet | Must update FM config | ✅ Robots self-register |
| Security | FM needs robot IPs | ✅ Robots need only FM IP |
| Scalability | Config grows with fleet | ✅ Single endpoint |
Pattern 2 (Robots → Fleet Manager) is usually better because: - Works through NAT (robots initiate connections) - No need to update Fleet Manager config for new robots - Single well-known endpoint for all robots
Access Control (ACL)
This section covers fine-grained access control for Zenoh topic forwarding.
Access Control Lists (ACLs) provide fine-grained control over which topics can be forwarded through a Zenoh router. This is essential for:
- Bandwidth reduction - Don’t forward high-bandwidth topics over slow links
- Privacy - Block camera data from leaving the robot
- Operational safety - Restrict who can send control commands
ACL Rule Syntax
ACL rules apply per key expression, direction, and peer:
// router_with_acl.json5
{
  mode: "router",
  listen: {
    endpoints: ["tcp/0.0.0.0:7447"]
  },
  access_control: {
    enabled: true,
    default_permission: "deny",  // Deny by default, allow explicitly
    rules: [
      {
        // Allow odometry and battery from any peer
        id: "allow-telemetry",
        permission: "allow",
        key_exprs: ["/*/odom", "/*/battery_state"],
        messages: ["put", "get", "declare_subscriber"]
      },
      {
        // Block camera data to external networks
        id: "block-camera",
        permission: "deny",
        key_exprs: ["/camera/**", "/**/image_raw", "/**/points/**"],
        messages: ["put"]
      },
      {
        // Only allow cmd_vel from authenticated operators
        id: "restrict-control",
        permission: "allow",
        key_exprs: ["/cmd_vel", "/**/cmd_vel"],
        interfaces: ["tls/0.0.0.0:7448"],  // Only via TLS
        messages: ["put"]
      }
    ]
  }
}
Common ACL Patterns
1. Block high-bandwidth topics from external network:
{
  id: "block-cameras-external",
  permission: "deny",
  key_exprs: [
    "/camera/points/**",     // Point clouds (huge!)
    "/camera/**/image_raw",  // Raw images
    "/velodyne_points"       // LIDAR
  ],
  messages: ["put"]
}
2. Allow only compressed images:
{
  id: "allow-compressed-only",
  permission: "allow",
  key_exprs: ["/camera/**/compressed", "/camera/**/theora"],
  messages: ["put", "declare_subscriber"]
}
3. Read-only access for monitoring:
{
  id: "monitoring-read-only",
  permission: "allow",
  key_exprs: ["**"],  // All topics
  messages: ["get", "declare_subscriber"],  // No "put"!
  // Peers with this cert can only subscribe, not publish
}
ACL with mTLS: Per-Robot Permissions
Combine ACLs with mTLS certificates for per-robot authorization:
{
  mode: "router",
  access_control: {
    enabled: true,
    rules: [
      {
        id: "robot-042-full-access",
        permission: "allow",
        key_exprs: ["/robot_042/**"],
        cert_common_name: "robot-042"  // Only this robot
      },
      {
        id: "operator-read-only",
        permission: "allow",
        key_exprs: ["**"],
        messages: ["get", "declare_subscriber"],
        cert_common_name: "operator-*"  // Operators can only read
      }
    ]
  }
}Rules are evaluated in order. Place more specific rules before general ones:
// CORRECT: Specific first, then general
rules: [
  { id: "allow-compressed", key_exprs: ["/camera/*/compressed"], permission: "allow" },
  { id: "block-camera", key_exprs: ["/camera/**"], permission: "deny" }
]

// WRONG: General rule blocks everything before specific is checked
rules: [
  { id: "block-camera", key_exprs: ["/camera/**"], permission: "deny" },
  { id: "allow-compressed", key_exprs: ["/camera/*/compressed"], permission: "allow" }  // Never reached!
]
Testing ACL Configuration
# Start router with ACL
zenohd -c router_with_acl.json5

# This should SUCCEED (telemetry allowed)
zenoh --connect "tcp/127.0.0.1:7447" subscribe -k "/robot/odom"

# This should FAIL (camera blocked)
zenoh --connect "tcp/127.0.0.1:7447" subscribe -k "/camera/image_raw"

# Check router logs for ACL denials
# Look for: "access denied for key expression..."
What’s Next
In Part 3, we’ll preview Exercises 6-8: - Exercise 6: Wireless Performance Tuning - Exercise 7: Congestion Handling - Exercise 8: NAT Traversal & Namespace Resolution
These exercises tackle the practical challenges of real-world robot deployments over unreliable networks.
Preparation Checklist
Before Workshop 3, make sure you understand:
Resources
- Zenoh TLS Configuration
- mTLS Explained
- OpenSSL Certificate Guide
- Let’s Encrypt for TLS (server certificates only)