Workshop 3: Official Zenoh Image Deep Dive
Exploring Zettascale’s ROSCon 2025 Docker Environment
The Night Before the Workshop
Tonight, we received an email from the ROSCon India 2025 workshop organizers with a simple instruction:
docker pull zettascaletech/roscon2025_workshop“Please have this image ready for tomorrow’s Zenoh workshop.”
We’ve been preparing our own Docker images for Workshop 3, building containers with rmw_zenoh, CycloneDDS bridges, and camera integrations. But now we have the official image from Zettascale themselves.
What’s inside? How does it compare to what we built? Let’s explore together!
Pulling the Official Image
docker pull zettascaletech/roscon2025_workshopThe first thing we notice: 17.5 GB. That’s larger than our images. Something interesting must be inside!
Status: Downloaded newer image for zettascaletech/roscon2025_workshop:latest
docker.io/zettascaletech/roscon2025_workshop:latest
🔍 What’s Inside the Container?
Let’s peek inside:
docker inspect zettascaletech/roscon2025_workshop:latest --format='{{.Config.Labels}}'This isn’t a simple ROS container - it’s a full Ubuntu MATE desktop accessible via your web browser! Based on Tiryoh’s docker-ros2-desktop-vnc.
Key Discovery: VNC Architecture
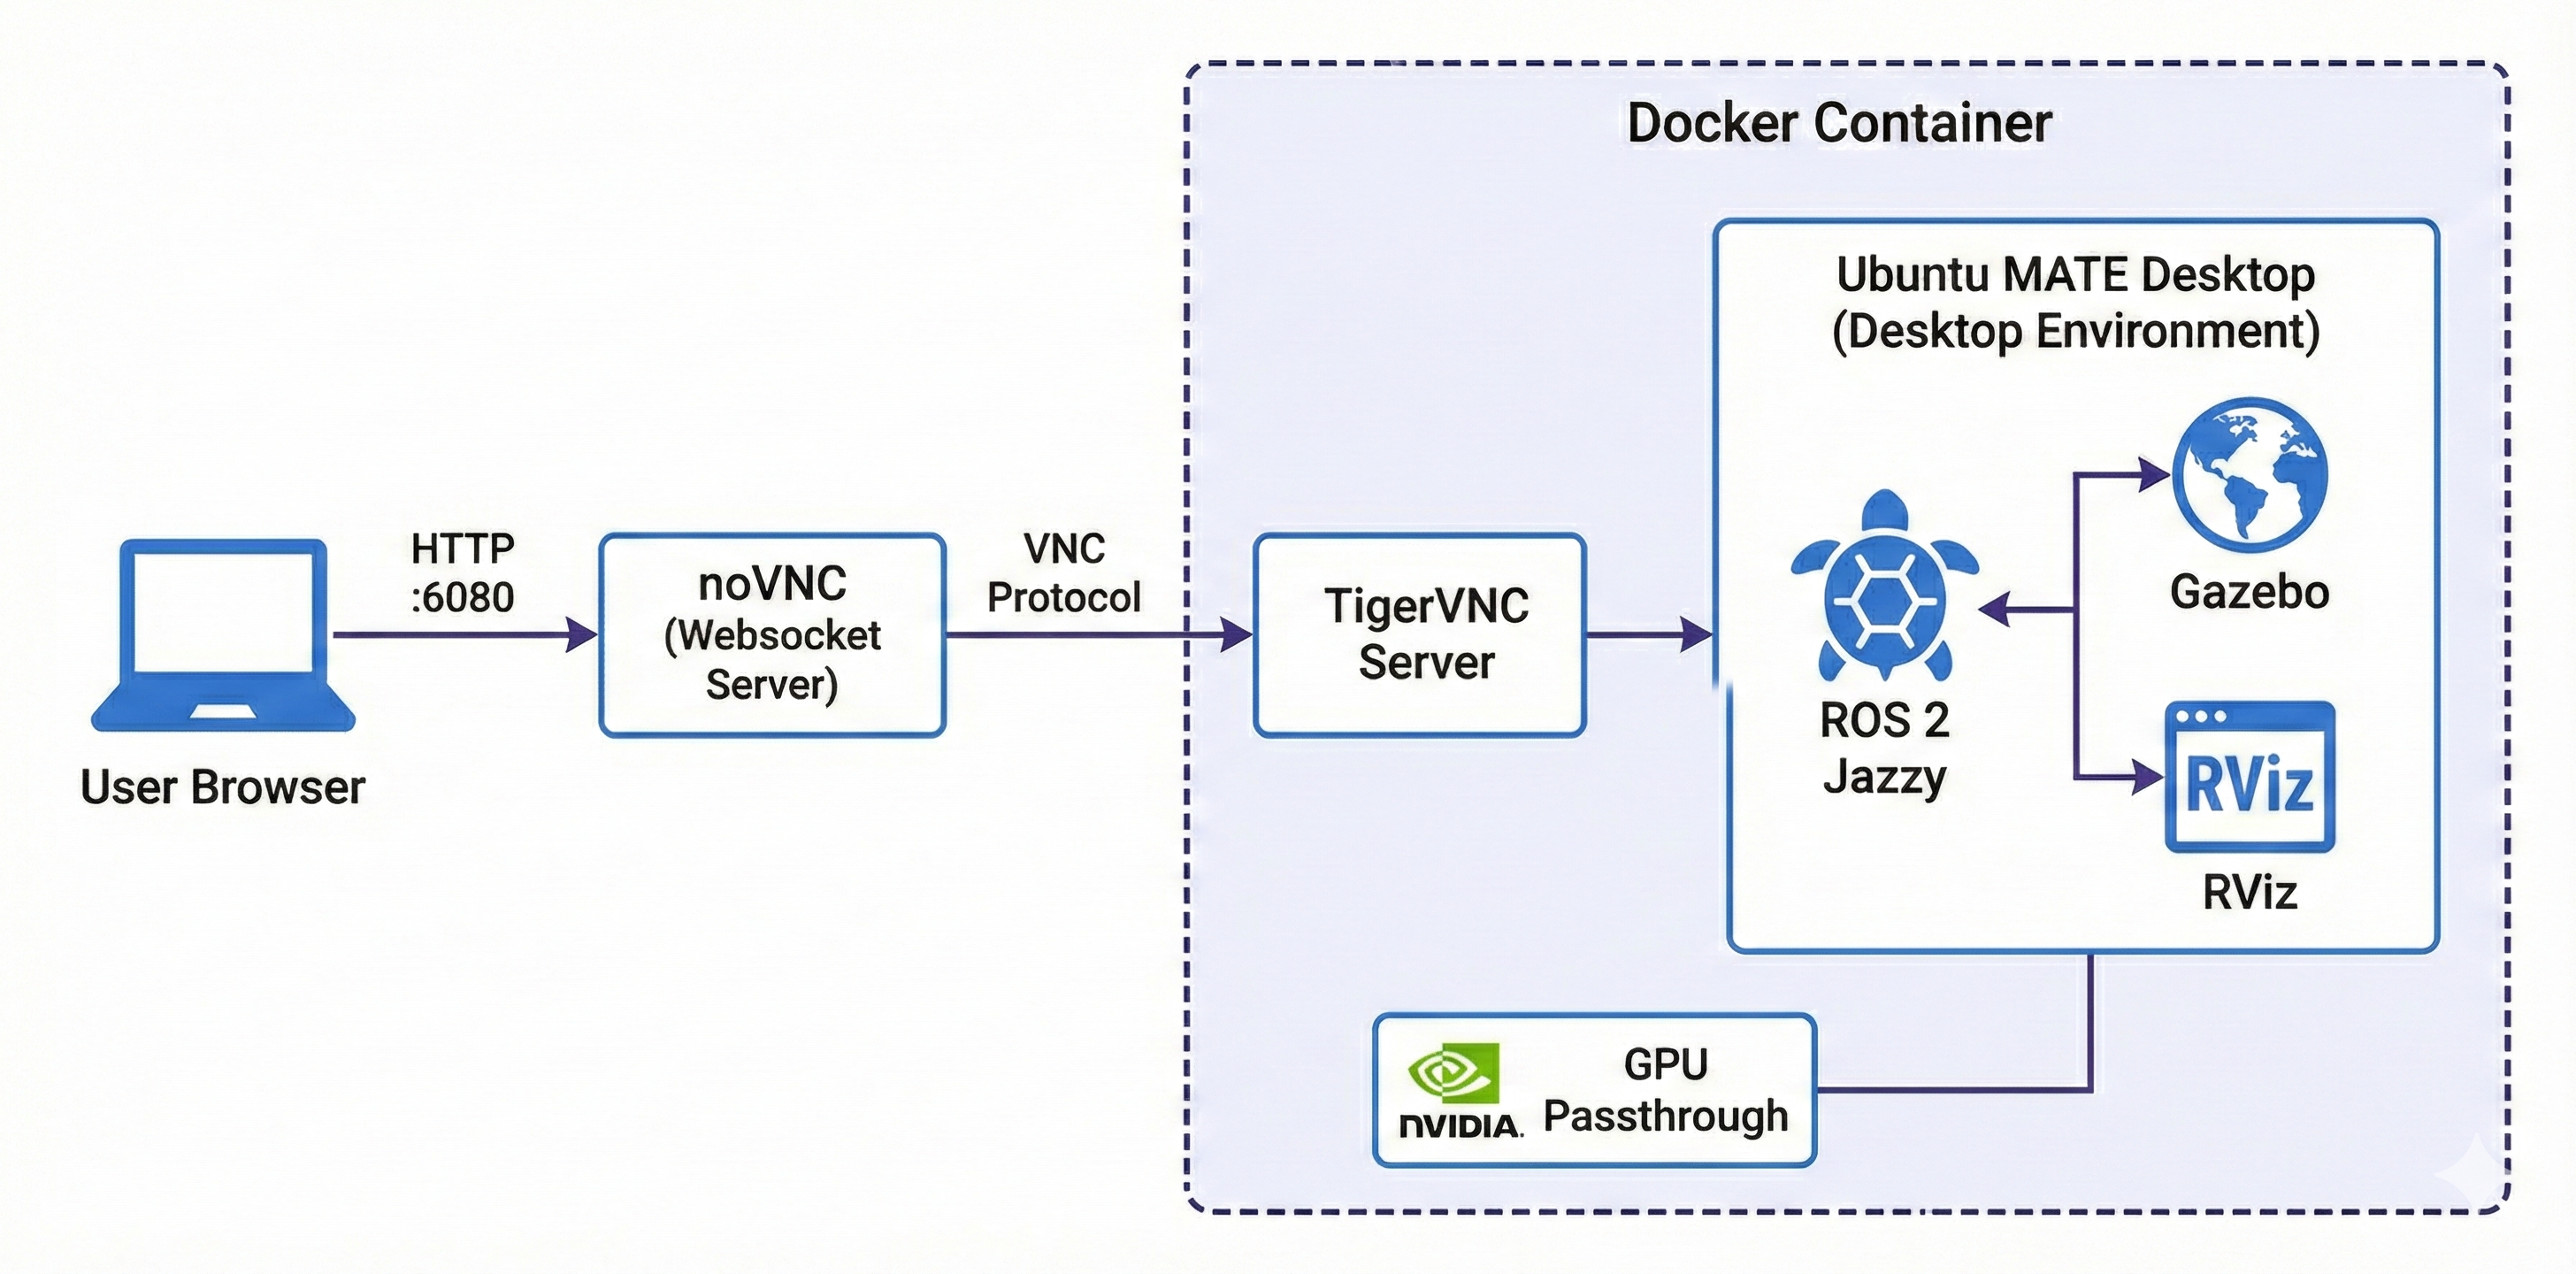
The container provides:
| Component | Details |
|---|---|
| Base Image | Tiryoh’s docker-ros2-desktop-vnc |
| Desktop | Ubuntu MATE |
| Access | Browser via http://localhost:6080 |
| Credentials | ubuntu / ubuntu |
| ROS Distro | Jazzy |
| Size | 17.5 GB |
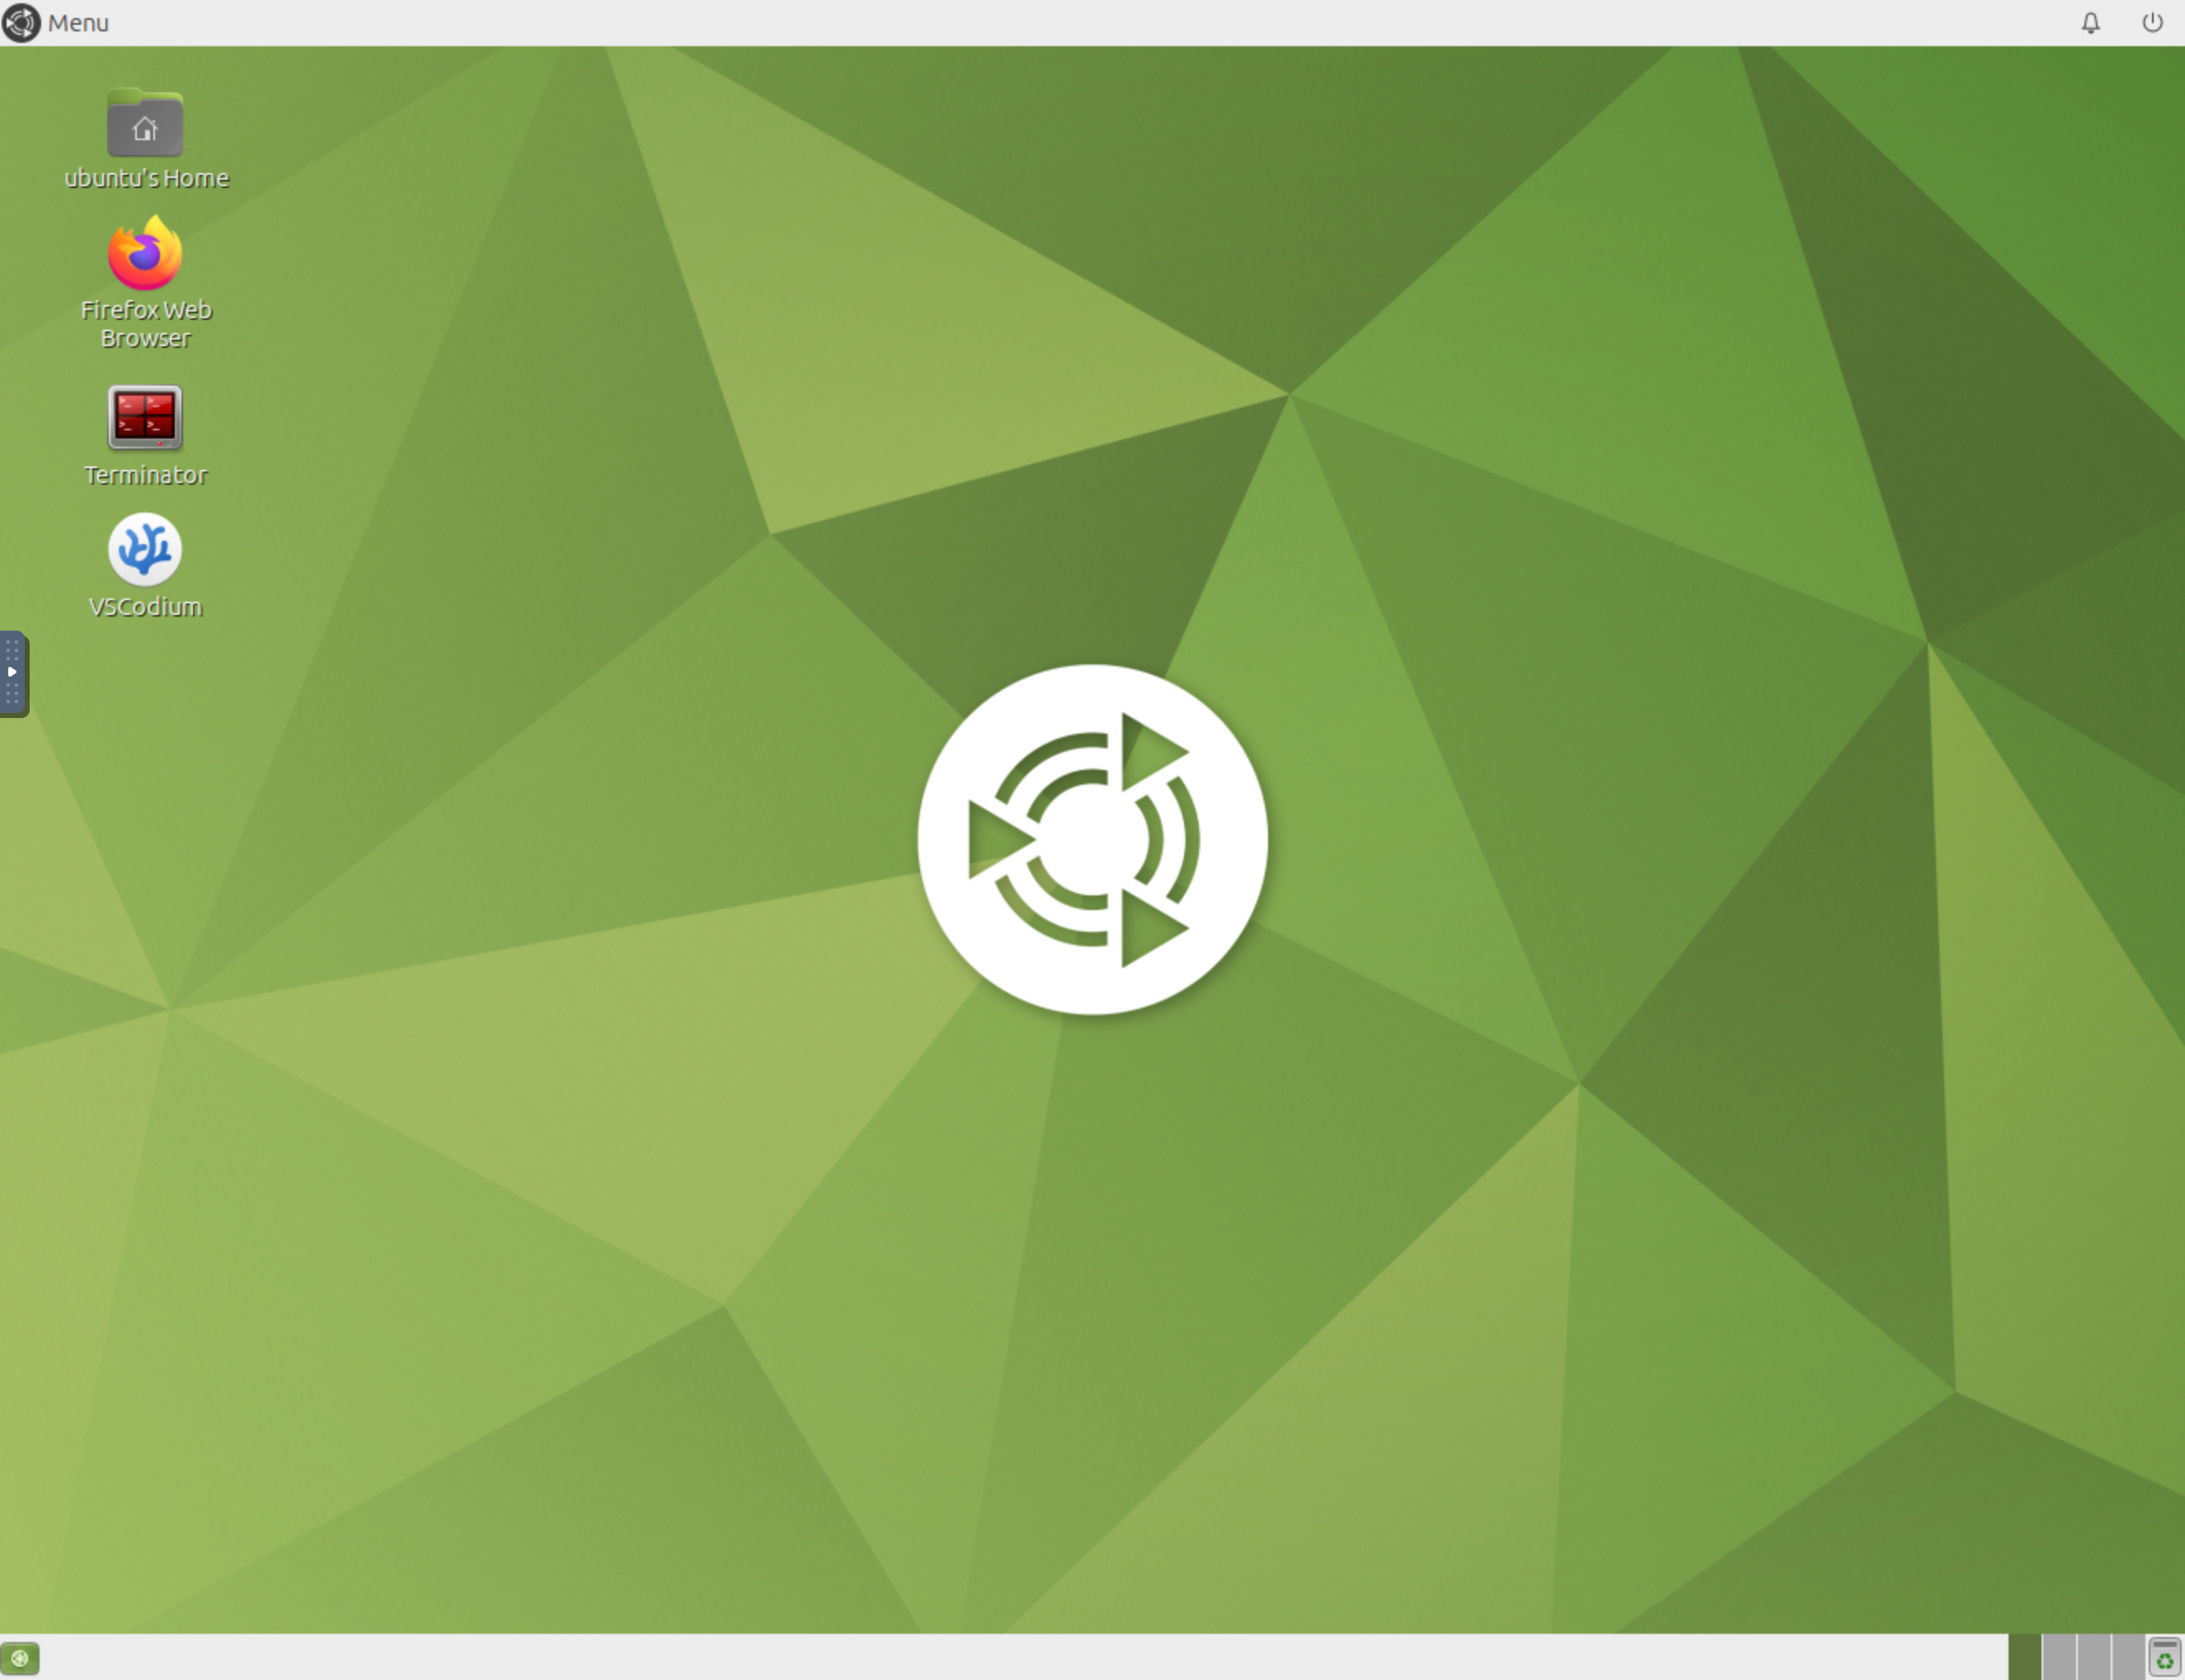
The VNC Desktop Experience
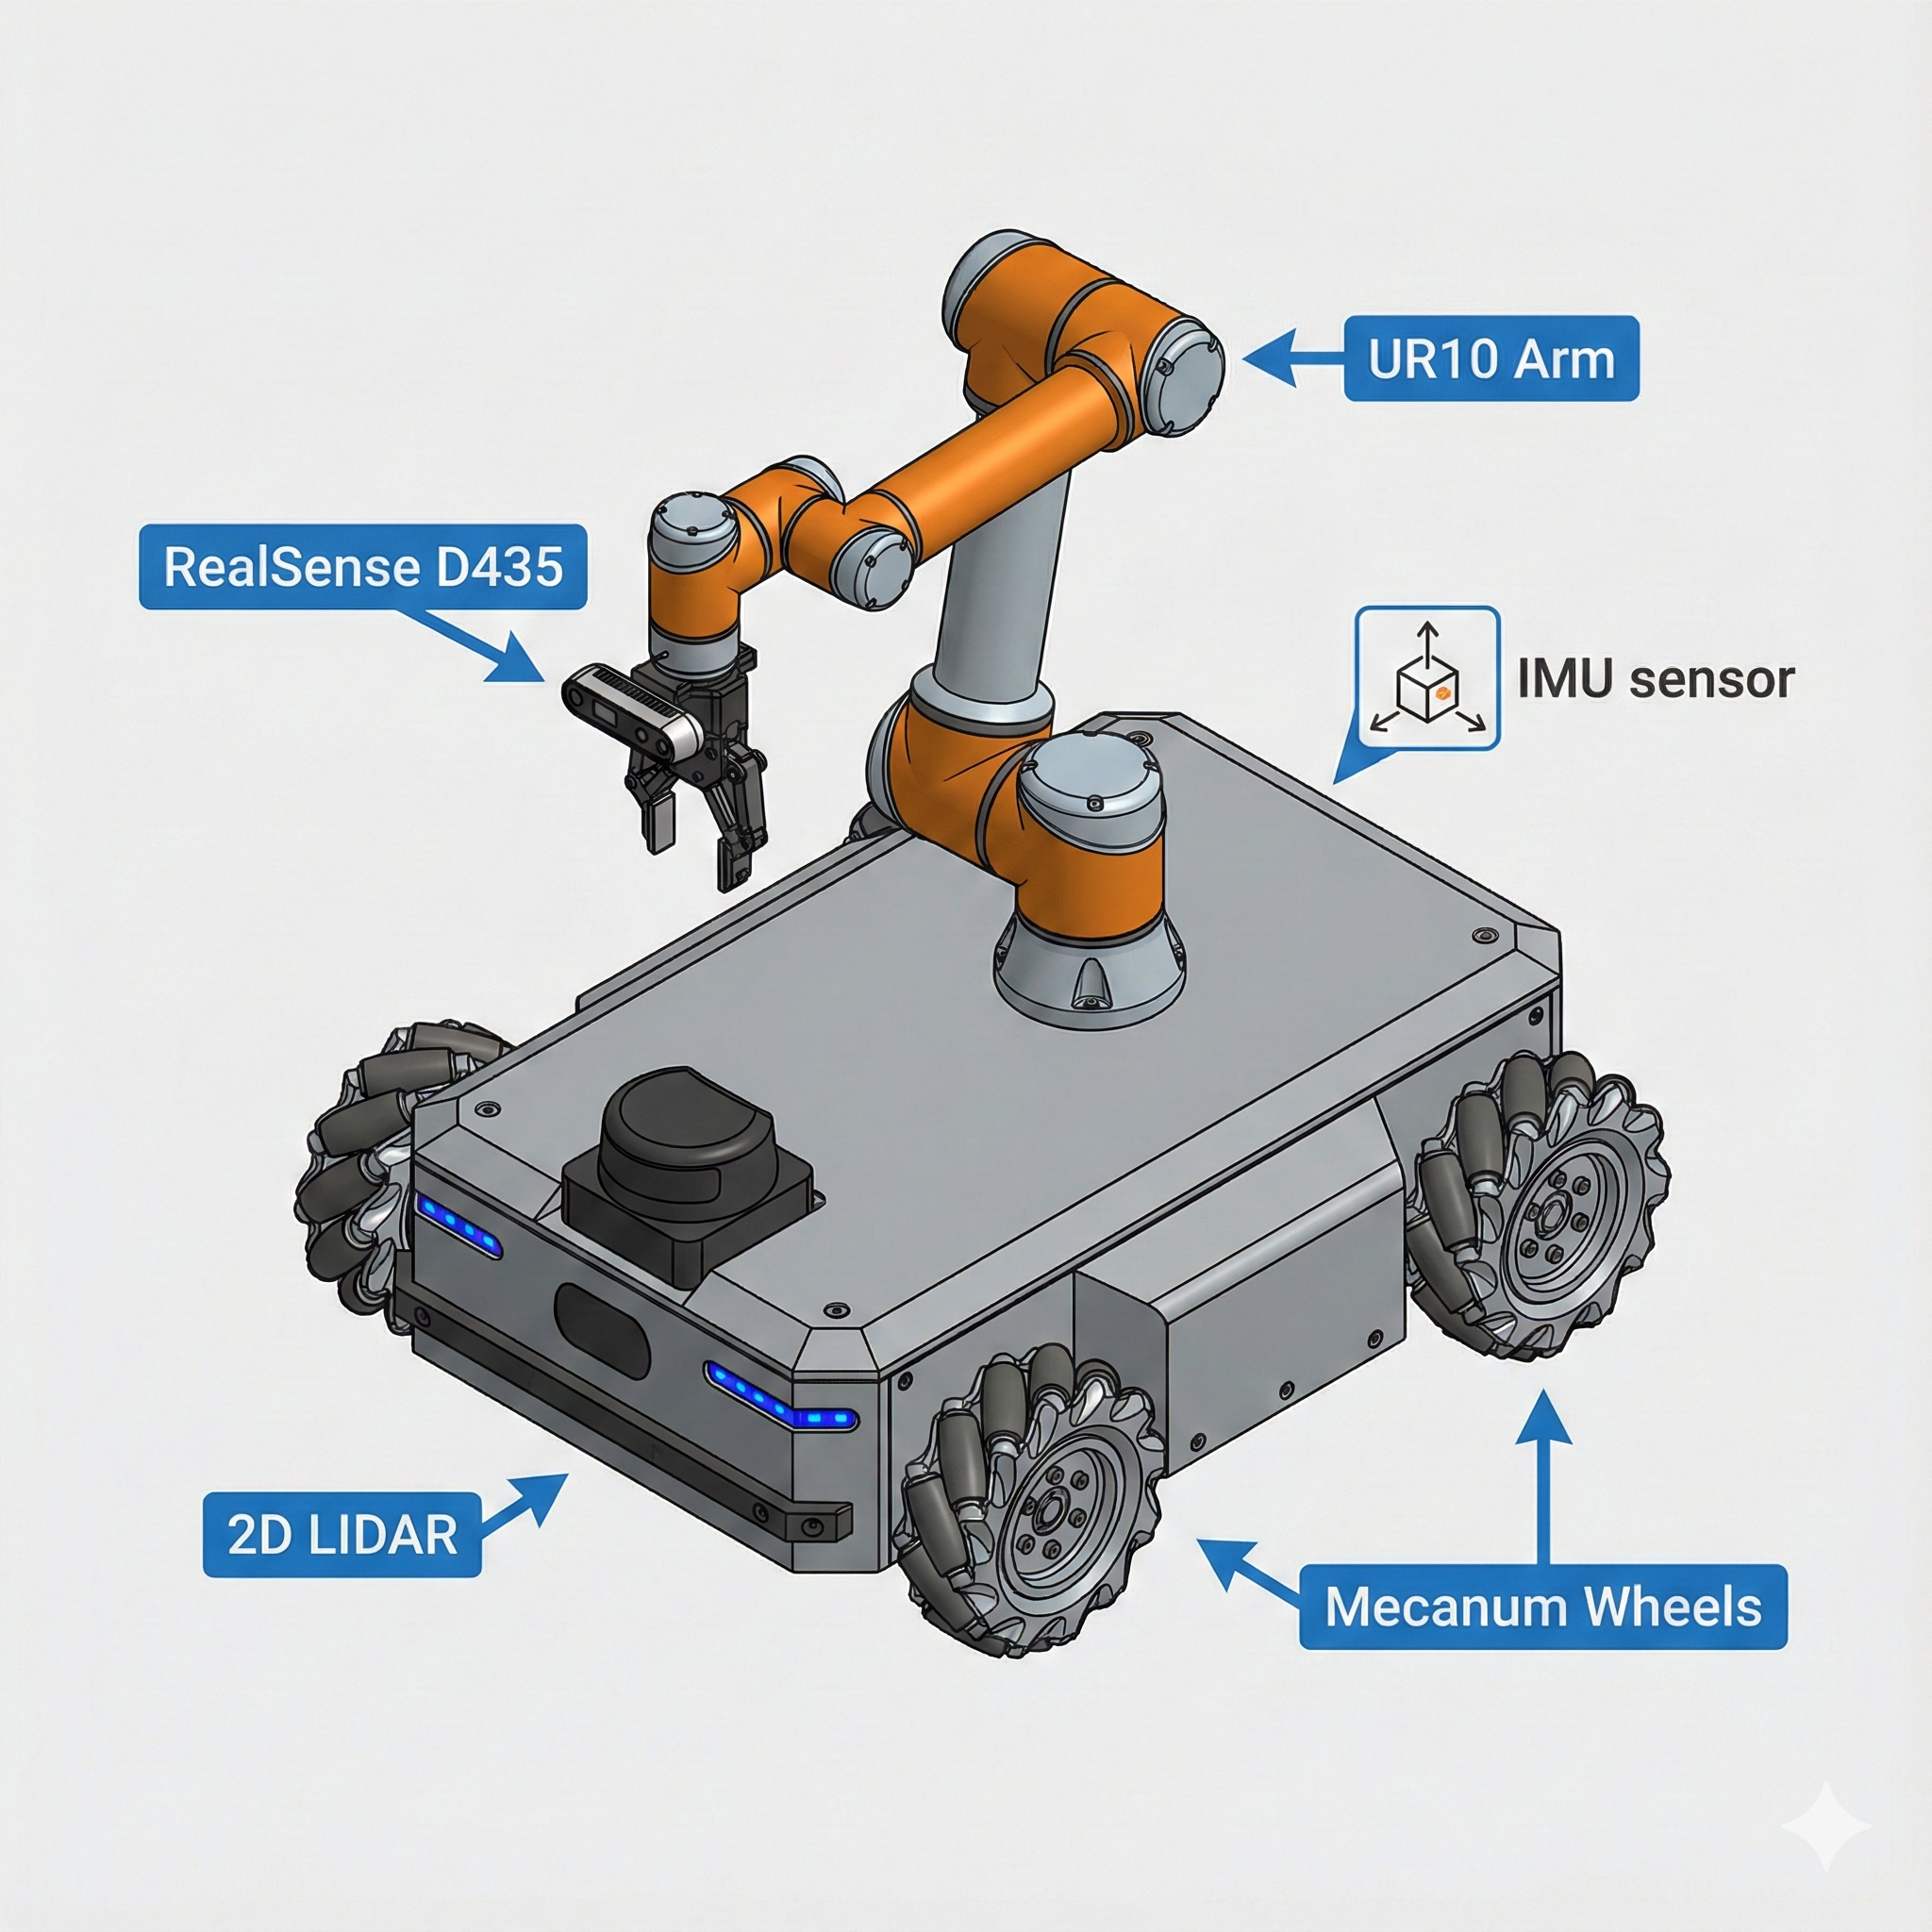
The Robot: Neobotix ROX
They’re not using TurtleBot3! The workshop features the Neobotix ROX - an industrial mobile robot with a UR10 arm and RealSense camera.
Why This Robot?
The ROX generates high-bandwidth sensor data:
- RealSense D435 Point Cloud: ~7.37 MB per message
- Camera Images: Continuous streaming
- LIDAR Scans: Real-time updates
- IMU Data: High-frequency sensor fusion
This creates the perfect stress test for comparing DDS vs Zenoh under load!
The just Command Runner
Instead of documenting long ros2 commands in a README, they use Just - a command runner with a simple justfile. This is brilliant!
Workshop Commands at Your Fingertips
Inside the container, just type just --list to see all available commands:
just --listOutput:
| Command | What It Does |
|---|---|
just router |
Start the Zenoh router |
just rox_simu |
Launch Neobotix ROX simulation in Gazebo |
just rox_nav2 |
Start Navigation2 stack |
just rviz_nav2 |
Launch RViz with Nav2 configuration |
just teleop |
Keyboard teleoperation |
just cam_latency |
Measure camera topic latency |
just rt_factor |
Monitor Gazebo real-time factor |
just network_limit |
Simulate WiFi network conditions |
just network_normal |
Restore normal network |
just top |
Show running processes |
just iftop_lo |
Monitor localhost traffic |
just iftop_router |
Monitor Zenoh router traffic |
The Justfile Contents
###
### ROS launch/run commands
###

# Run a Zenoh router
router:
   ros2 run rmw_zenoh_cpp rmw_zenohd

# Launch Neobotix ROX simulation
rox_simu *ARGS:
   ros2 launch rox_bringup bringup_sim_launch.py arm_type:=ur10 scanner_type:=psenscan imu_enable:=True d435_enable:=True {{ARGS}}

# Launch Neobotix ROX navigation stack (in simulation)
rox_nav2 *ARGS:
   ros2 launch rox_navigation navigation.launch.py rox_type:=argo use_sim_time:=True use_rviz:=False {{ARGS}}

# Launch RViz with Nav2 configuration for Neobotix ROX
rviz_nav2 *ARGS:
   ros2 launch nav2_bringup rviz_launch.py rviz_config:=/home/ubuntu/rox_nav2.rviz {{ARGS}}

# Run teleop_twist_keyboard
teleop:
   ros2 run teleop_twist_keyboard teleop_twist_keyboard
Workshop Flow: The Teaching Methodology
Now we understand how the workshop is structured!
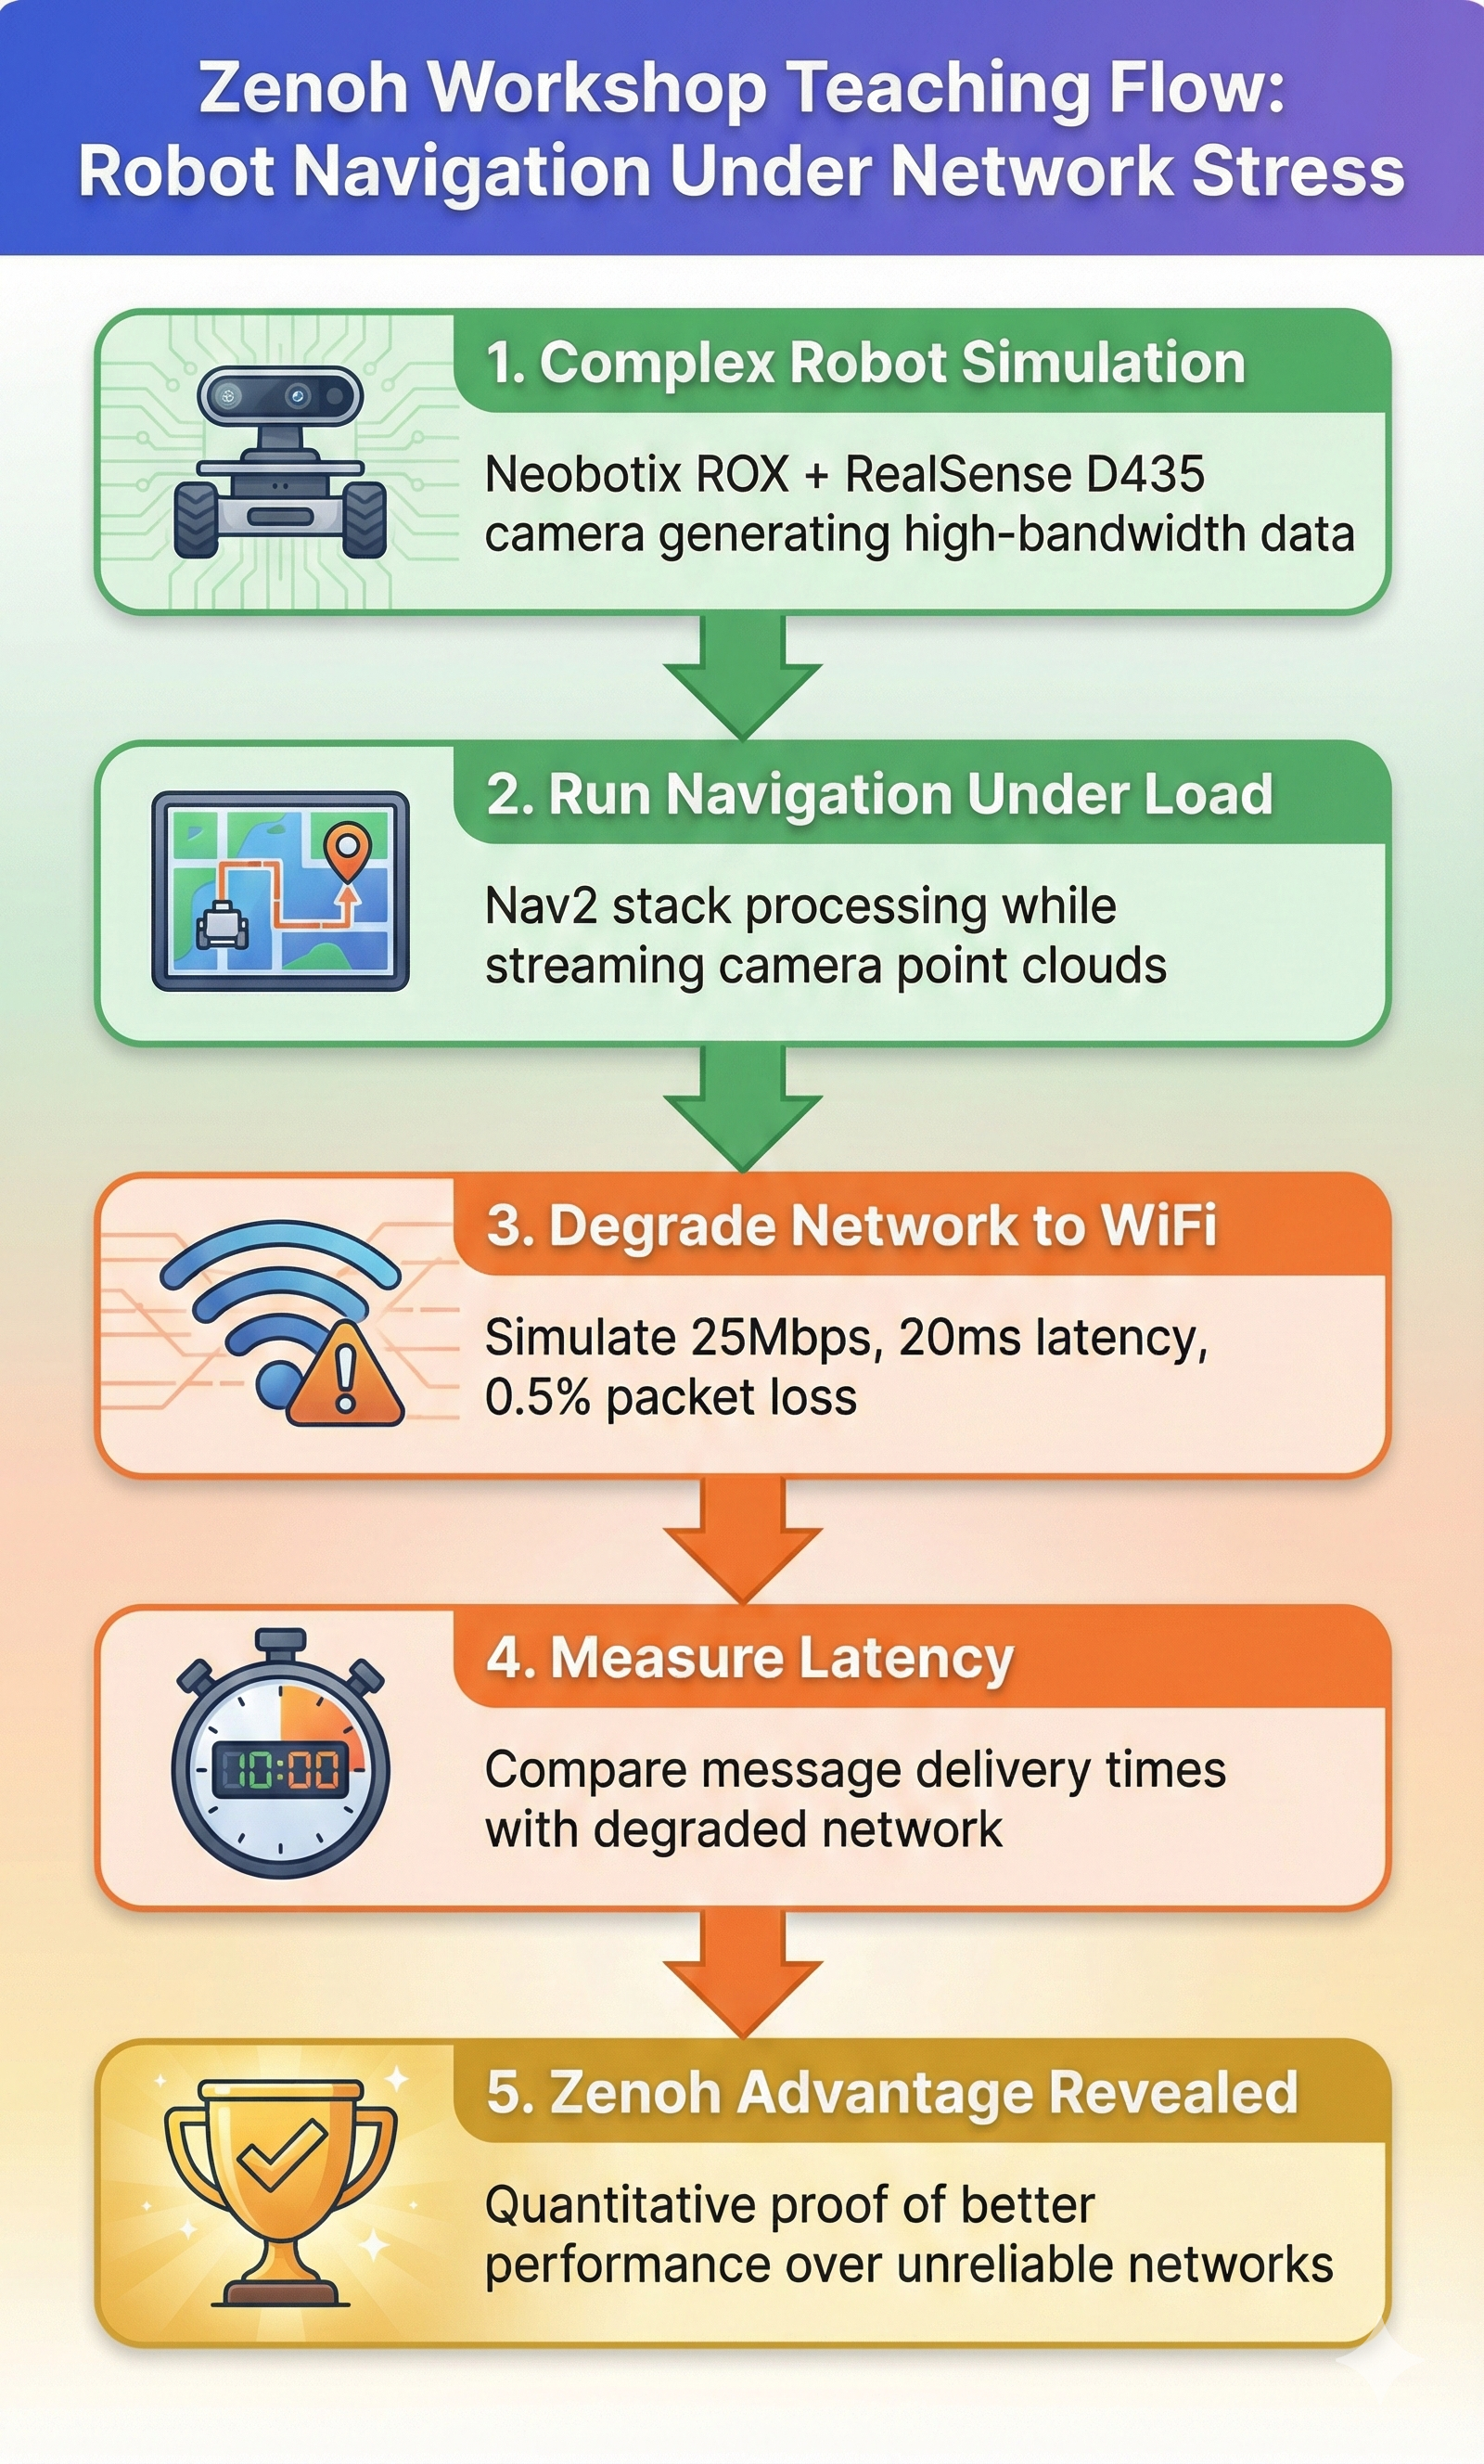
The workshop proves Zenoh’s advantages quantitatively by:
- Creating high-bandwidth traffic (point clouds)
- Running navigation under load
- Degrading the network to simulate WiFi
- Measuring the difference in latency
Step 1: Complex Robot Simulation
just rox_simu use_wall_time:=TrueThe use_wall_time:=True flag is important for accurate latency measurements!
Step 3: Degrade Network to WiFi
just network_limitThis simulates a typical WiFi connection:
| Parameter | Value | Meaning |
|---|---|---|
| Bandwidth | 25 Mbit/s | Typical 2.4GHz WiFi |
| Latency | 20ms ± 10ms | Base delay with jitter |
| Packet Loss | 0.5% | Occasional drops |
| Reordering | 1% | Out-of-order packets |
| Duplicates | 0.1% | Duplicate packets |
| Corruption | 0.01% | Bit errors |
Step 4: Measure Latency
just cam_latency pointsStep 5: Compare and Learn
The difference between DDS and Zenoh becomes clear!
Measurement Scripts Deep Dive
The container includes Python scripts for measuring performance. Let’s understand how they work:
camera_latency.py - Measuring End-to-End Latency
#!/usr/bin/env python3
import rclpy
from rclpy.node import Node
from sensor_msgs.msg import Image, PointCloud2
import numpy as np
import time
import sys

class LatencyStatsNode(Node):
    def __init__(self, topic):
        super().__init__('camera_latency')
        self.latencies = []

        if topic == 'image':
            self.sub = self.create_subscription(
                Image,
                '/camera/image_raw',
                self.callback,
                10)
        elif topic == 'points':
            self.sub = self.create_subscription(
                PointCloud2,
                '/camera/points',
                self.callback,
                10)

        print(f'Subscribing to topic "{self.sub.topic_name}" to measure latency...')
        self.interval_start = time.time_ns() / 1e9

    def callback(self, msg):
        reception_time = time.time_ns() / 1e9
        message_time = msg.header.stamp.sec + msg.header.stamp.nanosec / 1e9
        latency = reception_time - message_time
        self.latencies.append(latency * 1000)  # convert to ms

        # Print stats every 3 seconds
        if reception_time - self.interval_start > 3.0:
            self.interval_start = reception_time
            if len(self.latencies) > 0:
                print(f"Mean: {np.mean(self.latencies):.2f} ms | "
                      f"Std: {np.std(self.latencies):.2f} ms | "
                      f"Min: {np.min(self.latencies):.2f} ms | "
                      f"Max: {np.max(self.latencies):.2f} ms")
self.latencies.clear()- Subscribes to either
/camera/points(point cloud) or/camera/image_raw(image) - Compares message header timestamp with wall clock reception time
- Calculates latency = reception_time - message_time
- Reports statistics every 3 seconds: mean, std, min, max
Important: Requires use_wall_time:=True in simulation for accurate measurements!
rt_factor_avg.py - Monitoring Simulation Performance
#!/usr/bin/env python3
import subprocess
import re
import time
from collections import deque

WINDOW_SIZE_SECONDS = 10
DISPLAY_INTERVAL = 1.0
MAX_WINDOW = 1000

def parse_real_time_factor(line):
    match = re.search(r'real_time_factor:\s+([0-9.]+)', line)
    if match:
        return float(match.group(1))
    return None

def main():
    window = deque(maxlen=MAX_WINDOW)
    last_print = time.time()

    # Start 'gz topic' command
    process = subprocess.Popen(
        ['gz', 'topic', '-e', '-t', '/world/default/stats'],
        stdout=subprocess.PIPE,
        stderr=subprocess.PIPE,
        text=True,
    )

    print(f"Average Gazebo real time factor over {WINDOW_SIZE_SECONDS}s window")

    for line in process.stdout:
        rtf = parse_real_time_factor(line)
        if rtf is not None:
            timestamp = time.time()
            window.append((timestamp, rtf))

            # Remove old values
            current_time = time.time()
            while window and (current_time - window[0][0] > WINDOW_SIZE_SECONDS):
                window.popleft()

            # Print each DISPLAY_INTERVAL
            if time.time() - last_print >= DISPLAY_INTERVAL:
                if window:
                    values = [x[1] for x in window]
                    avg = sum(values) / len(values)
                    print(f"real_time_factor: {avg:.4f}")
last_print = time.time()- RT Factor = 1.0: Simulation runs at real-time speed
- RT Factor < 1.0: Simulation is slower than real-time
- RT Factor > 1.0: Simulation is faster than real-time
For accurate latency measurements, you want consistent RT factor close to 1.0!
network_limit.sh - Simulating WiFi Conditions
#!/bin/bash
TARGET_IP="172.1.0.3"
RATE="25mbit"
LATENCY="20ms"
JITTER="10ms"
LOSS="0.5%"
REORDER="1% 25%"
DUPLICATE="0.1%"
CORRUPT="0.01%"

apply_rules() {
    echo "Applying WiFi simulation to $TARGET_IP..."

    # Create root HTB queue
    sudo tc qdisc add dev eth0 root handle 1: htb default 30

    # Create class for limited traffic
    sudo tc class add dev eth0 parent 1: classid 1:1 htb rate $RATE

    # Add netem queue with WiFi-like characteristics
    sudo tc qdisc add dev eth0 parent 1:1 handle 10: \
        netem rate $RATE delay $LATENCY $JITTER \
        loss $LOSS reorder $REORDER \
        duplicate $DUPLICATE corrupt $CORRUPT

    # Mark packets destined for TARGET_IP
    sudo iptables -t mangle -A OUTPUT -d $TARGET_IP -j CLASSIFY --set-class 1:1
}

cancel_rules() {
    sudo tc qdisc del dev eth0 root 2>/dev/null
    sudo iptables -t mangle -F OUTPUT 2>/dev/null
    echo "All rules removed."
}Uses Linux Traffic Control (tc) with netem to shape network traffic:
- HTB (Hierarchical Token Bucket): Rate limiting
- netem: Network emulation (latency, jitter, loss)
- iptables: Packet classification
This is the same technique used by network engineers to test application behavior under degraded conditions!
Official vs. Our Approach: Comparison
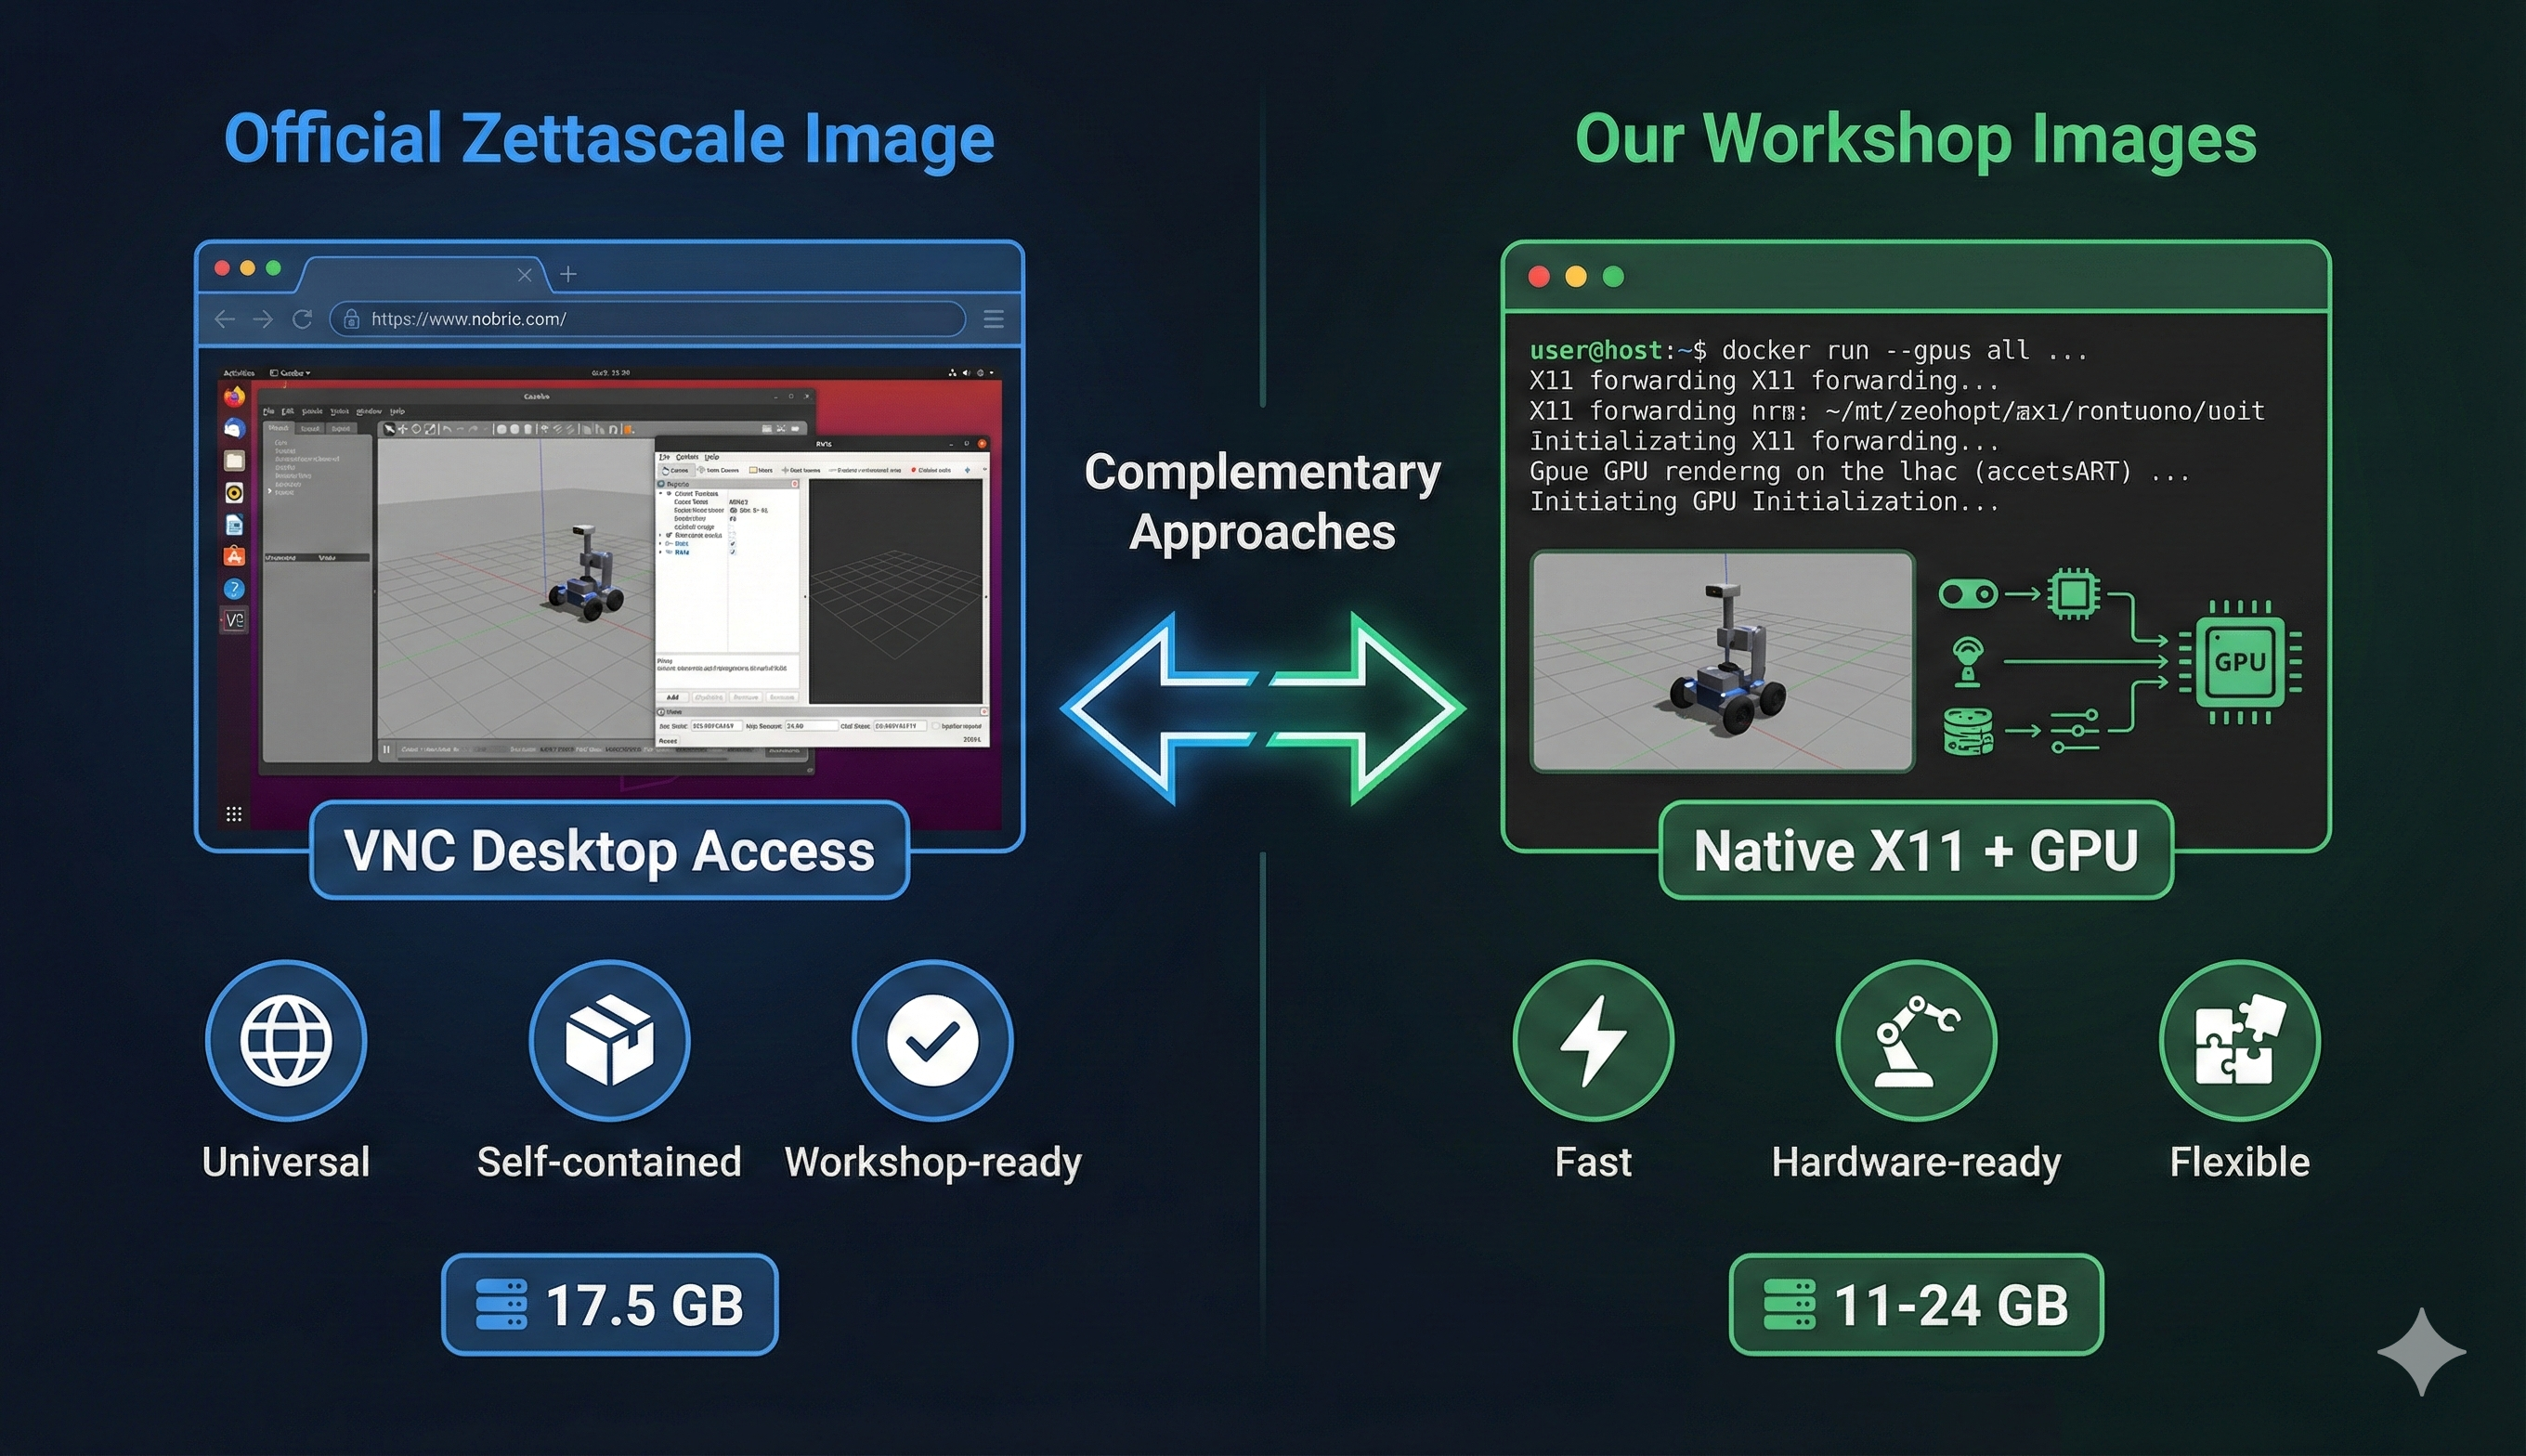
| Aspect | Official Zettascale | Our Workshop Images |
|---|---|---|
| Access Method | VNC via browser | Native X11 + GPU |
| Size | 17.5 GB | 11-24 GB |
| ROS Distro | Jazzy only | Humble + Jazzy |
| Robot Platform | Neobotix ROX | TurtleBot3 + Go2 |
| Focus | Network QoS effects | DDS↔︎Zenoh bridging |
| Command Runner | just (justfile) |
Manual ros2 commands |
| Real Hardware | Simulation only | Camera + sensor ready |
| IDE | VSCodium included | Claude Code ready |
- Use Official Image → Follow along with instructor, run workshop exercises
- Use Our Images → Real hardware integration, native GPU performance, bridging experiments
Recommended Strategy for Tomorrow
During the Workshop
Launch the official image for following the instructor:
cd ~/docker/ros2/scripts
./launch-container.sh 1  # Select "zettascale-official"
Open browser to
http://localhost:6080Login with ubuntu / ubuntu
Follow along with the
justcommands
After the Workshop
- Use our images to experiment with real hardware
- Try bridging DDS robots to Zenoh networks
- Compare performance with your own sensors
Lessons Learned: VNC Approach for Future Containers
We should adopt this pattern for our future containers. Here’s why:
Why VNC Works for Workshops
- Universal Accessibility
- Works on any OS (Windows, Mac, Linux, Chromebook)
- No X11 setup, no driver compatibility issues
- Just open a browser!
- Self-Contained Environment
- Everything attendees need is inside
- No “it works on my machine” problems
- Consistent experience for everyone
- The
justPattern- Self-documenting commands
just --listshows everything available- Much cleaner than README copy-paste
When to Use Each Approach
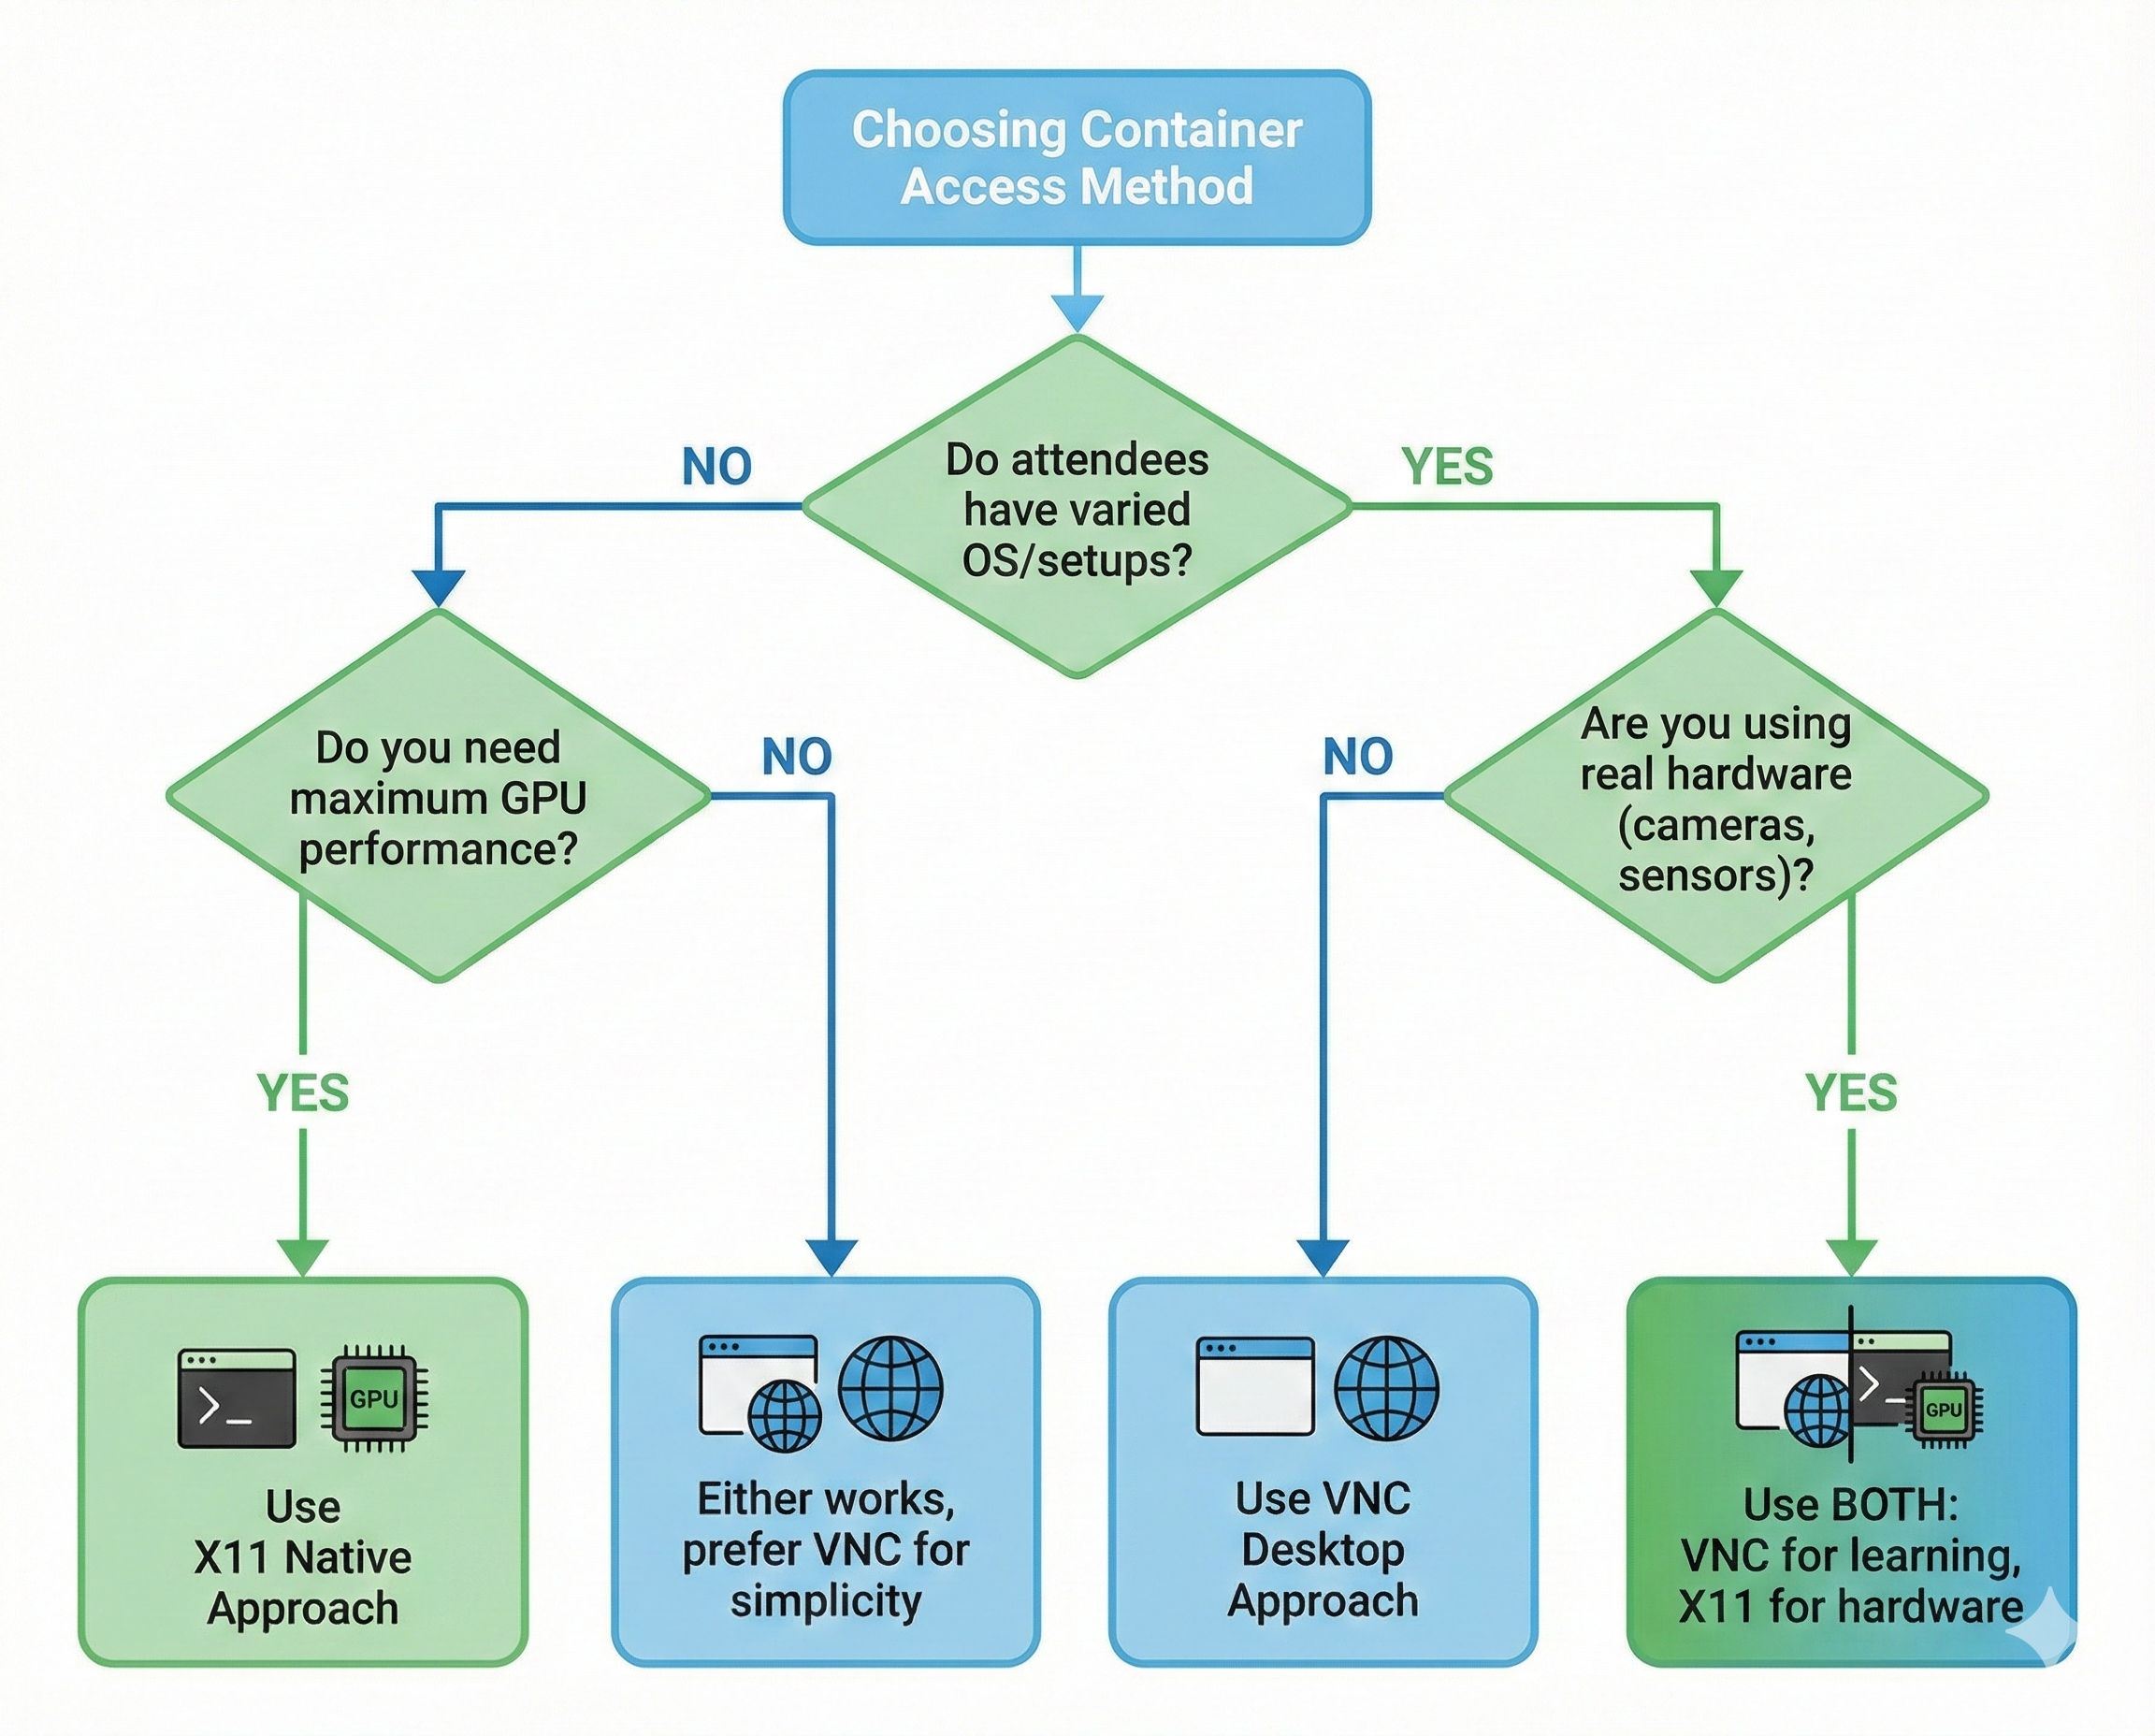
| Scenario | Use VNC | Use X11 Native |
|---|---|---|
| Public workshops | ✅ | |
| Cross-platform attendees | ✅ | |
| Real hardware (cameras, sensors) | ✅ | |
| Maximum GPU performance | ✅ | |
| Internal development | ✅ |
Future Plans
We’ll be adding VNC variants to our container collection:
workshop-vnc:jazzy- VNC-accessible Jazzy environmentworkshop-vnc:humble- VNC-accessible Humble environment- Adding
justfileto all our containers
Quick Start: Using Our Updated Launcher
We’ve added the official image to our container launcher!
cd ~/docker/ros2/scripts
./launch-container.sh
You’ll see:
1) [VNC] zettascale-official  [jazzy]  ★ Official Zenoh Workshop (VNC)
2)       workshop3-dds        [humble] CycloneDDS + Zenoh Bridge
3)       workshop3-jazzy      [jazzy]  Jazzy + Zenoh + D435i/Webcam
...
Select 1 for the official workshop image, or any other option for our custom images!
What’s Next?
Tomorrow is Workshop 3: Zenoh - The Next-Gen Middleware for ROS 2!
Workshop Schedule (December 18, 2025)
- Location: COEP Pune
- Duration: Half-day hands-on session
- Prerequisites: Docker image pulled and ready ✅
What We’ll Learn
- Why Zenoh was created
- Zenoh router setup and configuration
- Network performance under various conditions
- Comparing DDS vs Zenoh for ROS 2
- Practical exercises with the ROX simulation
Conclusion
Tonight’s exploration revealed a thoughtfully designed workshop environment:
- VNC desktop makes it accessible to everyone
- Neobotix ROX provides realistic high-bandwidth scenarios
justcommands simplify the learning experience- Network simulation proves Zenoh’s advantages quantitatively
- Measurement tools enable objective comparisons
We’re ready for tomorrow! See you at Workshop 3! 🚀
This analysis was performed the night before ROSCon India 2025 Workshop 3. The official image is provided by Zettascale Technology, creators of Zenoh.