Workshop 3: Complete Exercises Walkthrough
Hands-on Zenoh Exercises Before ROSCon India 2025
1 The Night Before: Running All Exercises

Tomorrow is Workshop 3: Zenoh - The Next-Gen Middleware for ROS 2 at ROSCon India 2025. Tonight, we’re doing a complete dry run of all 8 exercises using the official Zettascale container.
- Identify issues - Find any problems before the actual workshop
- Understand the flow - Know what to expect in each exercise
- Prepare questions - Formulate thoughtful questions for instructors
- Build confidence - Walk in prepared, not scrambling
1.1 Workshop Target Audience
- ROS 2 developers and robotics engineers
- Systems engineers evaluating middleware alternatives
- Network architects planning multi-robot and cloud deployments
1.2 Environment Setup
# Official container from Zettascale
docker pull zettascaletech/roscon2025_workshop:latest

# Start container with VNC
docker run -d \
  --name roscon-workshop-vnc \
  --privileged \
  -p 6080:6080 \
  -p 5901:5901 \
  zettascaletech/roscon2025_workshop:latest

# Access via browser: http://localhost:6080
# Credentials: ubuntu / ubuntu
1.3 Container Environment Summary
| Component | Value |
|---|---|
| ROS Distro | Jazzy |
| RMW Implementation | rmw_zenoh_cpp |
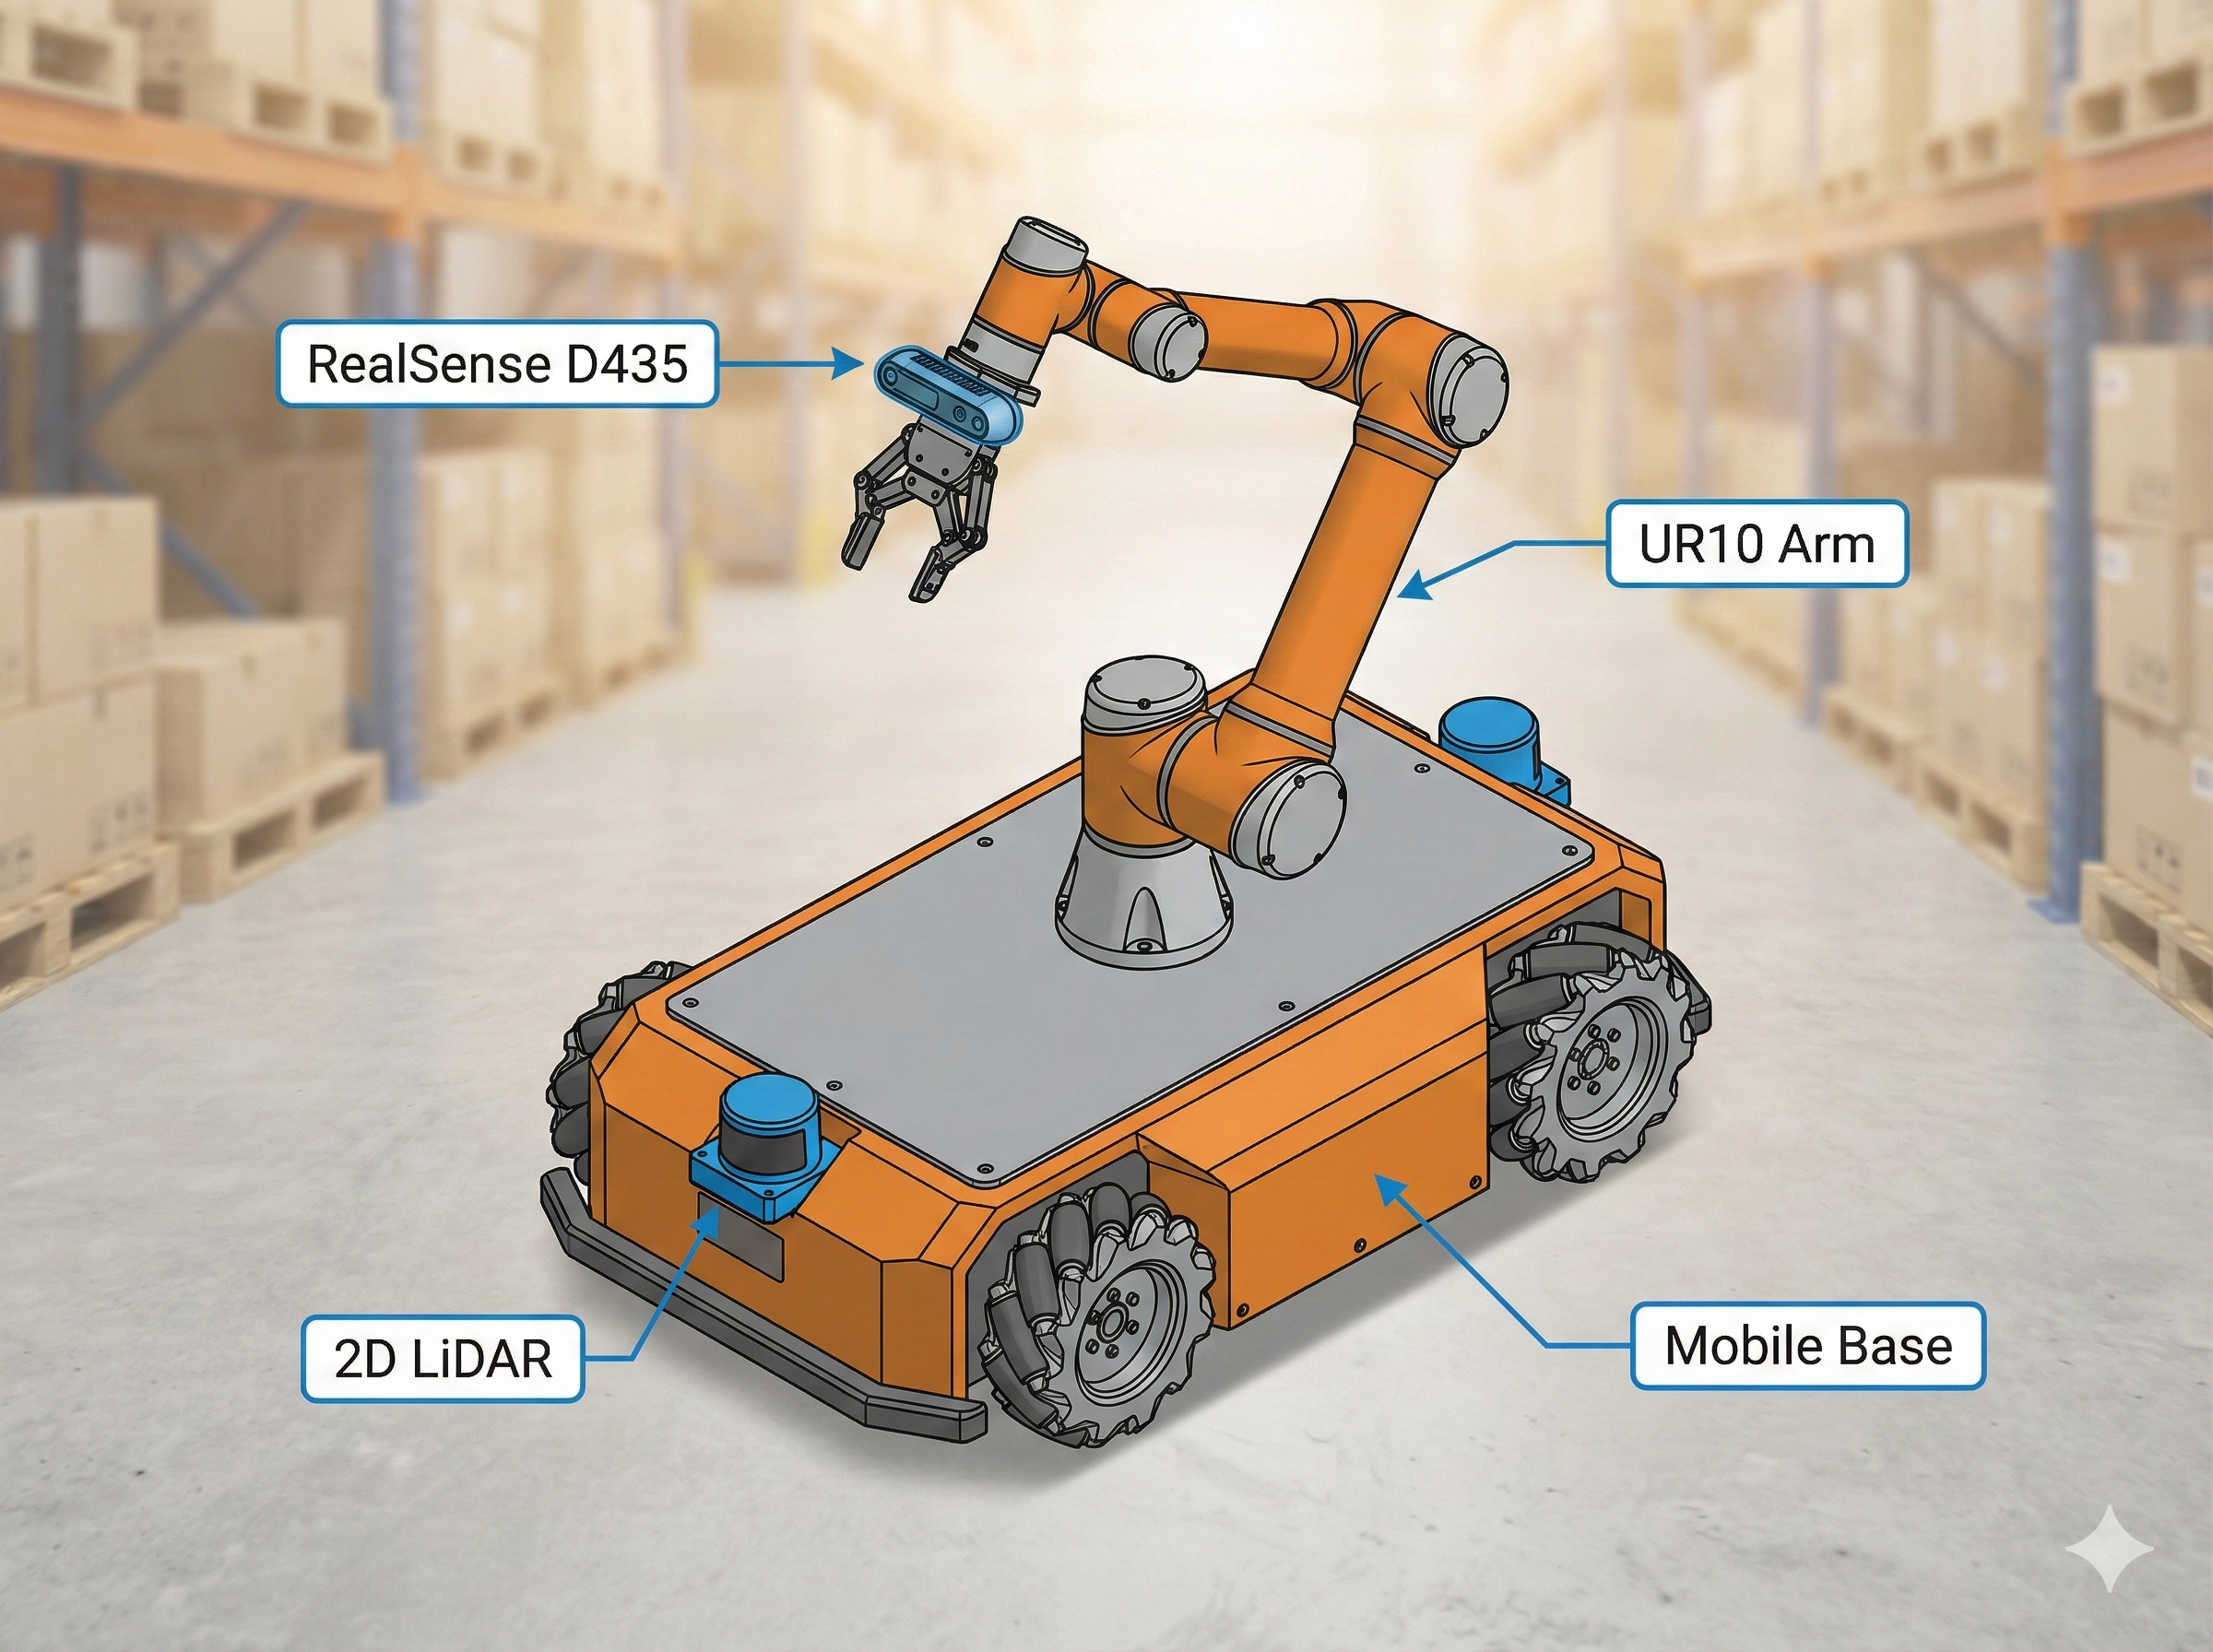
| Robot Platform | Neobotix ROX (industrial robot with UR10 arm) |
| Key Sensors | RealSense D435 (7.37 MB point clouds), 2D LiDAR, IMU |
| Command Runner | just (justfile) |
2 Exercise 1: Core Pub/Sub
2.1 Objective
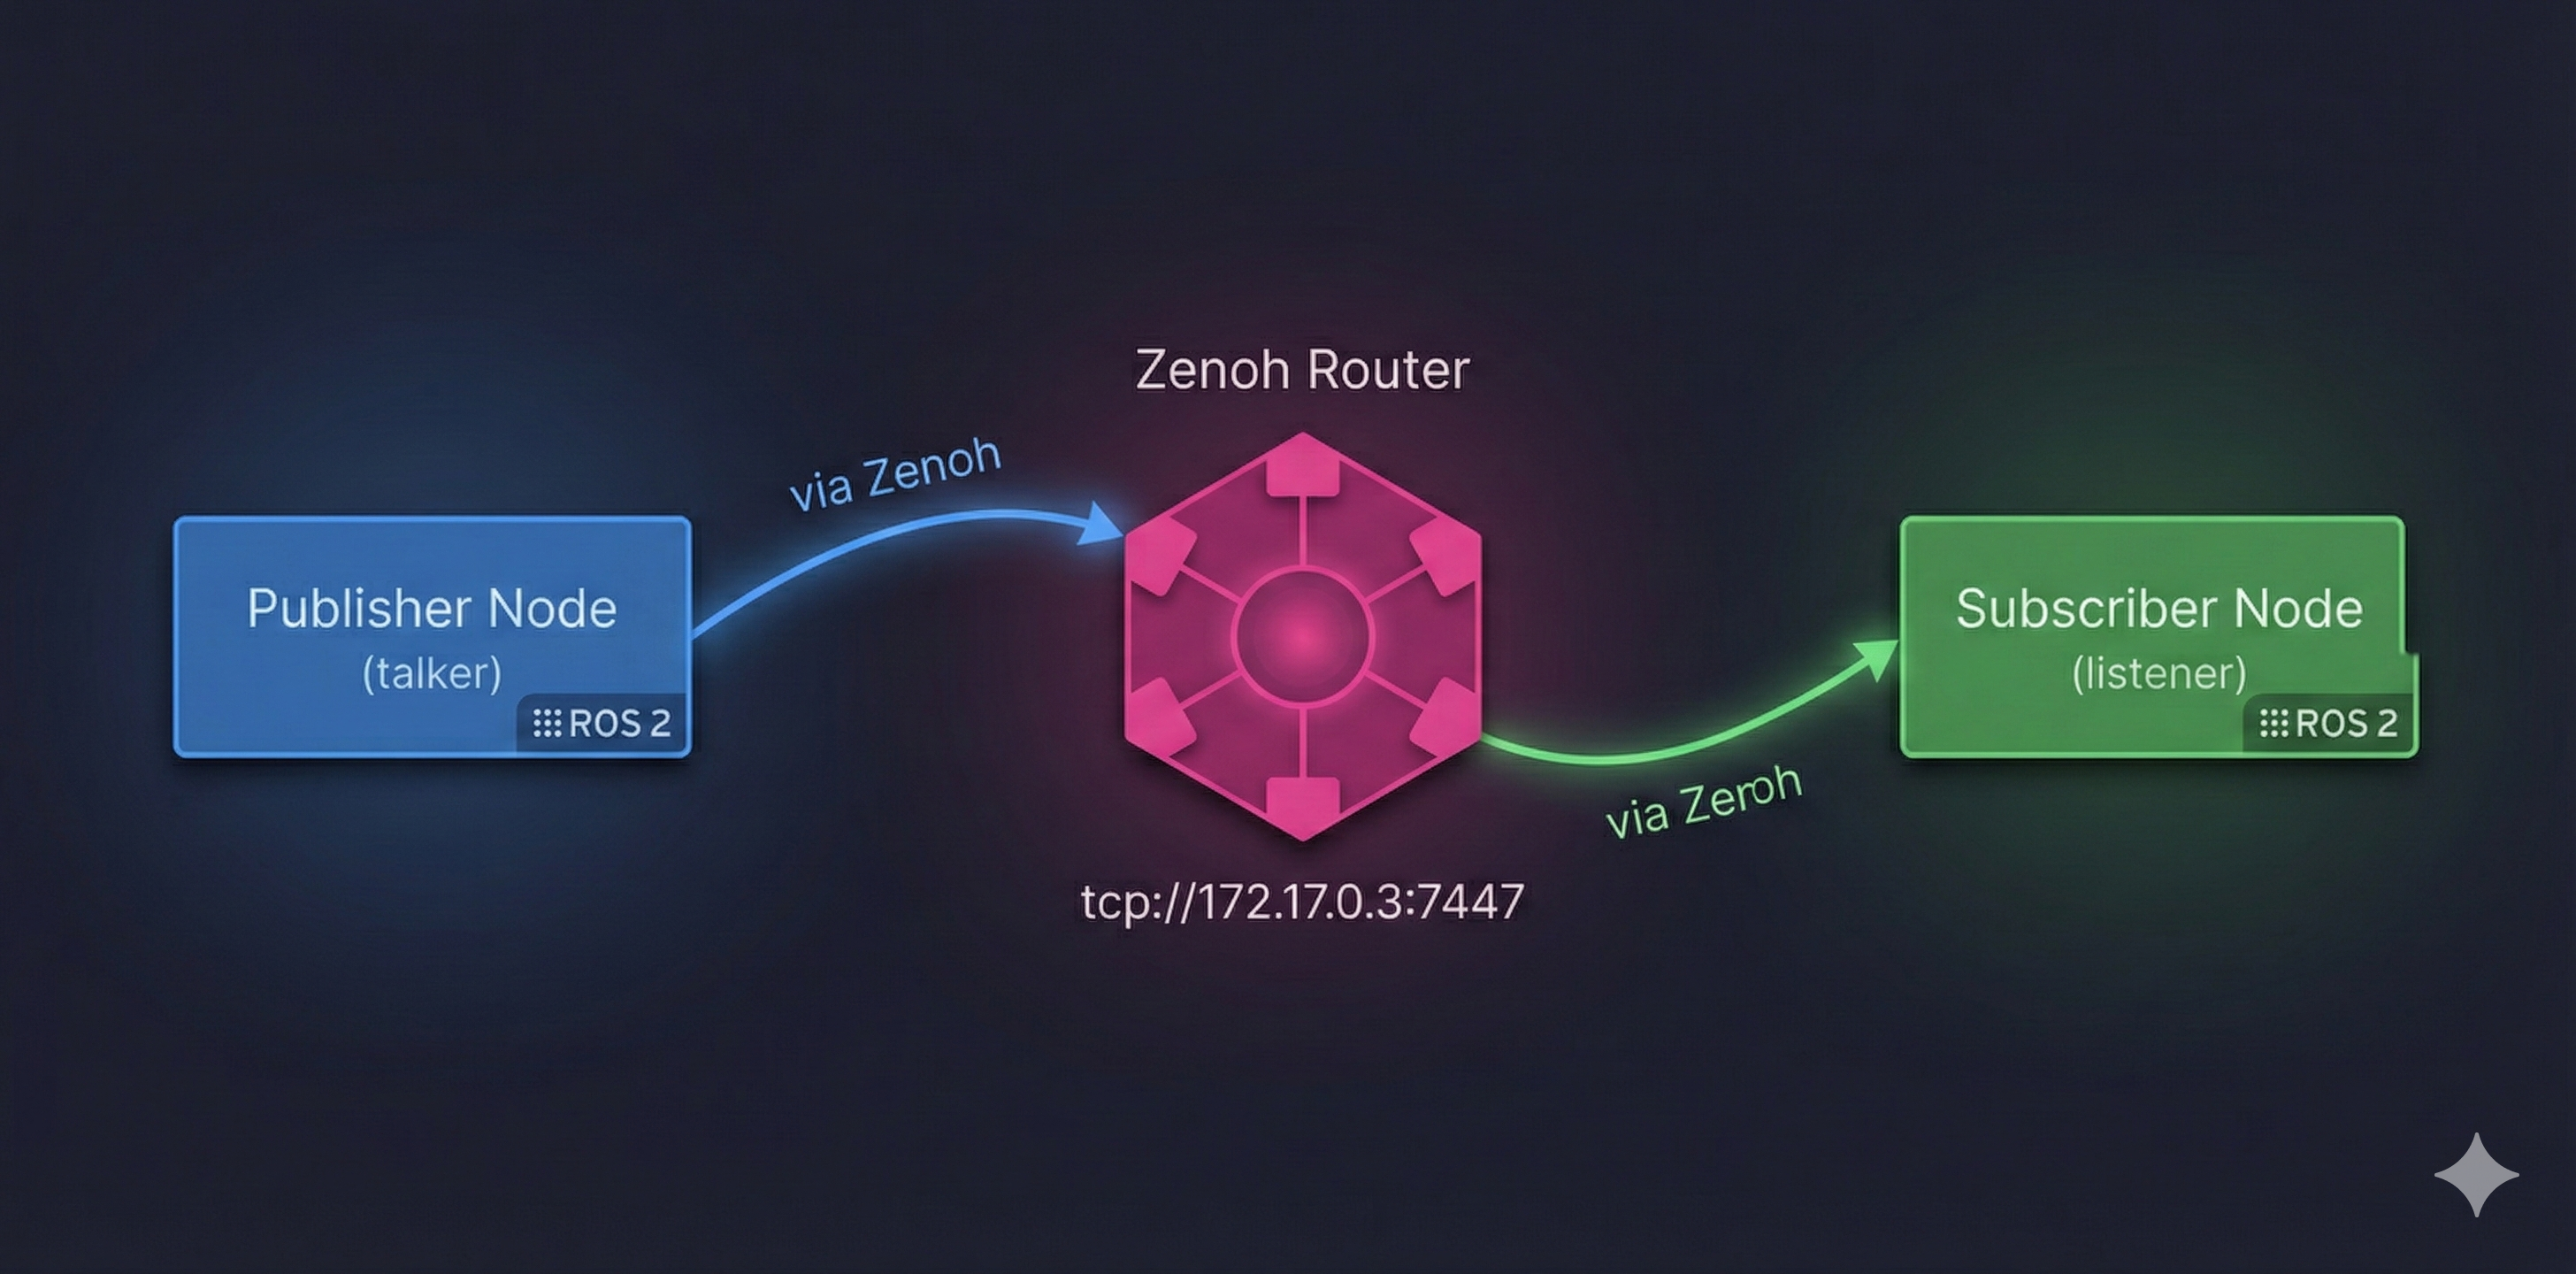
Launch ROS 2 publisher/subscriber and observe Zenoh router behavior and discovery.
2.2 Key Concepts
┌─────────────────────────────────────────────────────────────────────┐
│                     Zenoh Pub/Sub Architecture                       │
│                                                                      │
│   ┌──────────────┐         ┌──────────────┐         ┌─────────────┐ │
│   │  Publisher   │         │    Zenoh     │         │  Subscriber │ │
│   │    Node      │─────────│    Router    │─────────│    Node     │ │
│   │  (talker)    │via Zenoh│  (rmw_zenohd)│via Zenoh│  (listener) │ │
│   └──────────────┘         └──────────────┘         └─────────────┘ │
│                                   │                                  │
│                         tcp://172.17.0.3:7447                       │
└─────────────────────────────────────────────────────────────────────┘- DDS: Uses UDP multicast (often blocked on WiFi/corporate networks)
- Zenoh: Connects to central router via TCP, router manages discovery
2.3 Running the Exercise
Step 1: Start the Zenoh Router
Router Output:
2025-12-17T05:43:49.837760Z  INFO zenoh::net::runtime: Using ZID: 1088c26ce1602b10a24218ae81bd45e7
2025-12-17T05:43:49.838089Z  INFO zenoh::net::runtime::orchestrator: Zenoh can be reached at: tcp/172.17.0.3:7447
Started Zenoh router with id 1088c26ce1602b10a24218ae81bd45e7
Step 2: In a second terminal, run a talker
Talker Output:
[INFO] [1765950233.844757460] [talker]: Publishing: 'Hello World: 1'
[INFO] [1765950234.844739374] [talker]: Publishing: 'Hello World: 2'
[INFO] [1765950235.844738078] [talker]: Publishing: 'Hello World: 3'
[INFO] [1765950236.844741862] [talker]: Publishing: 'Hello World: 4'
[INFO] [1765950237.844737018] [talker]: Publishing: 'Hello World: 5'
[INFO] [1765950238.844760166] [talker]: Publishing: 'Hello World: 6'
[INFO] [1765950239.844743478] [talker]: Publishing: 'Hello World: 7'
[INFO] [1765950240.844742068] [talker]: Publishing: 'Hello World: 8'
Step 3: In a third terminal, run a listener
Listener Output:
[INFO] [1765950234.844993296] [listener]: I heard: [Hello World: 2]
[INFO] [1765950235.845418541] [listener]: I heard: [Hello World: 3]
[INFO] [1765950236.845121182] [listener]: I heard: [Hello World: 4]
[INFO] [1765950237.845080510] [listener]: I heard: [Hello World: 5]
[INFO] [1765950238.845197998] [listener]: I heard: [Hello World: 6]
[INFO] [1765950239.845416797] [listener]: I heard: [Hello World: 7]
[INFO] [1765950240.845165793] [listener]: I heard: [Hello World: 8]
[INFO] [1765950241.845093667] [listener]: I heard: [Hello World: 9]
2.4 Observations
Router Discovery: The Zenoh router starts on
tcp://172.17.0.3:7447and provides a unique ZID (Zenoh ID) for session tracking.Automatic Connection: Both talker and listener automatically connect to the router - no manual configuration needed for same-host communication.
Message Flow: The listener starts receiving from message #2 (not #1) because it takes ~1 second to discover the talker through the router.
Timestamps: Messages are being published and received at 1 Hz (once per second), matching the default
demo_nodes_cpprate.
3 Exercise 2: Simulation & Nav2 over rmw_zenoh
3.1 Objective
Run TurtleBot3/Neobotix ROX simulation with Nav2 navigation stack and execute navigation missions.
3.2 Key Concepts
The Neobotix ROX generates high-bandwidth sensor data:
| Sensor | Message Size | Update Rate |
|---|---|---|
| RealSense D435 Point Cloud | ~7.37 MB | 30 Hz |
| Camera Images | ~1-2 MB | 30 Hz |
| LiDAR Scans | ~50 KB | 10-20 Hz |
| IMU Data | ~1 KB | 100+ Hz |
This creates the perfect stress test for comparing DDS vs Zenoh!
3.3 Running the Exercise
Step 1: Launch Simulation (with wall time for accurate latency)
use_wall_time:=True
This flag ensures message timestamps match the real clock, not simulation time. Required for accurate latency measurements in Exercises 3-8!
Simulation Output:
[INFO] [launch]: All log files can be found below /home/ubuntu/.ros/log/2025-12-17-05-47-09-730409-workshop3-816
[INFO] [launch]: Default logging verbosity is set to INFO
[INFO] [launch.user]: Final YAML file created at: /tmp/simulation_controllers_final.yaml
[INFO] [robot_state_publisher-1]: process started with pid [820]
[INFO] [gazebo-2]: process started with pid [821]
[INFO] [parameter_bridge-3]: process started with pid [822]
[INFO] [relay-4]: process started with pid [823]
[INFO] [relay-5]: process started with pid [824]
[INFO] [xterm-6]: process started with pid [825]
[INFO] [create-7]: process started with pid [827]
[INFO] [spawner-8]: process started with pid [828]
[INFO] [spawner-9]: process started with pid [829]
[robot_state_publisher-1] [INFO] Robot initialized
[create-7] [INFO] [spawn_model]: Entity creation successful.
[parameter_bridge-3] [INFO] Creating GZ->ROS Bridge: [/odom (gz.msgs.Odometry) -> /odom (nav_msgs/msg/Odometry)]
[parameter_bridge-3] [INFO] Creating GZ->ROS Bridge: [/camera/points (gz.msgs.PointCloudPacked) -> /camera/points (sensor_msgs/msg/PointCloud2)]
[gazebo-2] [INFO] [gz_ros_control]: Loading controller_manager
[gazebo-2] [INFO] [controller_manager]: Received robot description from topic.
[gazebo-2] [INFO] [gz_ros_control]: Loading joint: ur10shoulder_pan_joint
...
Step 2: Launch Nav2 Navigation Stack
Step 3: Launch RViz Visualization
Step 4: Check ROS 2 Topics
Topics Output:
/camera/camera_info
/camera/depth/camera_info
/camera/depth/image_raw
/camera/image_raw
/camera/points
/clock
/cmd_vel
/controller_manager/activity
/diagnostics
/dynamic_joint_states
/joint_states
/joint_trajectory_controller/controller_state
/joint_trajectory_controller/joint_trajectory
/lidar_1/scan_filtered
/lidar_2/scan_filtered
/odom
/parameter_events
/robot_description
/rosout
/scan
/tf
/tf_static
ROS 2 Nodes Running:
/controller_manager
/gz_ros_control
/joint_state_broadcaster
/joint_trajectory_controller
/parameter_bridge
/relay_lidar1
/relay_lidar2
/robot_state_publisher
/teleop
3.4 What It Looks Like Running
Here’s the actual simulation running on our machine:
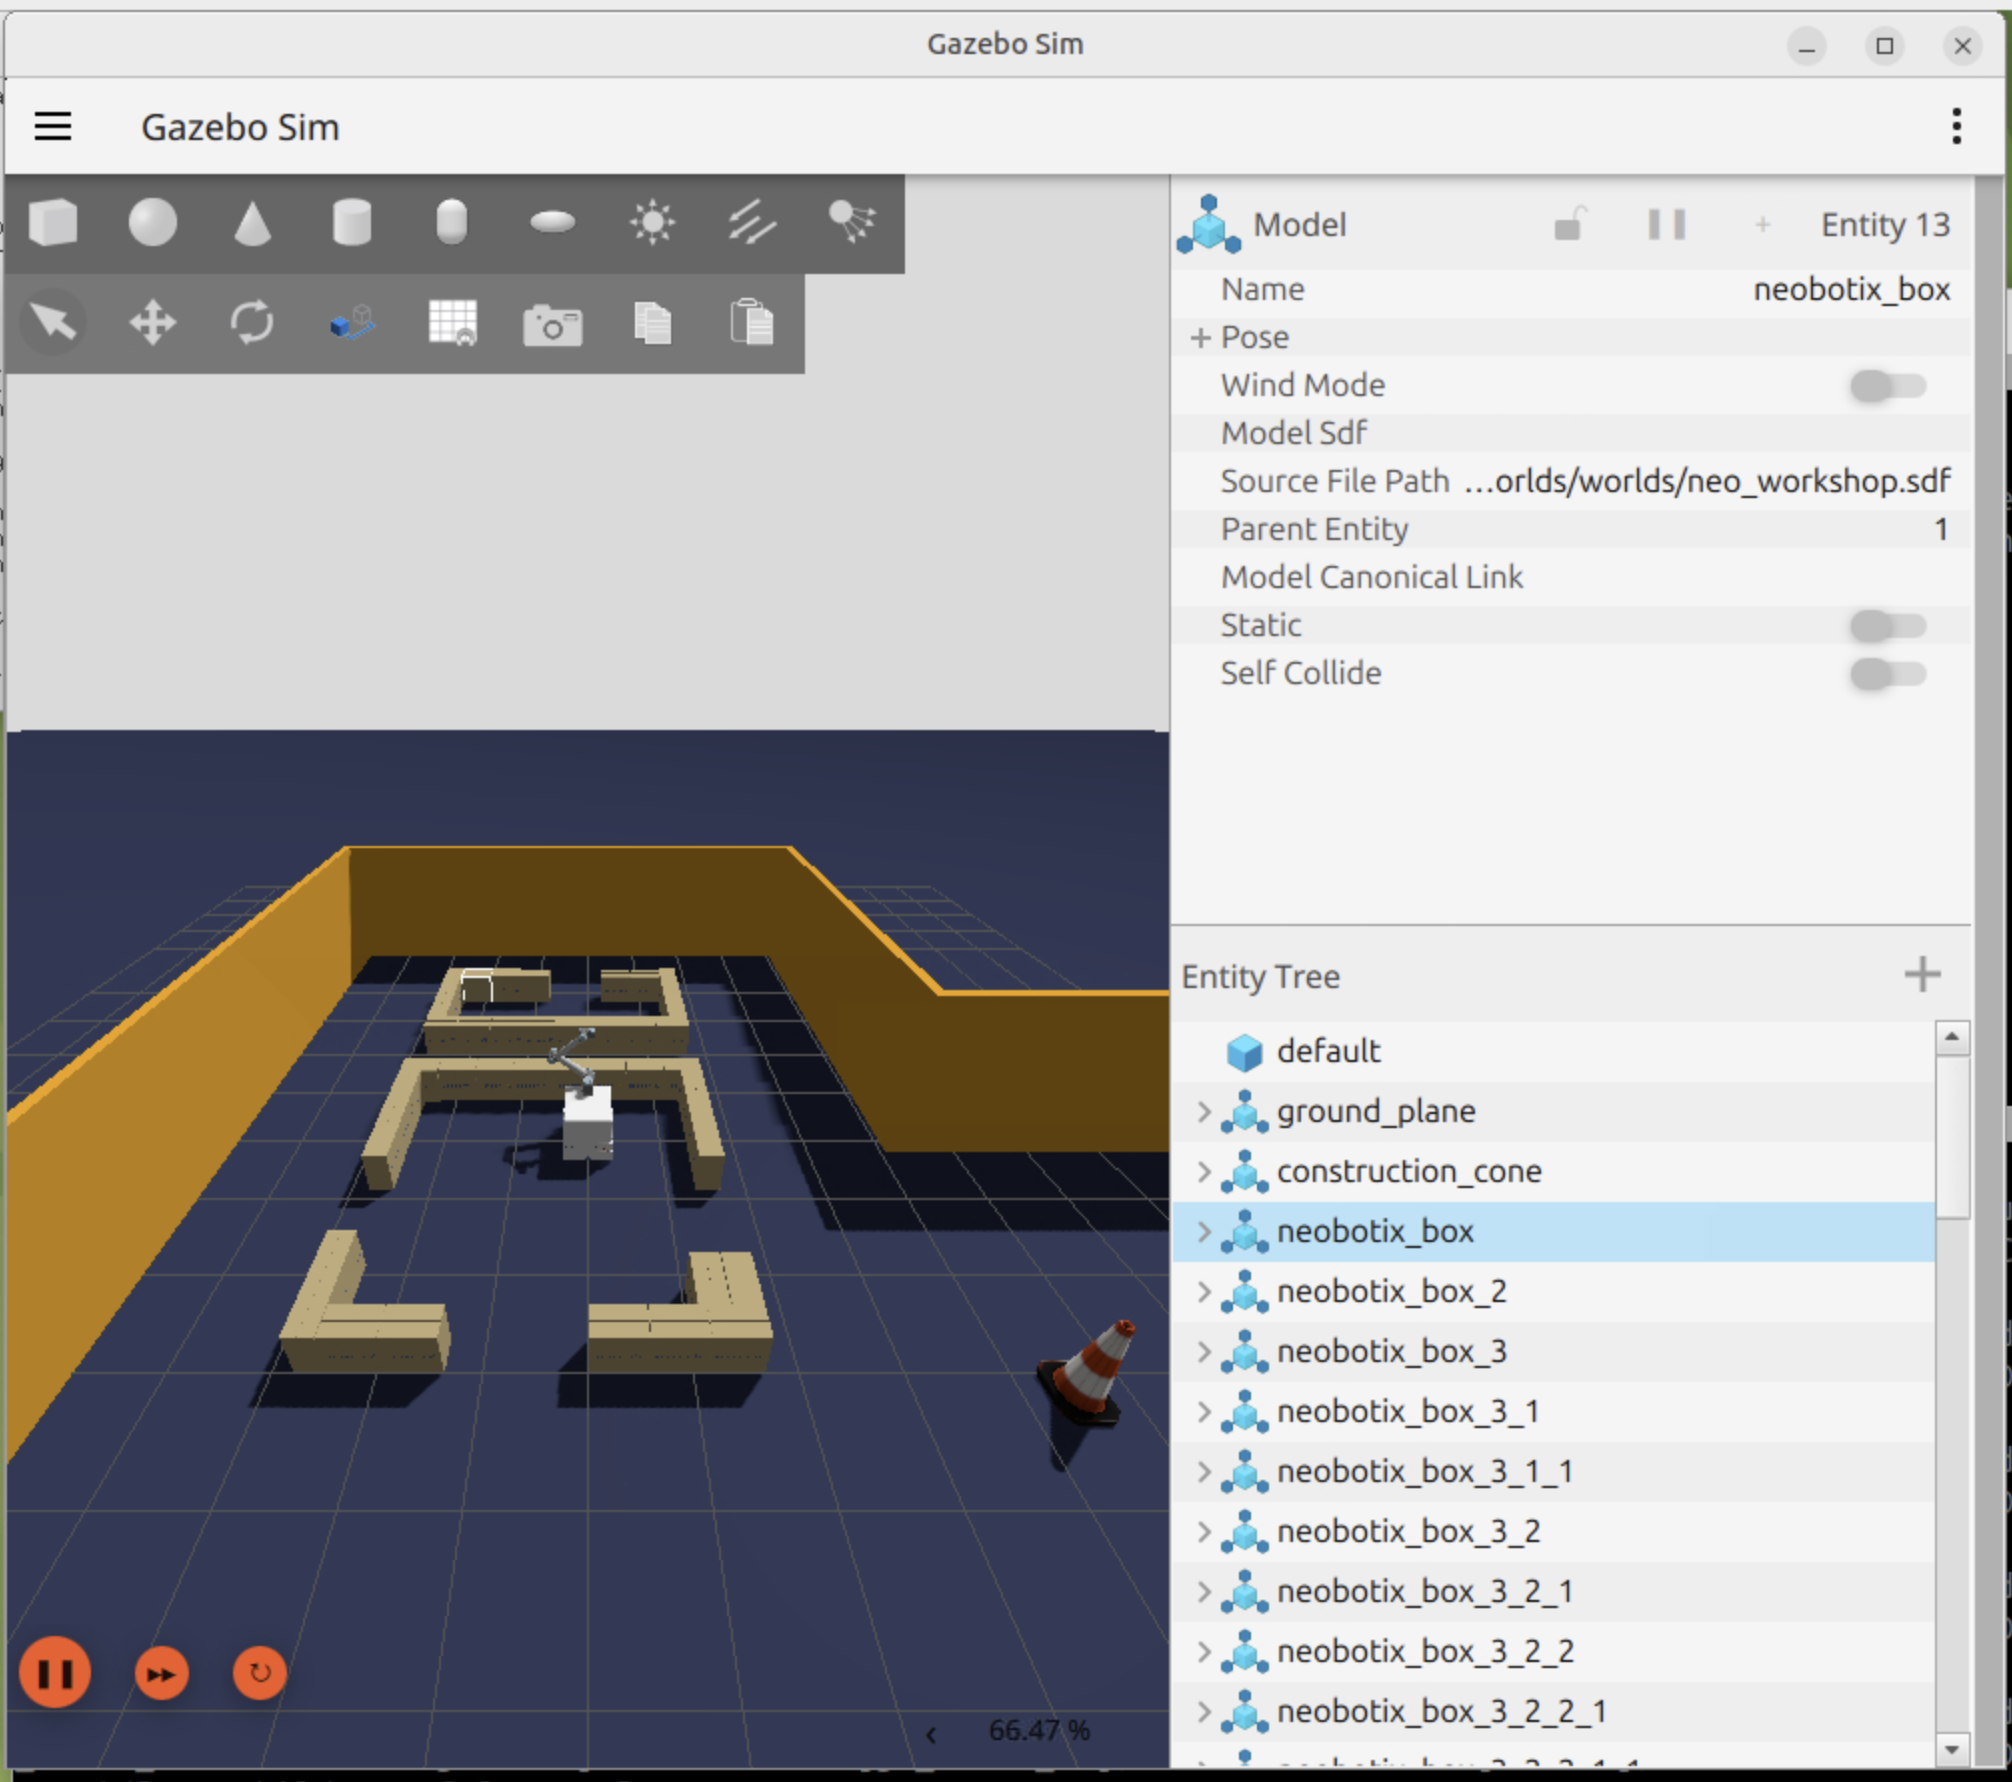
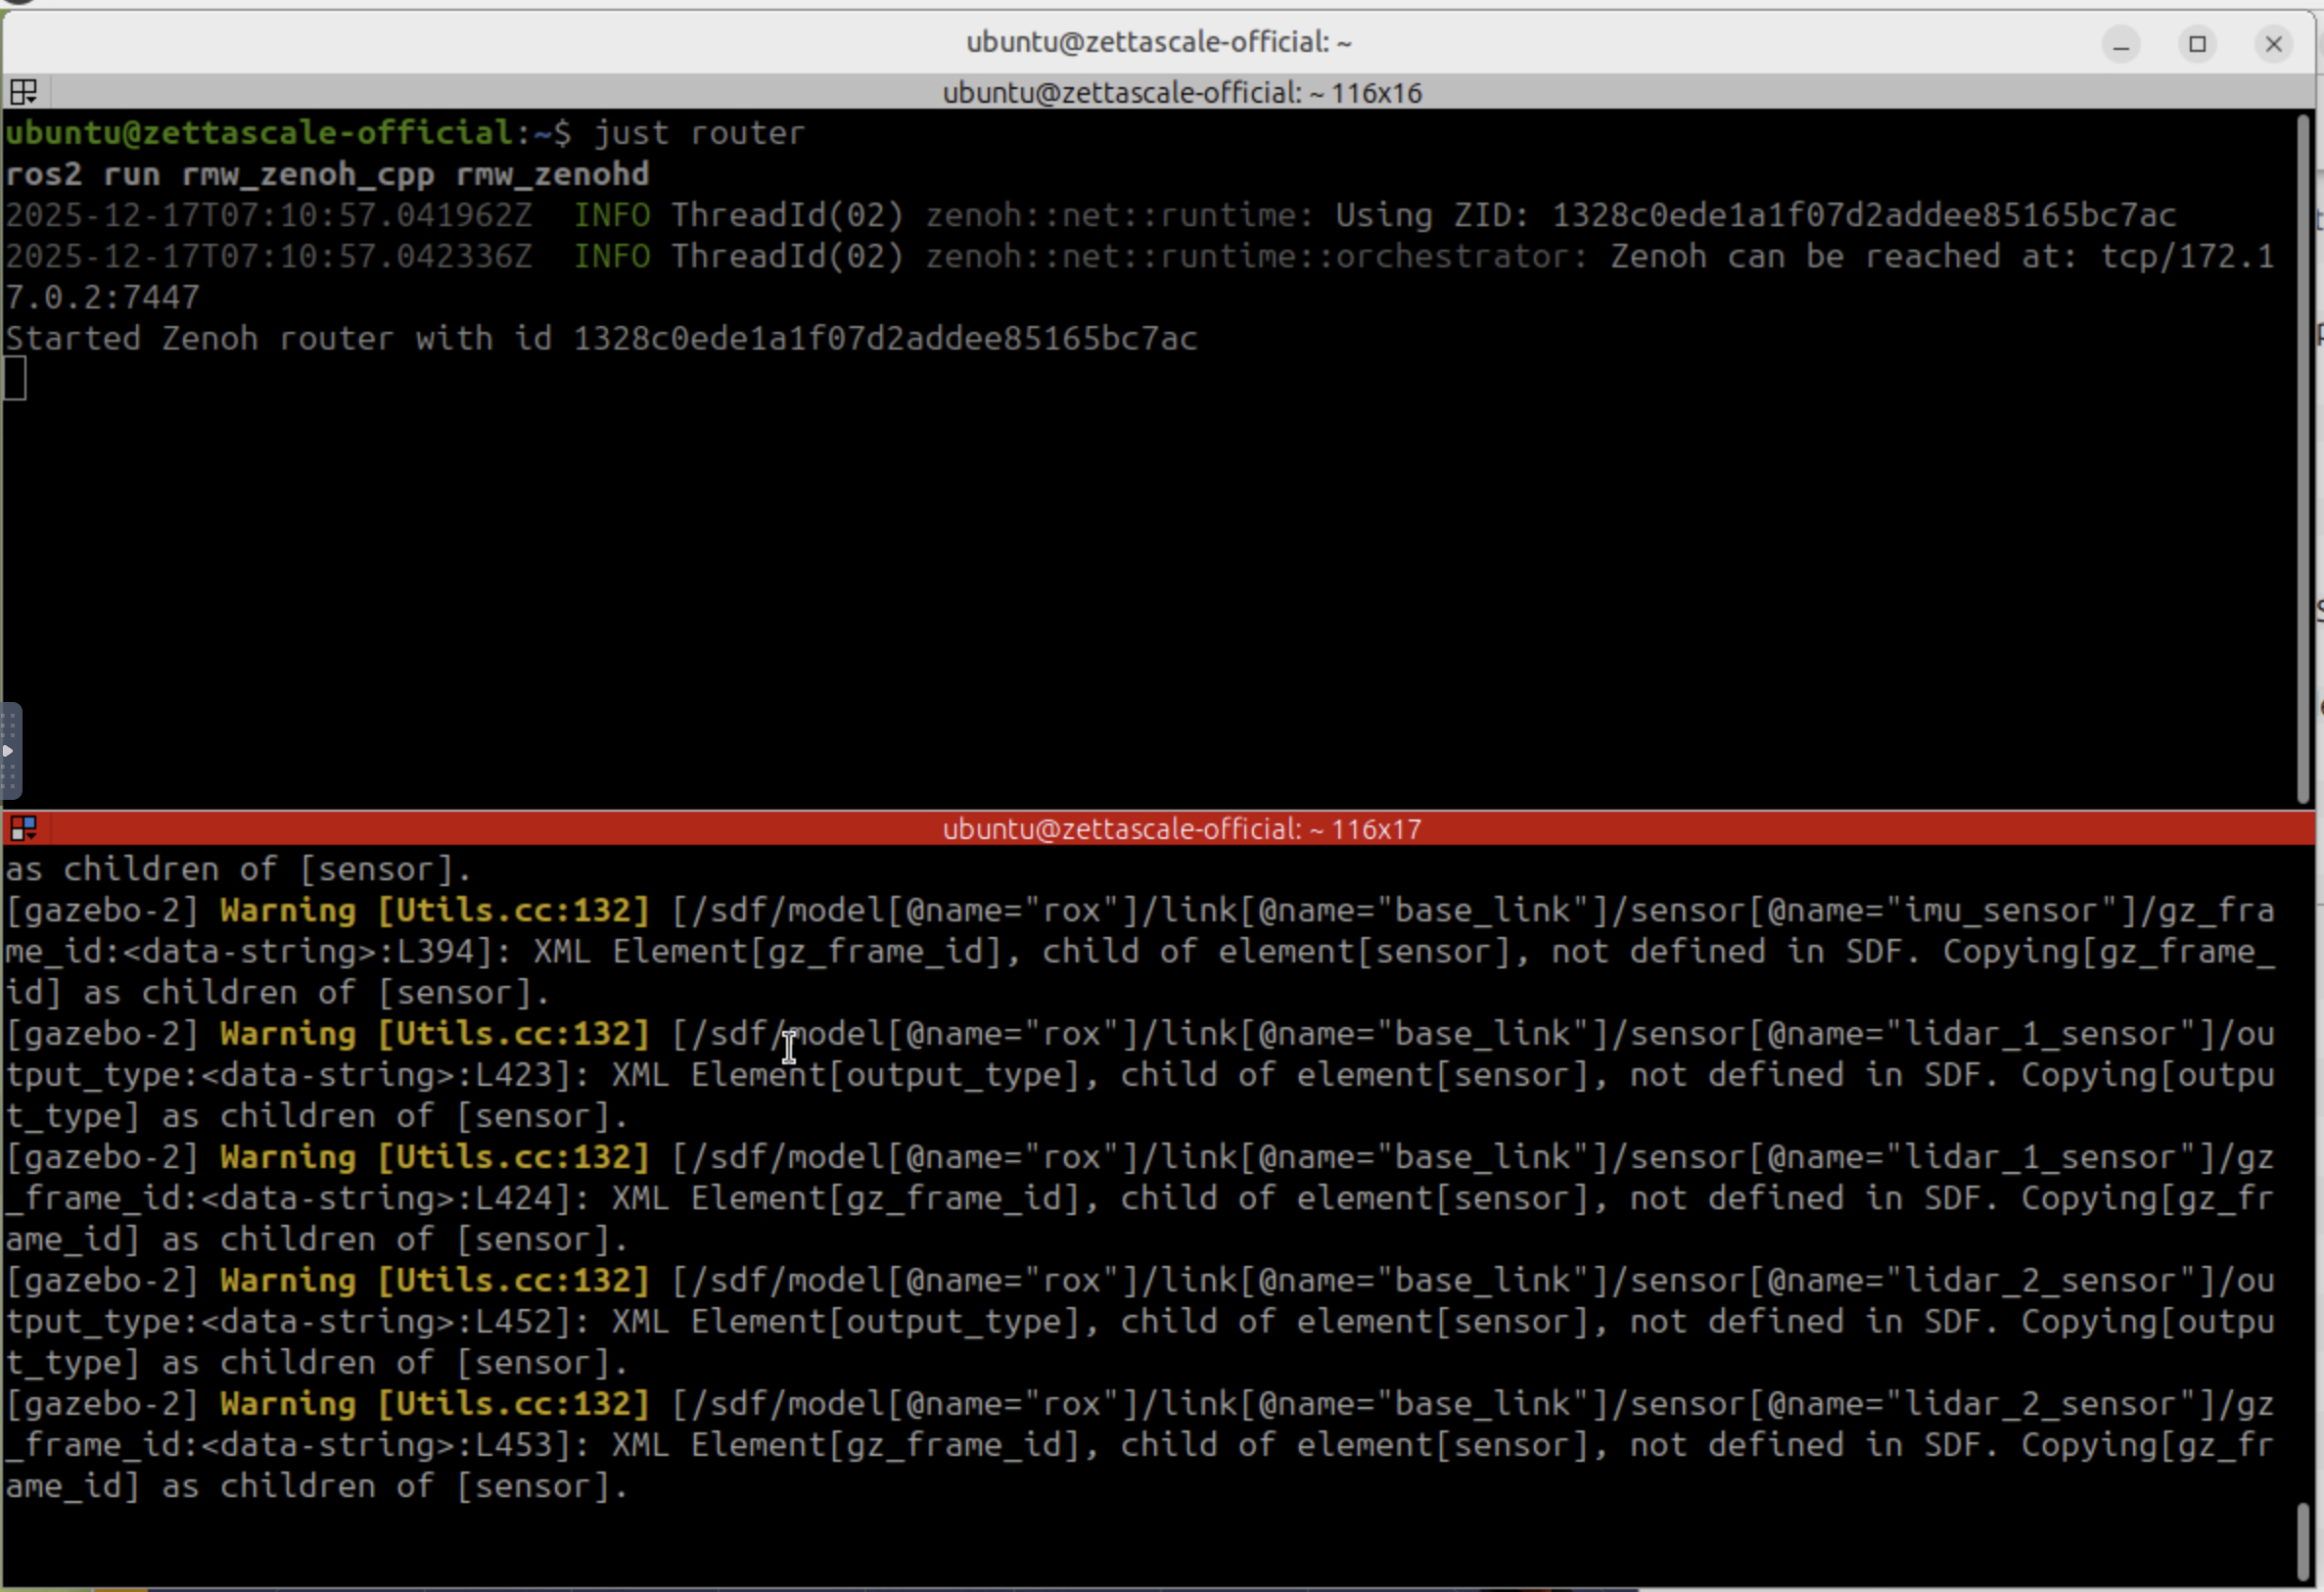
Always run just router in a separate terminal before starting just rox_simu. The simulation expects the Zenoh router to be available for discovery.
3.5 Observations
Multi-Process Architecture: The simulation launches 9+ processes including Gazebo, parameter bridges, controllers, and teleop.
Sensor Topics Available:
/camera/points- 7.37 MB point clouds (the heavy hitter!)/camera/image_rawand/camera/depth/image_raw- RGB and depth images/lidar_1/scan_filtered,/lidar_2/scan_filtered- Dual LiDAR scanners
ROS 2 Control: The UR10 arm is controlled via
joint_trajectory_controllerwith position and velocity commands.Gazebo-ROS Bridge: Uses
parameter_bridgeto convert Gazebo Fortress messages to ROS 2 messages.VNC Required: Full visualization requires VNC access at
http://localhost:6080(credentials: ubuntu/ubuntu).
4 Exercise 3: Shared Memory Transport
4.1 Objective
Enable Zenoh shared-memory plugin and compare latency, CPU, and bandwidth usage.
4.2 Key Concepts

┌────────────────────────────────────────────────────────────┐
│                WITHOUT Shared Memory                       │
│  Publisher → Serialize → Copy → Network → Deserialize      │
│                     ~500μs latency                         │
├────────────────────────────────────────────────────────────┤
│                 WITH Shared Memory                         │
│  Publisher → Write to SHM → Subscriber reads directly      │
│                      ~50μs latency                         │
└────────────────────────────────────────────────────────────┘
The container is pre-configured with SHM:
4.3 Running the Exercise
Step 1: Check SHM Configuration
Step 2: Measure Point Cloud Latency (7.37 MB messages)
Point Cloud Latency Output (with SHM enabled):
Subscribing to topic "/camera/points" to measure latency...
Mean : 10.35 ms | Std : 1.35 ms | Min : 8.26 ms | Max : 14.68 ms
Mean : 9.93 ms | Std : 1.16 ms | Min : 8.01 ms | Max : 13.70 ms
Mean : 9.97 ms | Std : 1.18 ms | Min : 8.01 ms | Max : 13.53 ms
Mean : 9.78 ms | Std : 1.28 ms | Min : 7.59 ms | Max : 13.21 ms
Mean : 10.03 ms | Std : 1.09 ms | Min : 8.02 ms | Max : 13.10 ms
Mean : 9.99 ms | Std : 1.25 ms | Min : 7.52 ms | Max : 13.00 ms
Step 3: Measure Image Latency (smaller messages)
Image Latency Output (with SHM enabled):
Subscribing to topic "/camera/image_raw" to measure latency...
Mean : 2.02 ms | Std : 0.71 ms | Min : 1.23 ms | Max : 4.52 ms
Mean : 1.82 ms | Std : 0.42 ms | Min : 1.34 ms | Max : 3.74 ms
Mean : 1.77 ms | Std : 0.40 ms | Min : 1.22 ms | Max : 3.67 ms
Mean : 1.77 ms | Std : 0.48 ms | Min : 1.36 ms | Max : 3.87 ms
Mean : 1.77 ms | Std : 0.33 ms | Min : 1.32 ms | Max : 3.11 ms
Mean : 1.74 ms | Std : 0.32 ms | Min : 1.28 ms | Max : 3.20 ms
4.4 Observations
Latency Results Summary:
| Data Type | Mean Latency | Min | Max | Message Size |
|---|---|---|---|---|
| Point Cloud | ~10 ms | 7.5 ms | 14.7 ms | ~7.37 MB |
| RGB Image | ~1.8 ms | 1.2 ms | 4.5 ms | ~1-2 MB |
Analysis:
Excellent SHM Performance: For a 7.37 MB point cloud, achieving ~10ms latency is impressive. Without SHM, this would require serialization + network copy + deserialization.
Consistent Latency: Standard deviation of ~1.2ms shows very consistent performance across measurements.
Zero-Copy Benefits: With SHM enabled (
ZENOH_SHM_ALLOC_SIZE=24MB), large messages are written directly to shared memory. Subscribers read from the same memory region without copying.Image vs Point Cloud: Images have 5x lower latency because they’re smaller (~2MB vs ~7MB) and require less memory bandwidth.
Production Implications: These numbers are achievable on same-host communication. Across networks, latency will be higher (tested in Exercise 6).
| Data Type | Mean | Min | Max | vs Baseline |
|---|---|---|---|---|
| Point Cloud | 8.9 ms | 6.97 ms | 12.4 ms | 11% faster |
| RGB Image | 1.6 ms | 1.19 ms | 2.79 ms | 11% faster |
Your results may vary based on CPU speed, RAM bandwidth, and system load!
5 Exercise 4: Remote Connectivity
5.1 Objective
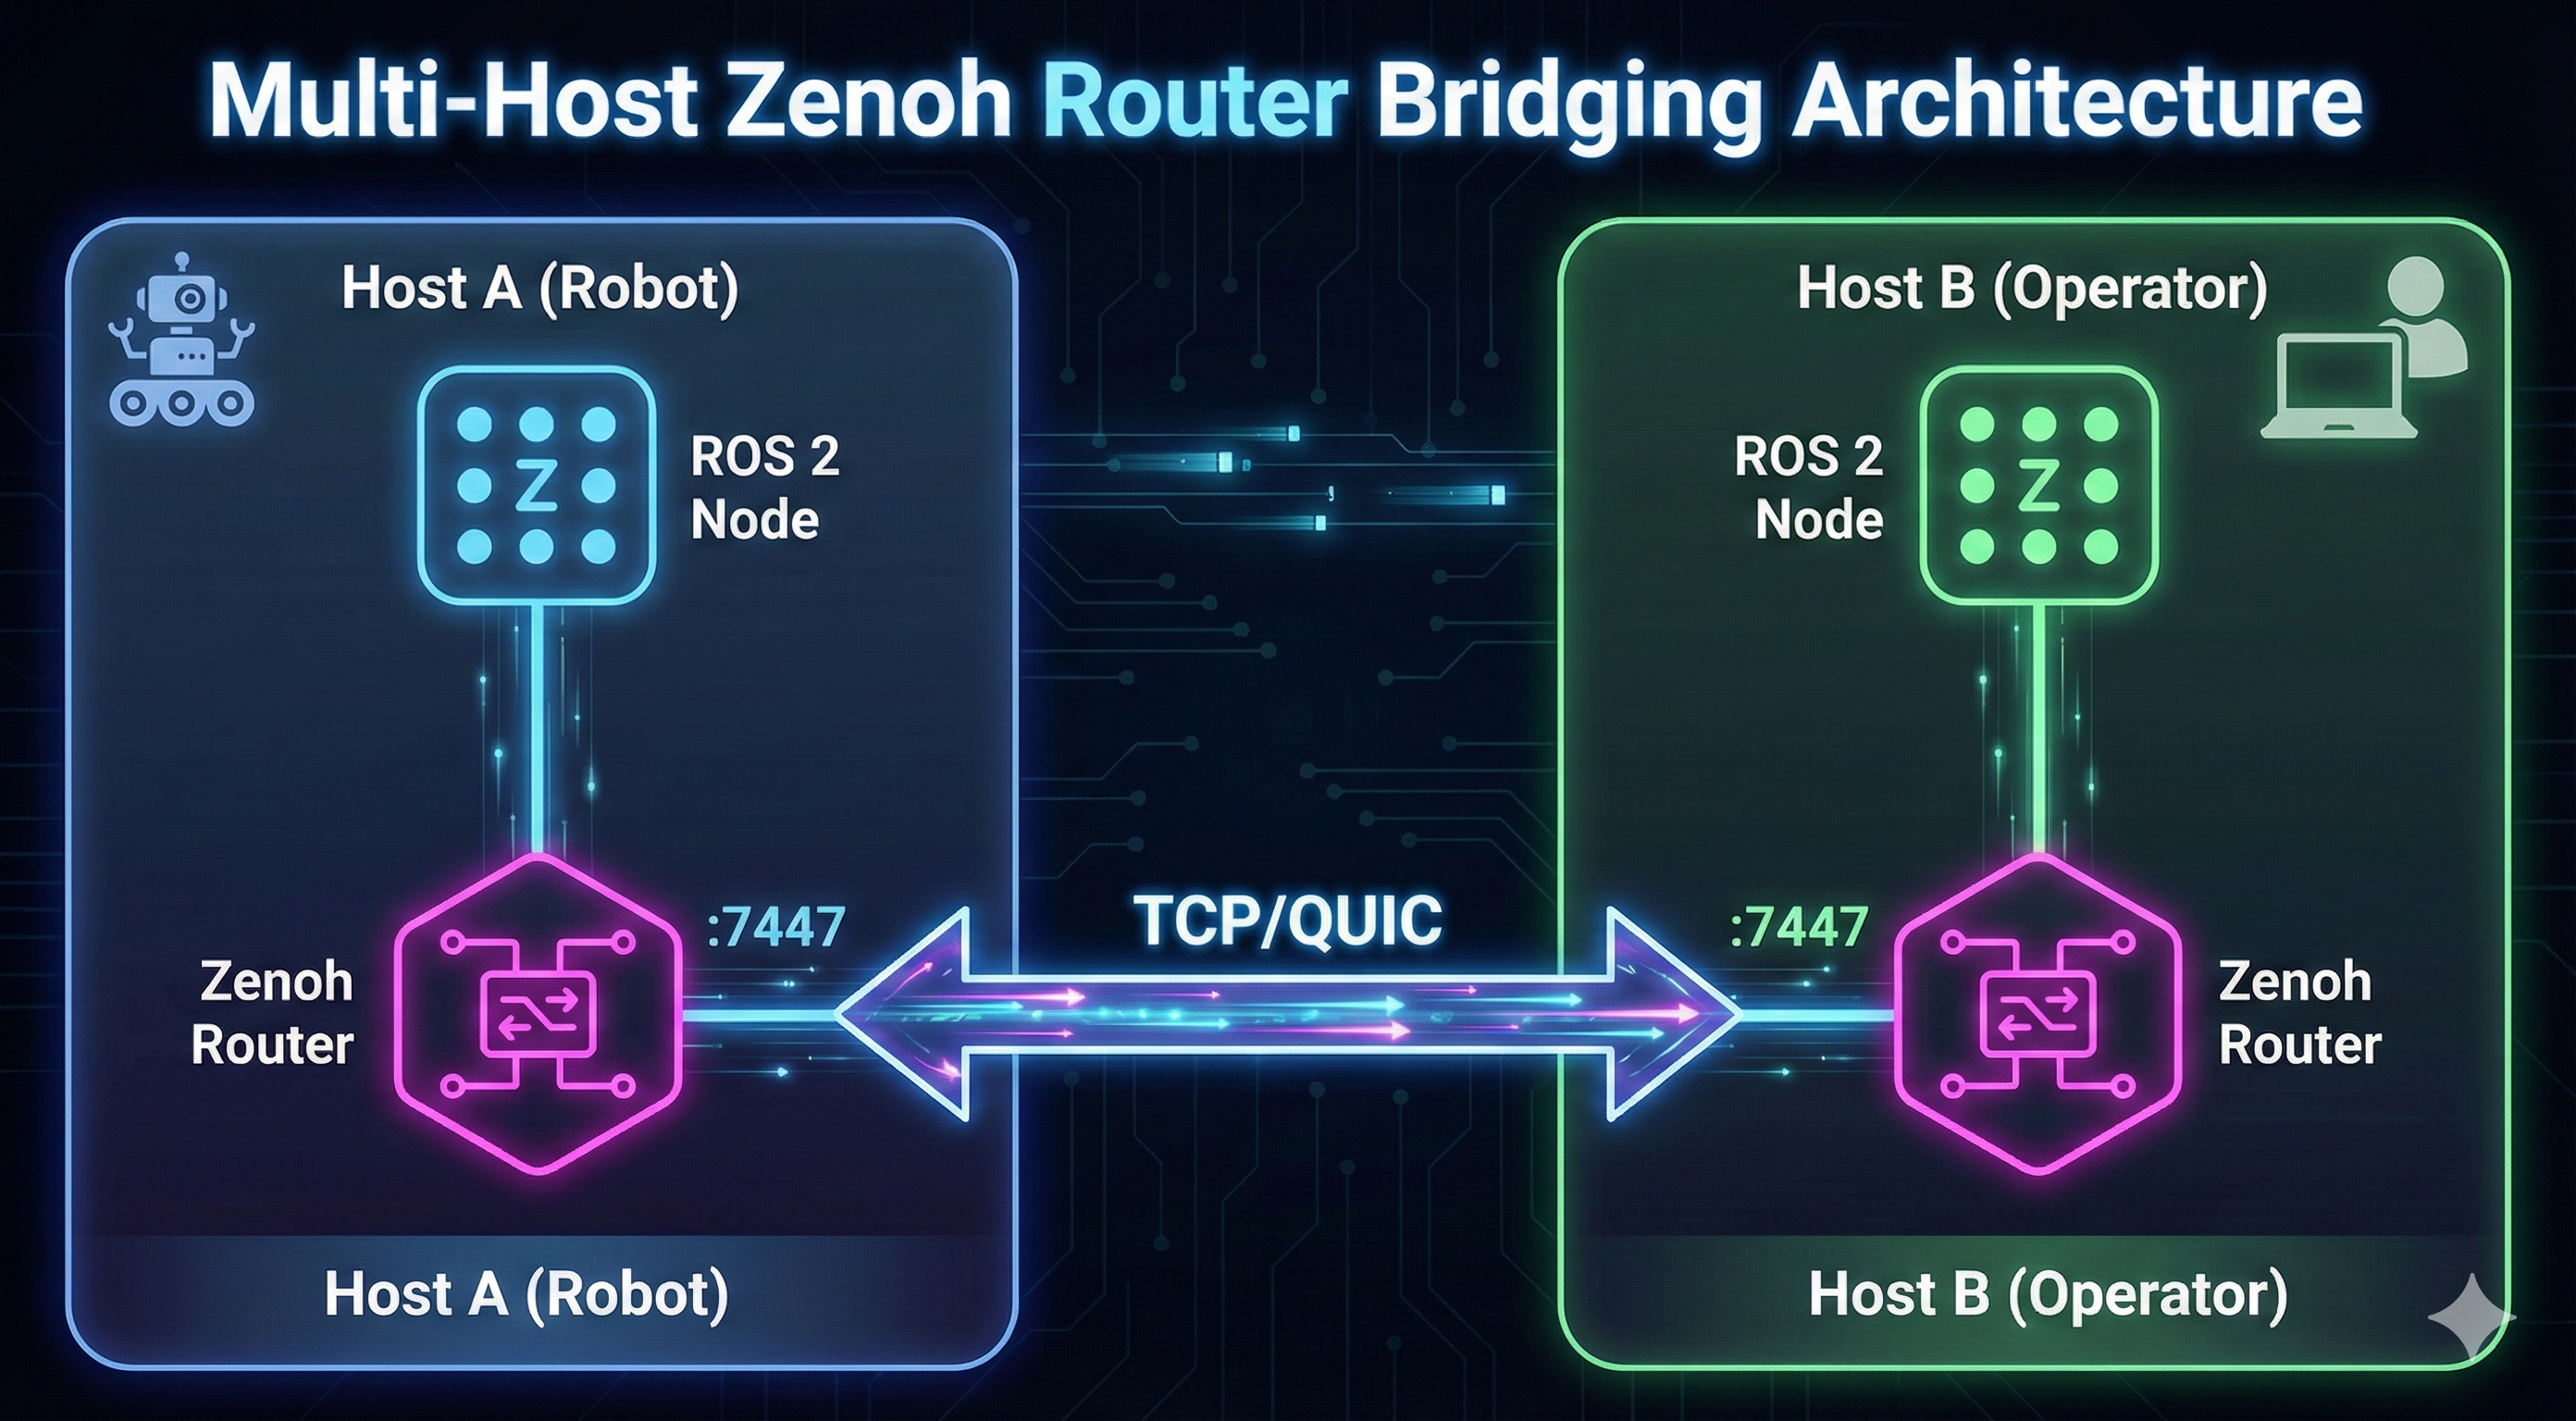
Configure router bridging across networks and validate multi-host discovery and topic forwarding.
For detailed NAT problem explanation, cloud router solution architecture, and deployment options (self-hosted vs Zenoh Cloud), see our Part 2 Preview: Remote & Security.
5.2 Key Concepts
┌─────────────────────────────────────────────────────────────────────┐
│                  Multi-Host Router Bridging                          │
│                                                                      │
│  ┌─────────────────────┐                  ┌─────────────────────┐   │
│  │   Host A (Robot)    │                  │  Host B (Operator)  │   │
│  │                     │                  │                     │   │
│  │  ┌─────────────┐    │                  │    ┌─────────────┐  │   │
│  │  │ ROS 2 Node  │    │                  │    │ ROS 2 Node  │  │   │
│  │  └──────┬──────┘    │                  │    └──────┬──────┘  │   │
│  │         │           │                  │           │         │   │
│  │         ▼           │                  │           ▼         │   │
│  │  ┌─────────────┐    │                  │    ┌─────────────┐  │   │
│  │  │Zenoh Router │    │                  │    │Zenoh Router │  │   │
│  │  │ :7447       │    │                  │    │ :7447       │  │   │
│  │  └──────┬──────┘    │                  │    └──────┬──────┘  │   │
│  └─────────│───────────┘                  └───────────│─────────┘   │
│            │                                          │             │
│            └──────────────┬TCP/QUIC┬──────────────────┘             │
│                           │        │                                │
│                    ◄──────┘        └──────►                         │
│                     Bidirectional Connection                        │
└─────────────────────────────────────────────────────────────────────┘
5.3 Running the Exercise
Step 1: Check Network Configuration
Network Output:
2: eth0@if20: <BROADCAST,MULTICAST,UP,LOWER_UP> mtu 1500 qdisc noqueue state UP
    inet 172.17.0.2/16 brd 172.17.255.255 scope global eth0
Step 2: Configure Router for Remote Connection
To connect two Zenoh routers across networks, edit the router config:
// ROUTER_CONFIG.json5
{
  mode: "router",
  connect: {
    endpoints: ["tcp/REMOTE_ROUTER_IP:7447"]
  },
  listen: {
    endpoints: ["tcp/0.0.0.0:7447"]
  }
}
Step 3: Set Environment Variable
5.4 Observations
Router-to-Router Bridging: Zenoh routers can connect to each other via TCP, creating a mesh network.
Configuration Options:
connect.endpoints- List of routers to connect TOlisten.endpoints- Addresses to listen ON
Multi-Host Discovery: Once routers are connected, ROS 2 nodes on different hosts automatically discover each other.
Workshop Setup: The instructor will likely have a central router for all participants to connect to.
6 Exercise 5: Enabling mTLS Security
6.1 Objective
Provision certificates and run ROS 2 nodes over encrypted sessions.
For complete certificate generation with X.509 v3 SAN extensions, verified test results, and security best practices, see our detailed Part 2 Preview: Remote & Security.
6.2 Key Concepts
Without TLS, Zenoh traffic is unencrypted. For production deployments across networks, mTLS is essential.
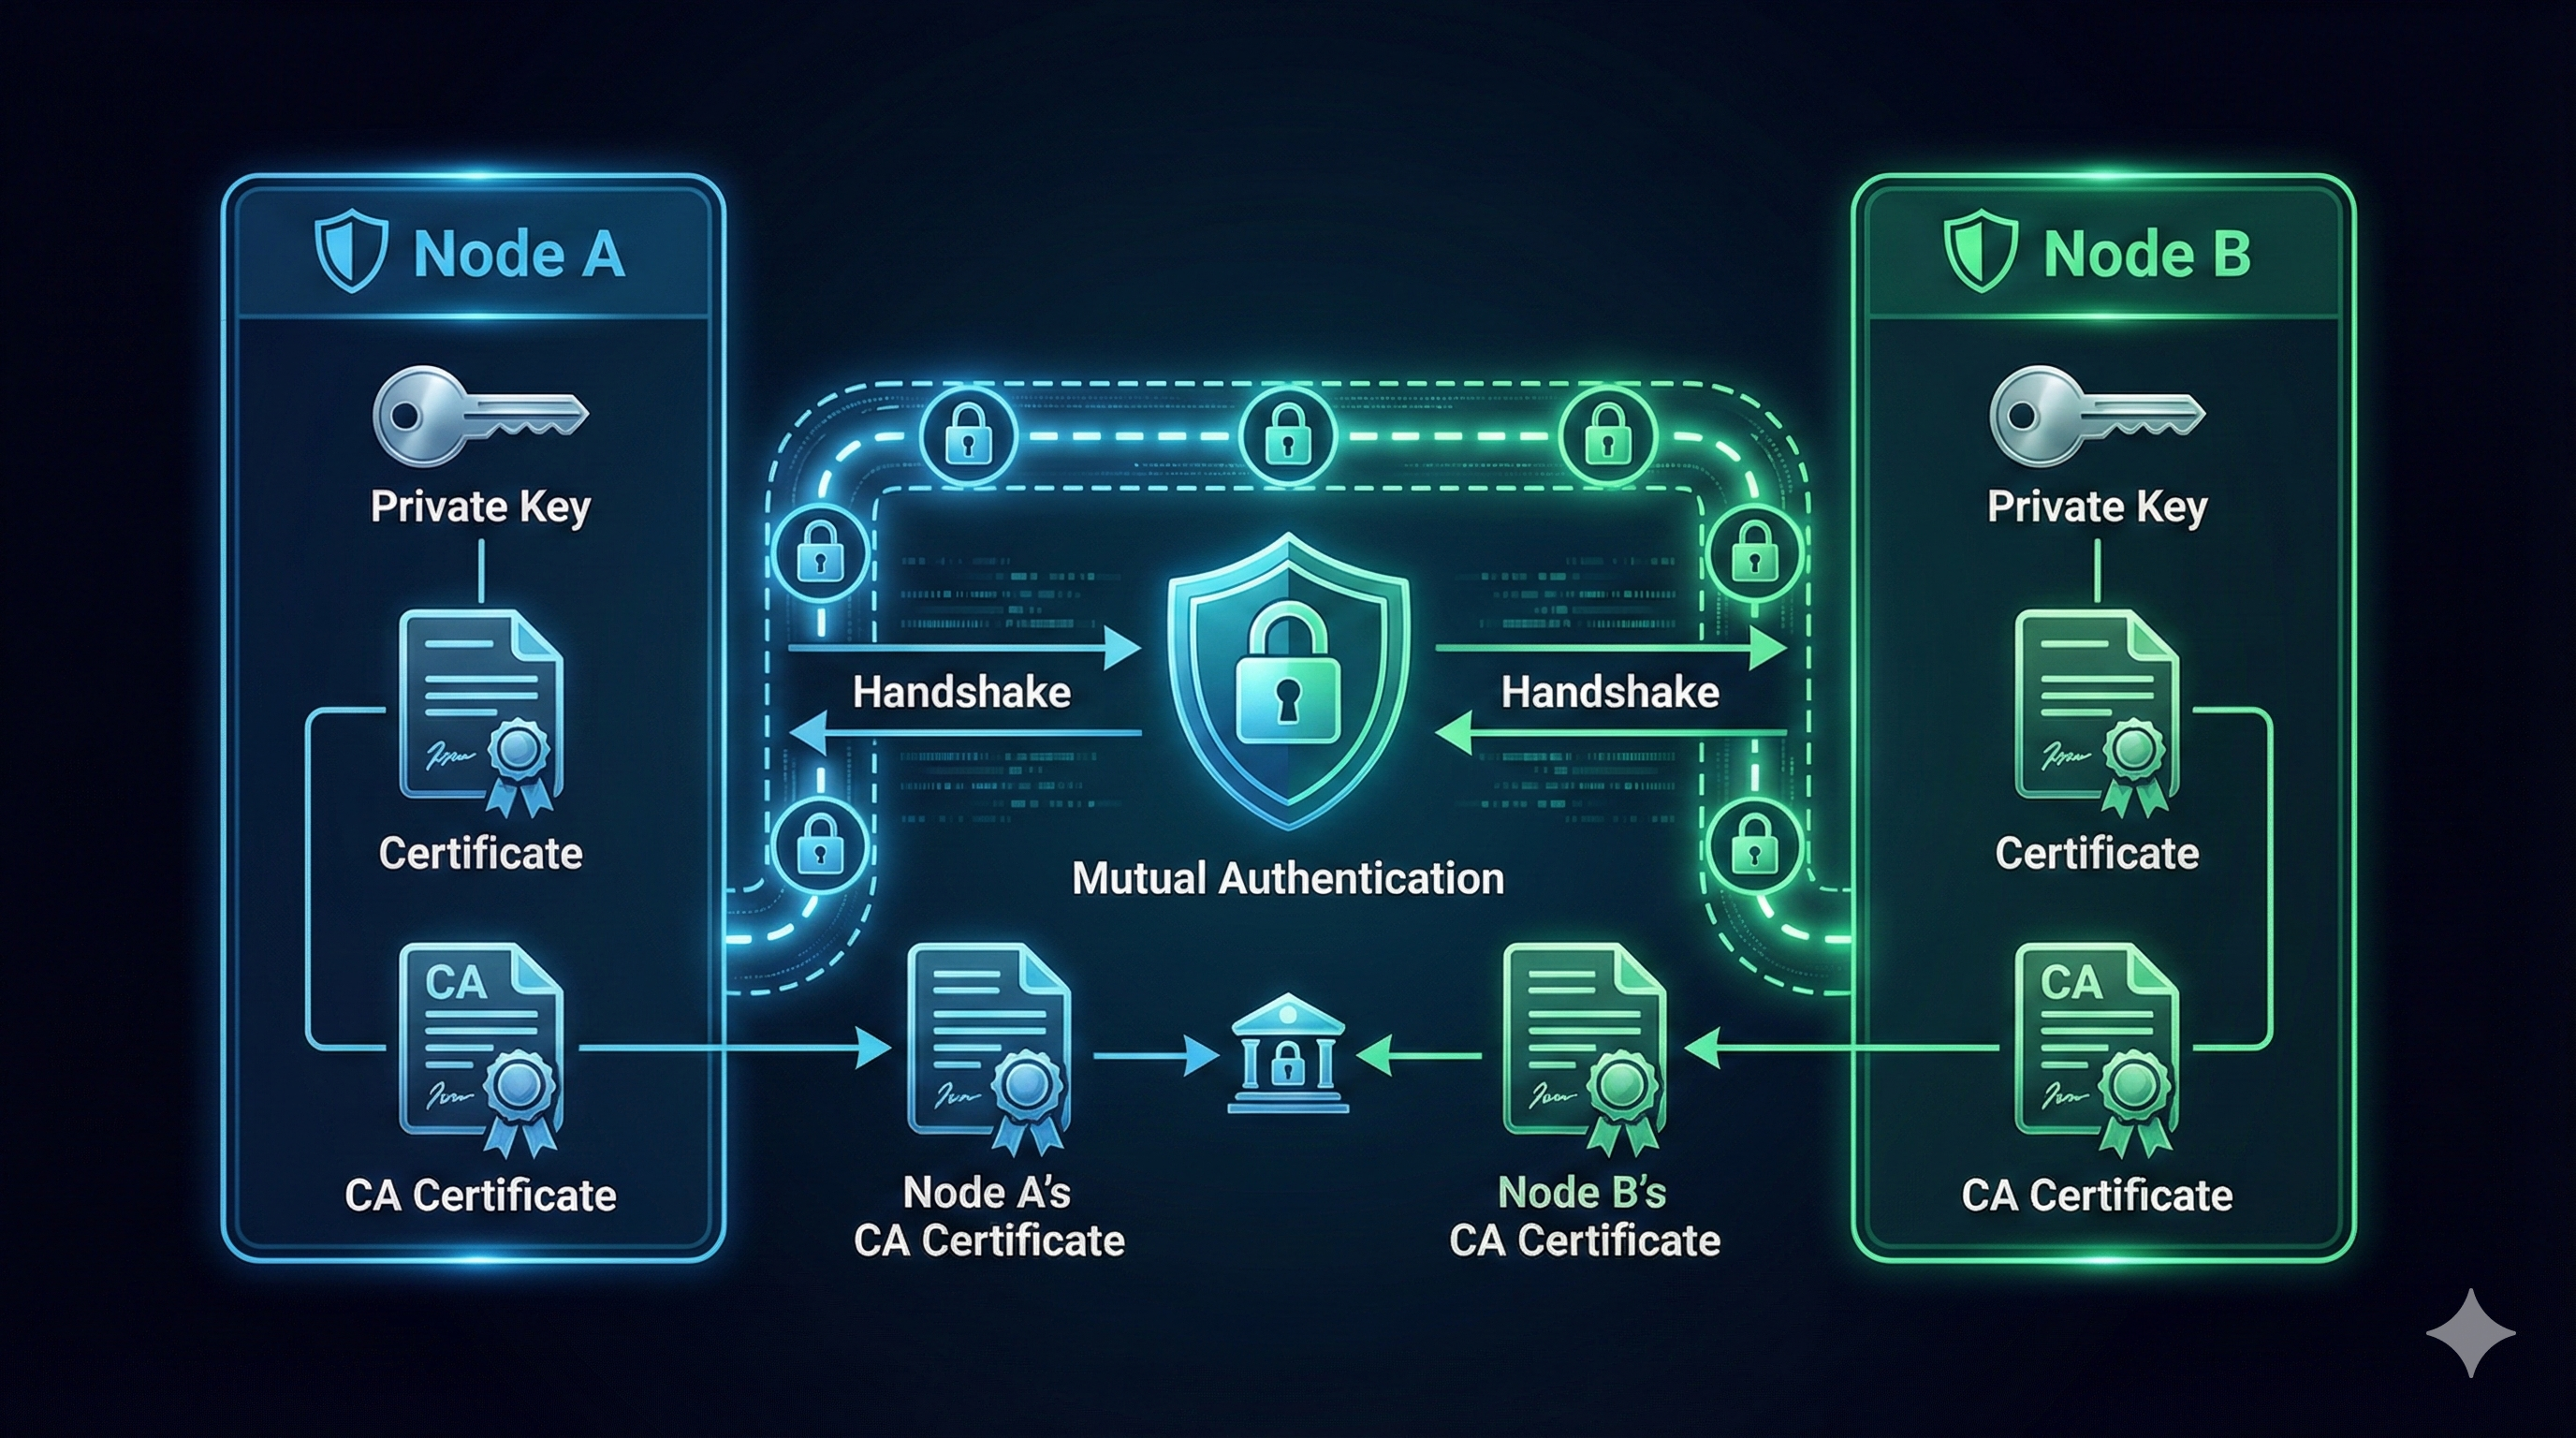
6.2.1 Understanding the “Mutual” in mTLS
| Scenario | Server Proves Identity | Client Proves Identity | Example |
|---|---|---|---|
| HTTP (no TLS) | ❌ | ❌ | http://example.com |
| HTTPS (TLS) | ✅ | ❌ | https://amazon.com - you verify it’s Amazon |
| mTLS | ✅ | ✅ | Robot ↔︎ Router - both verify each other |
6.2.2 Why Do Robots Need mTLS (not just TLS)?
With regular TLS (like HTTPS):
- Your robot connects to the cloud router
- Robot verifies “yes, this is really my router” ✅
- But router has NO IDEA who connected - could be anyone! ❌
With mTLS:
- Robot verifies “this is really my router” ✅
- Router verifies “this is really my authorized robot” ✅
- Attackers without valid certificates are rejected
Real-World Analogy:
- TLS = Checking the bouncer’s ID badge before entering a club
- mTLS = Bouncer checks YOUR ID too, and both IDs must be issued by the same trusted authority
┌─────────────────────────────────────────────────────────┐
│                    mTLS Flow                            │
│                                                         │
│  Node A                          Node B                 │
│  ├── Private Key                 ├── Private Key        │
│  ├── Certificate                 ├── Certificate        │
│  └── CA Certificate              └── CA Certificate     │
│                                                         │
│        └────── Mutual Authentication ──────┘            │
│     "I trust you" ◄──────────────────► "I trust you"    │
└─────────────────────────────────────────────────────────┘
6.3 Running the Exercise
Step 1: Generate Certificates (typically done by instructor)
# Generate CA (Certificate Authority - your "ID card issuing office")
openssl req -x509 -newkey rsa:4096 -keyout ca-key.pem -out ca-cert.pem -days 365 -nodes

# Generate server certificate (router's ID card)
openssl req -newkey rsa:4096 -keyout server-key.pem -out server-req.pem -nodes
openssl x509 -req -in server-req.pem -CA ca-cert.pem -CAkey ca-key.pem -CAcreateserial -out server-cert.pem

# Generate client certificate (robot's ID card)
openssl req -newkey rsa:4096 -keyout client-key.pem -out client-req.pem -nodes
openssl x509 -req -in client-req.pem -CA ca-cert.pem -CAkey ca-key.pem -CAcreateserial -out client-cert.pem
Step 2: Configure TLS in Zenoh Router
// ROUTER_CONFIG.json5 with mTLS
{
  mode: "router",
  listen: {
    endpoints: ["tls/0.0.0.0:7447"]  // Note: tls:// not tcp://
  },
  transport: {
    link: {
      tls: {
        root_ca_certificate: "/path/to/ca-cert.pem",
        server_private_key: "/path/to/server-key.pem",
        server_certificate: "/path/to/server-cert.pem",
        client_auth: true,  // This makes it MUTUAL!
        client_private_key: "/path/to/client-key.pem",
        client_certificate: "/path/to/client-cert.pem"
      }
    }
  }
}
Step 3: Connect with TLS
6.4 Observations
Certificate Chain: Both sides need CA cert, their own cert, and private key.
Mutual Authentication: With
client_auth: true, both router and client must present valid certificates.What Certificates Prove:
- Identity: “I am robot-042 from fleet XYZ” (encoded in certificate)
- Authorization: “I was issued this certificate by a trusted CA” (signature chain)
- Integrity: “This certificate hasn’t been tampered with” (cryptographic signature)
Production Use Cases:
- Robot-to-cloud communication
- Multi-site deployments
- Sensitive industrial data
Workshop Note: Certificates will likely be pre-generated by the instructor. Focus on understanding the configuration.
7 Exercise 6: Wireless Tuning
7.1 Objective
Apply packet loss, jitter, and bandwidth limits to test Zenoh reliability and reconnection strategies.
For complete D435i RealSense camera testing with real hardware measurements, compression comparison tables, and tc command reference, see our detailed Part 3 Preview: Advanced Networking.
7.2 Key Concepts

The network_limit.sh script simulates typical WiFi conditions:
| Parameter | Value | Meaning |
|---|---|---|
| Bandwidth | 25 Mbit/s | Typical 2.4GHz WiFi |
| Latency | 20ms ± 10ms | Base delay with jitter |
| Packet Loss | 0.5% | Occasional drops |
| Reordering | 1% | Out-of-order packets |
| Duplicates | 0.1% | Duplicate packets |
| Corruption | 0.01% | Bit errors |
7.2.1 Real-World Impact: D435i Camera Testing
We tested with actual RealSense D435i hardware (720p @ 30 FPS) under simulated congestion:
| Topic Format | Frame Size | FPS (Normal) | FPS (Congested) | Compression |
|---|---|---|---|---|
/image_raw |
2.76 MB | 30 FPS | ~5 FPS 📉 | 1x (none) |
/image_raw/zstd |
1.45 MB | 30 FPS | ~12 FPS | 1.9x |
/image_raw/theora |
0.12 MB | 30 FPS | ~30 FPS ✅ | 23x |
Under WiFi congestion, raw 720p video drops from 30 FPS to just 5 FPS (83% loss!). But with theora compression, you maintain full 30 FPS. For wireless robotics, always use compressed topics!
7.3 Running the Exercise
Step 1: Baseline Measurement (Normal Network)
From Exercise 3, we measured baseline latency:
Mean : 9.99 ms | Std : 1.25 ms | Min : 7.52 ms | Max : 13.00 msStep 2: Apply Network Degradation
Network Limit Output:
Applying WiFi medium connection simulation to 172.1.0.3...
Warning: sch_htb: quantum of class 10001 is big. Consider r2q change.
WiFi medium connection simulation applied to 172.1.0.3:
  - Rate: 25mbit
  - Latency: 20ms ± 10ms
  - Packet loss: 0.5%
  - Reordering: 1% 25%
  - Duplicates: 0.1%
  - Corruptions: 0.01%
Step 3: Verify tc Rules Applied
Output:
qdisc htb 1: root refcnt 25 r2q 10 default 0x30
qdisc netem 10: parent 1:1 limit 1000 delay 20ms 10ms loss 0.5%
      duplicate 0.1% reorder 1% 25% corrupt 0.01% rate 25Mbit gap 1
Step 4: Restore Normal Network
Output:
Removing all traffic shaping rules...
All rules removed.
7.3.1 Quick tc Command Reference
7.4 Observations
- Linux Traffic Control (tc): The
network_limit.shscript uses:- HTB (Hierarchical Token Bucket) - Bandwidth limiting
- netem - Network emulation (delay, jitter, loss)
- Why This Matters:
- Real WiFi networks have all these impairments
- DDS struggles with packet loss and reordering
- Zenoh handles these gracefully with TCP reliability
- Compression Strategy (from D435i testing):
- Raw images: Unusable on congested WiFi (5 FPS)
- ZSTD compression: 2x better, still degraded (12 FPS)
- Theora video: Full frame rate maintained (30 FPS)
- Expected Results Under Degradation:
- DDS: Latency spikes, message drops, potential discovery failures
- Zenoh: Higher but stable latency, automatic reconnection
- Real-World Scenarios:
- Robot on 2.4GHz WiFi in a warehouse
- Drone communicating over cellular
- Multiple robots sharing bandwidth
8 Exercise 7: Congestion & Head-of-Line Blocking
8.1 Objective
Stress the network with mixed traffic and observe adaptive routing and buffering responses.
For complete congestion testing with cmd_vel jitter measurements, priority configuration examples, and detailed tc commands, see our detailed Part 3 Preview: Advanced Networking.
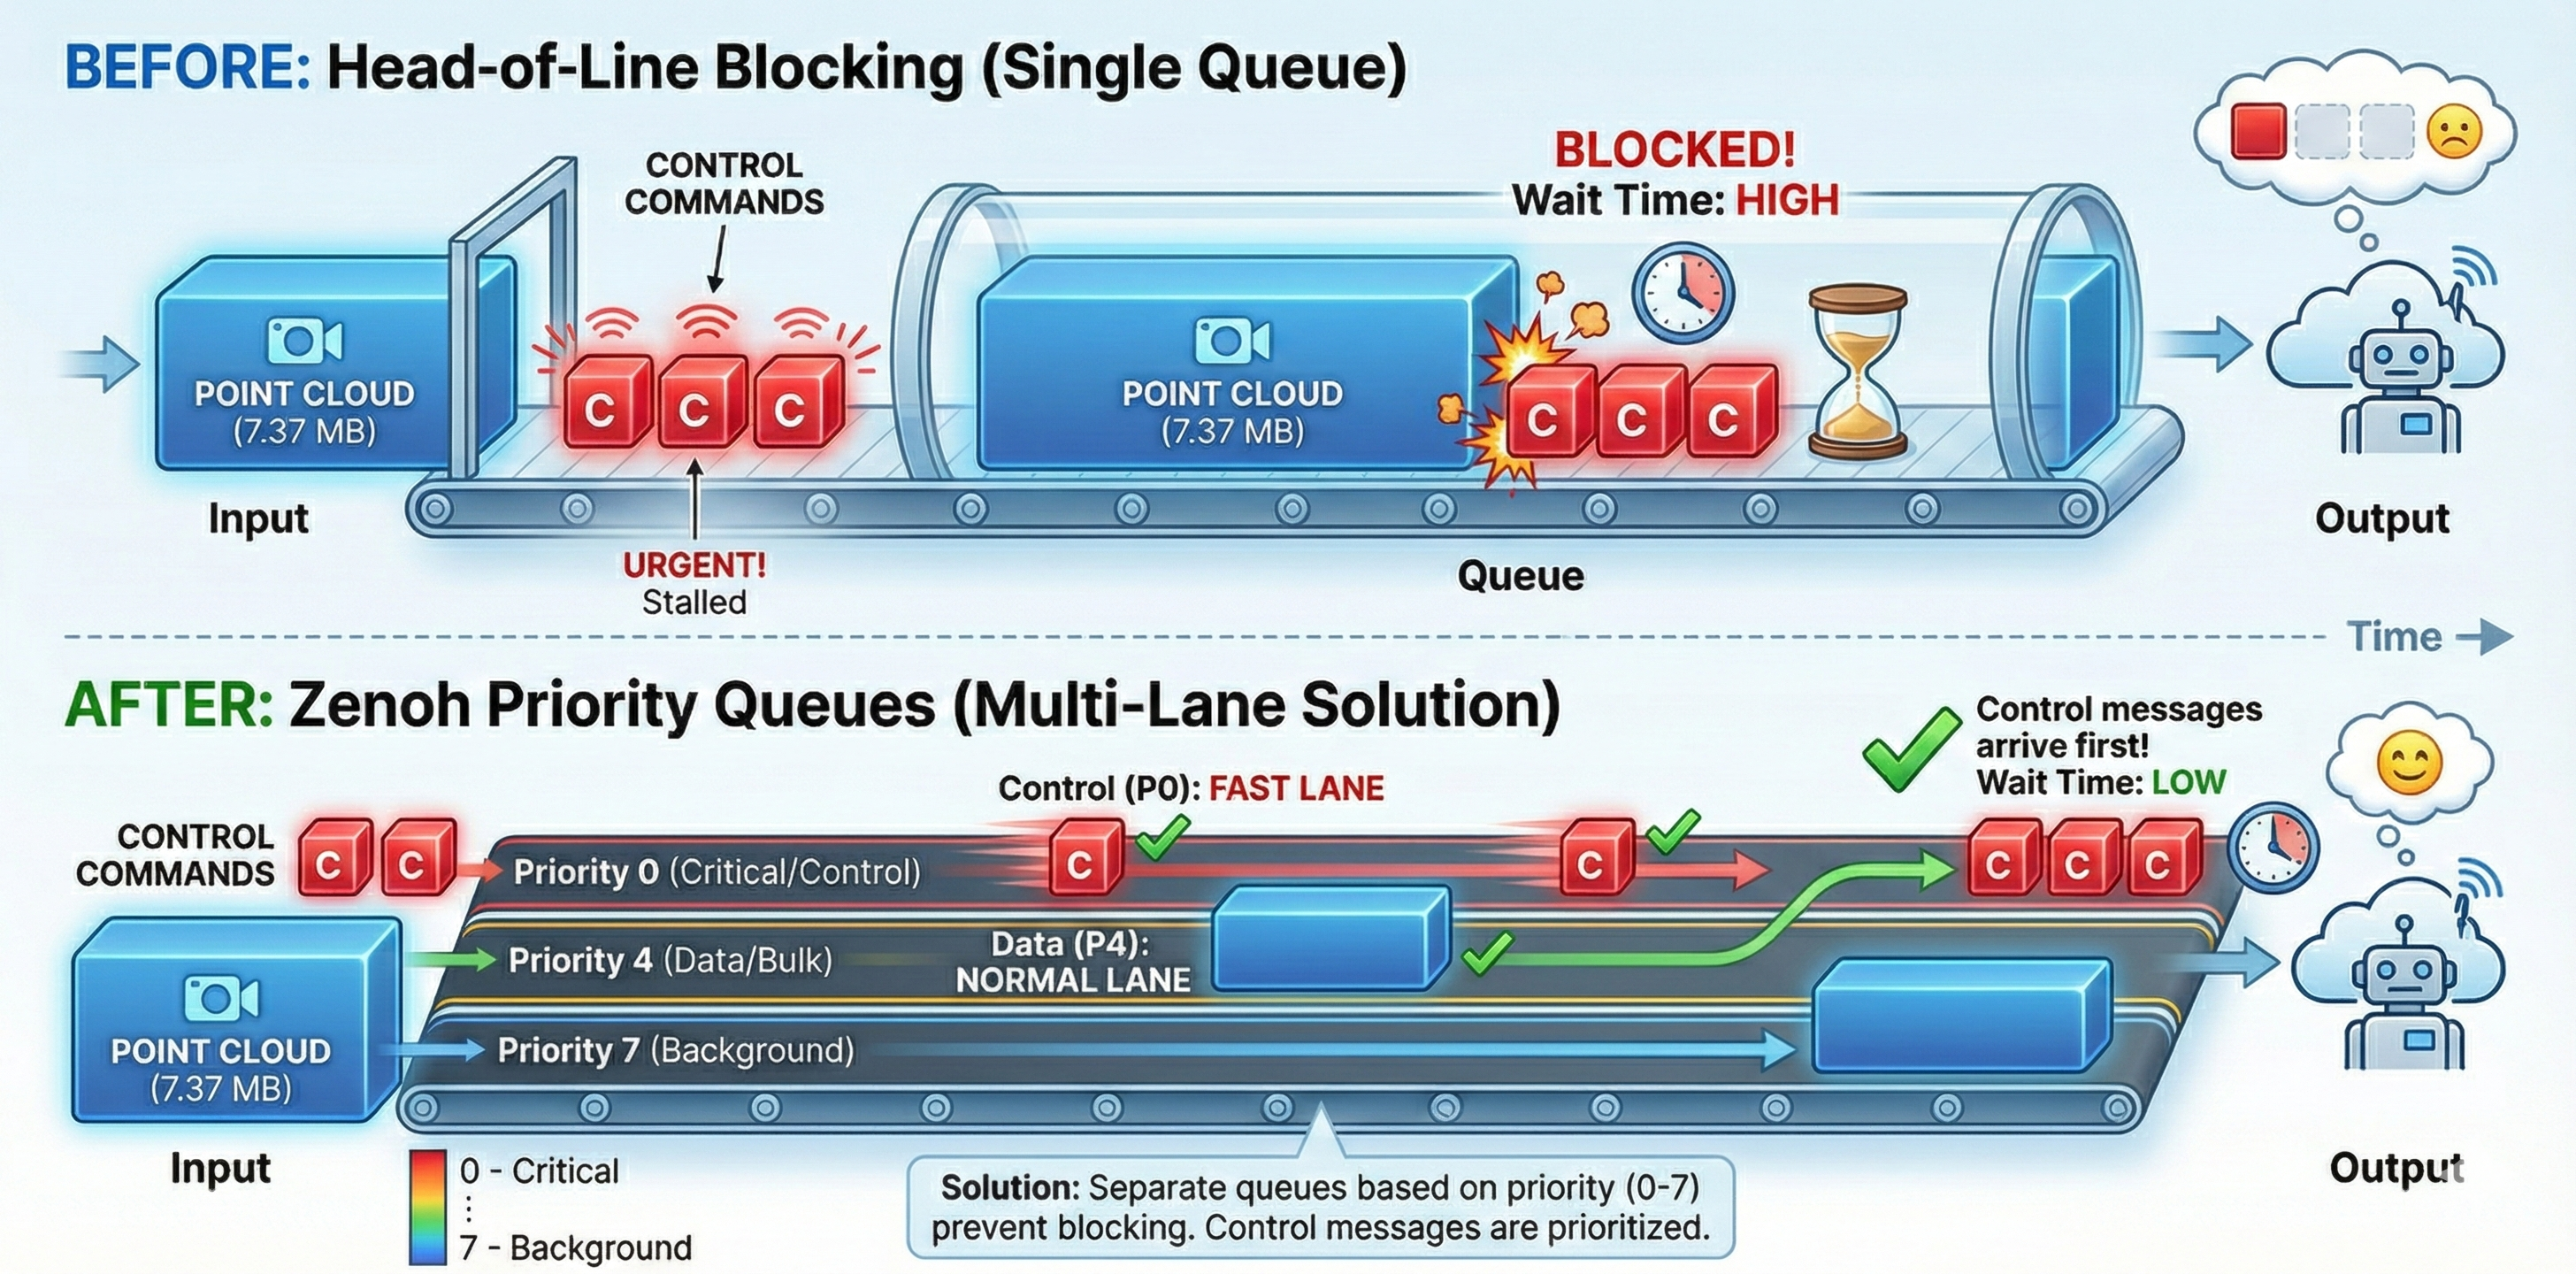
8.2 Key Concepts
When a large message (like a point cloud) blocks smaller, time-critical messages (like control commands). Zenoh’s prioritization helps mitigate this.
┌──────────────────────────────────────────────────────────┐
│              Head-of-Line Blocking Problem               │
│                                                          │
│  Time →                                                  │
│  ┌─────────────────────────┐                            │
│  │   Large Point Cloud     │  ← Blocking the queue      │
│  └─────────────────────────┘                            │
│  ┌──┐ ┌──┐ ┌──┐                                         │
│  │ C│ │ C│ │ C│  ← Small control msgs waiting           │
│  └──┘ └──┘ └──┘                                         │
└──────────────────────────────────────────────────────────┘
8.2.1 Real-World Impact: cmd_vel Under Congestion
We tested with camera (large images) and /cmd_vel (tiny control commands) running simultaneously:
| Condition | /cmd_vel Rate |
Jitter (std dev) | Impact |
|---|---|---|---|
| Baseline | 10 Hz | 0.0003s | Perfect |
| Moderate (200 Mbps + 10ms) | 10 Hz | 0.0035s | 10x worse! |
| Severe (50 Mbps + 50ms) | 10 Hz | 0.022s | 70x worse! |
Even though /cmd_vel maintains 10 Hz rate, the jitter (timing inconsistency) jumps from 0.3ms to 22ms under severe congestion. This causes jerky robot movement even when messages aren’t lost!
8.2.2 Zenoh Priority Levels
| Priority | Use Case | Example Topics |
|---|---|---|
| Real-time | Emergency, safety | /emergency_stop |
| Interactive | Control commands | /cmd_vel, /arm_control |
| Data | Sensor streams | /camera/**, /lidar/** |
| Background | Logs, diagnostics | /rosout |
8.3 Running the Exercise
Step 1: Monitor Local Traffic
This shows bandwidth usage on localhost, filtering out VNC traffic:
                    192.17KB           384.17KB          576.26KB
└─────────────────────┴──────────────────┴──────────────────┘
127.0.0.1:45678      =>     127.0.0.1:7447           7.37MB
                     <=                              1.23KB
Step 2: Monitor Router Traffic
This shows only Zenoh router traffic (port 7447):
Filtering on port 7447 (Zenoh router)Step 3: Zenoh’s Solution - Priority Configuration
Configure topic priorities in zenoh_priority.json5:
{
  qos: {
    publication: {
      // High priority for control
      "rt/cmd_vel": { priority: "real_time" },
      "rt/emergency_stop": { priority: "real_time" },

      // Normal priority for sensors
      "rt/camera/**": { priority: "data" },
      "rt/lidar/**": { priority: "data" },

      // Low priority for logs
      "rt/rosout": { priority: "background" }
    }
  }
}
8.4 Observations
Problem Visualization: Using
iftopshows how large messages dominate bandwidth.Jitter is the Real Enemy: Rate stays stable, but timing inconsistency (jitter) increases 70x under severe congestion.
Priority Configuration: Zenoh supports priority levels:
real_time→ Control messages (highest)interactive→ User interactionsdata→ Sensor streamsbackground→ Logs (lowest)
Topic Pattern Matching: Use wildcards like
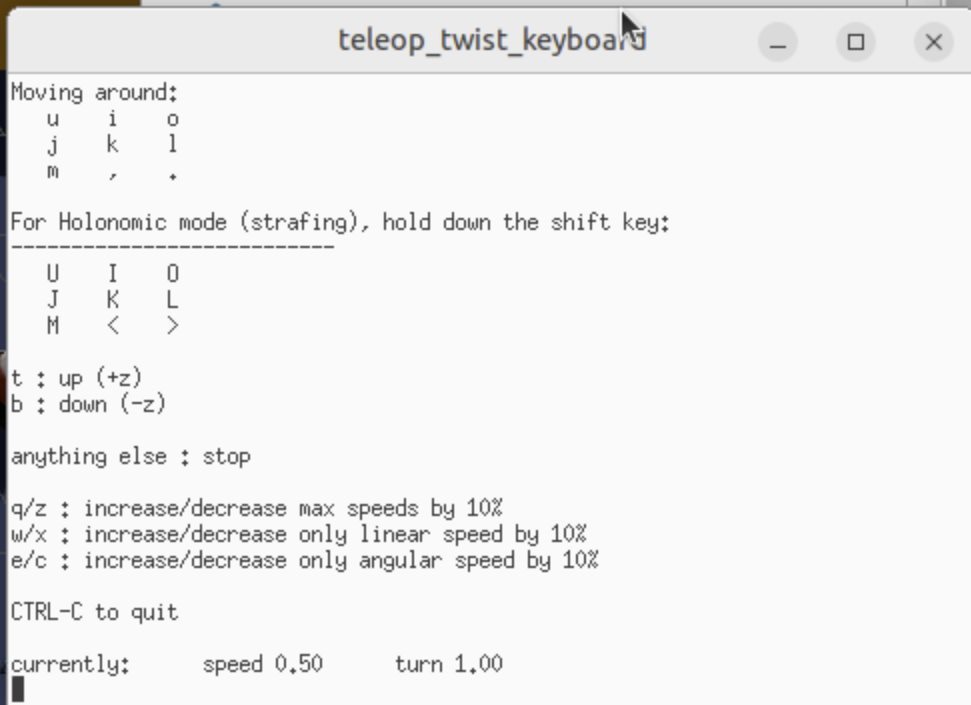
rt/camera/**to prioritize entire topic trees.Practical Tip: Run teleop while point clouds are streaming to feel the difference!
9 Exercise 8: Traversing the Internet
9.1 Objective
Use a cloud-hosted Zenoh router to cross NAT/firewalls and resolve topic conflicts using namespacing.
For NAT types comparison (Full Cone vs Symmetric), ICE connection establishment, and complete fleet namespace configuration, see our detailed Part 3 Preview: Advanced Networking.
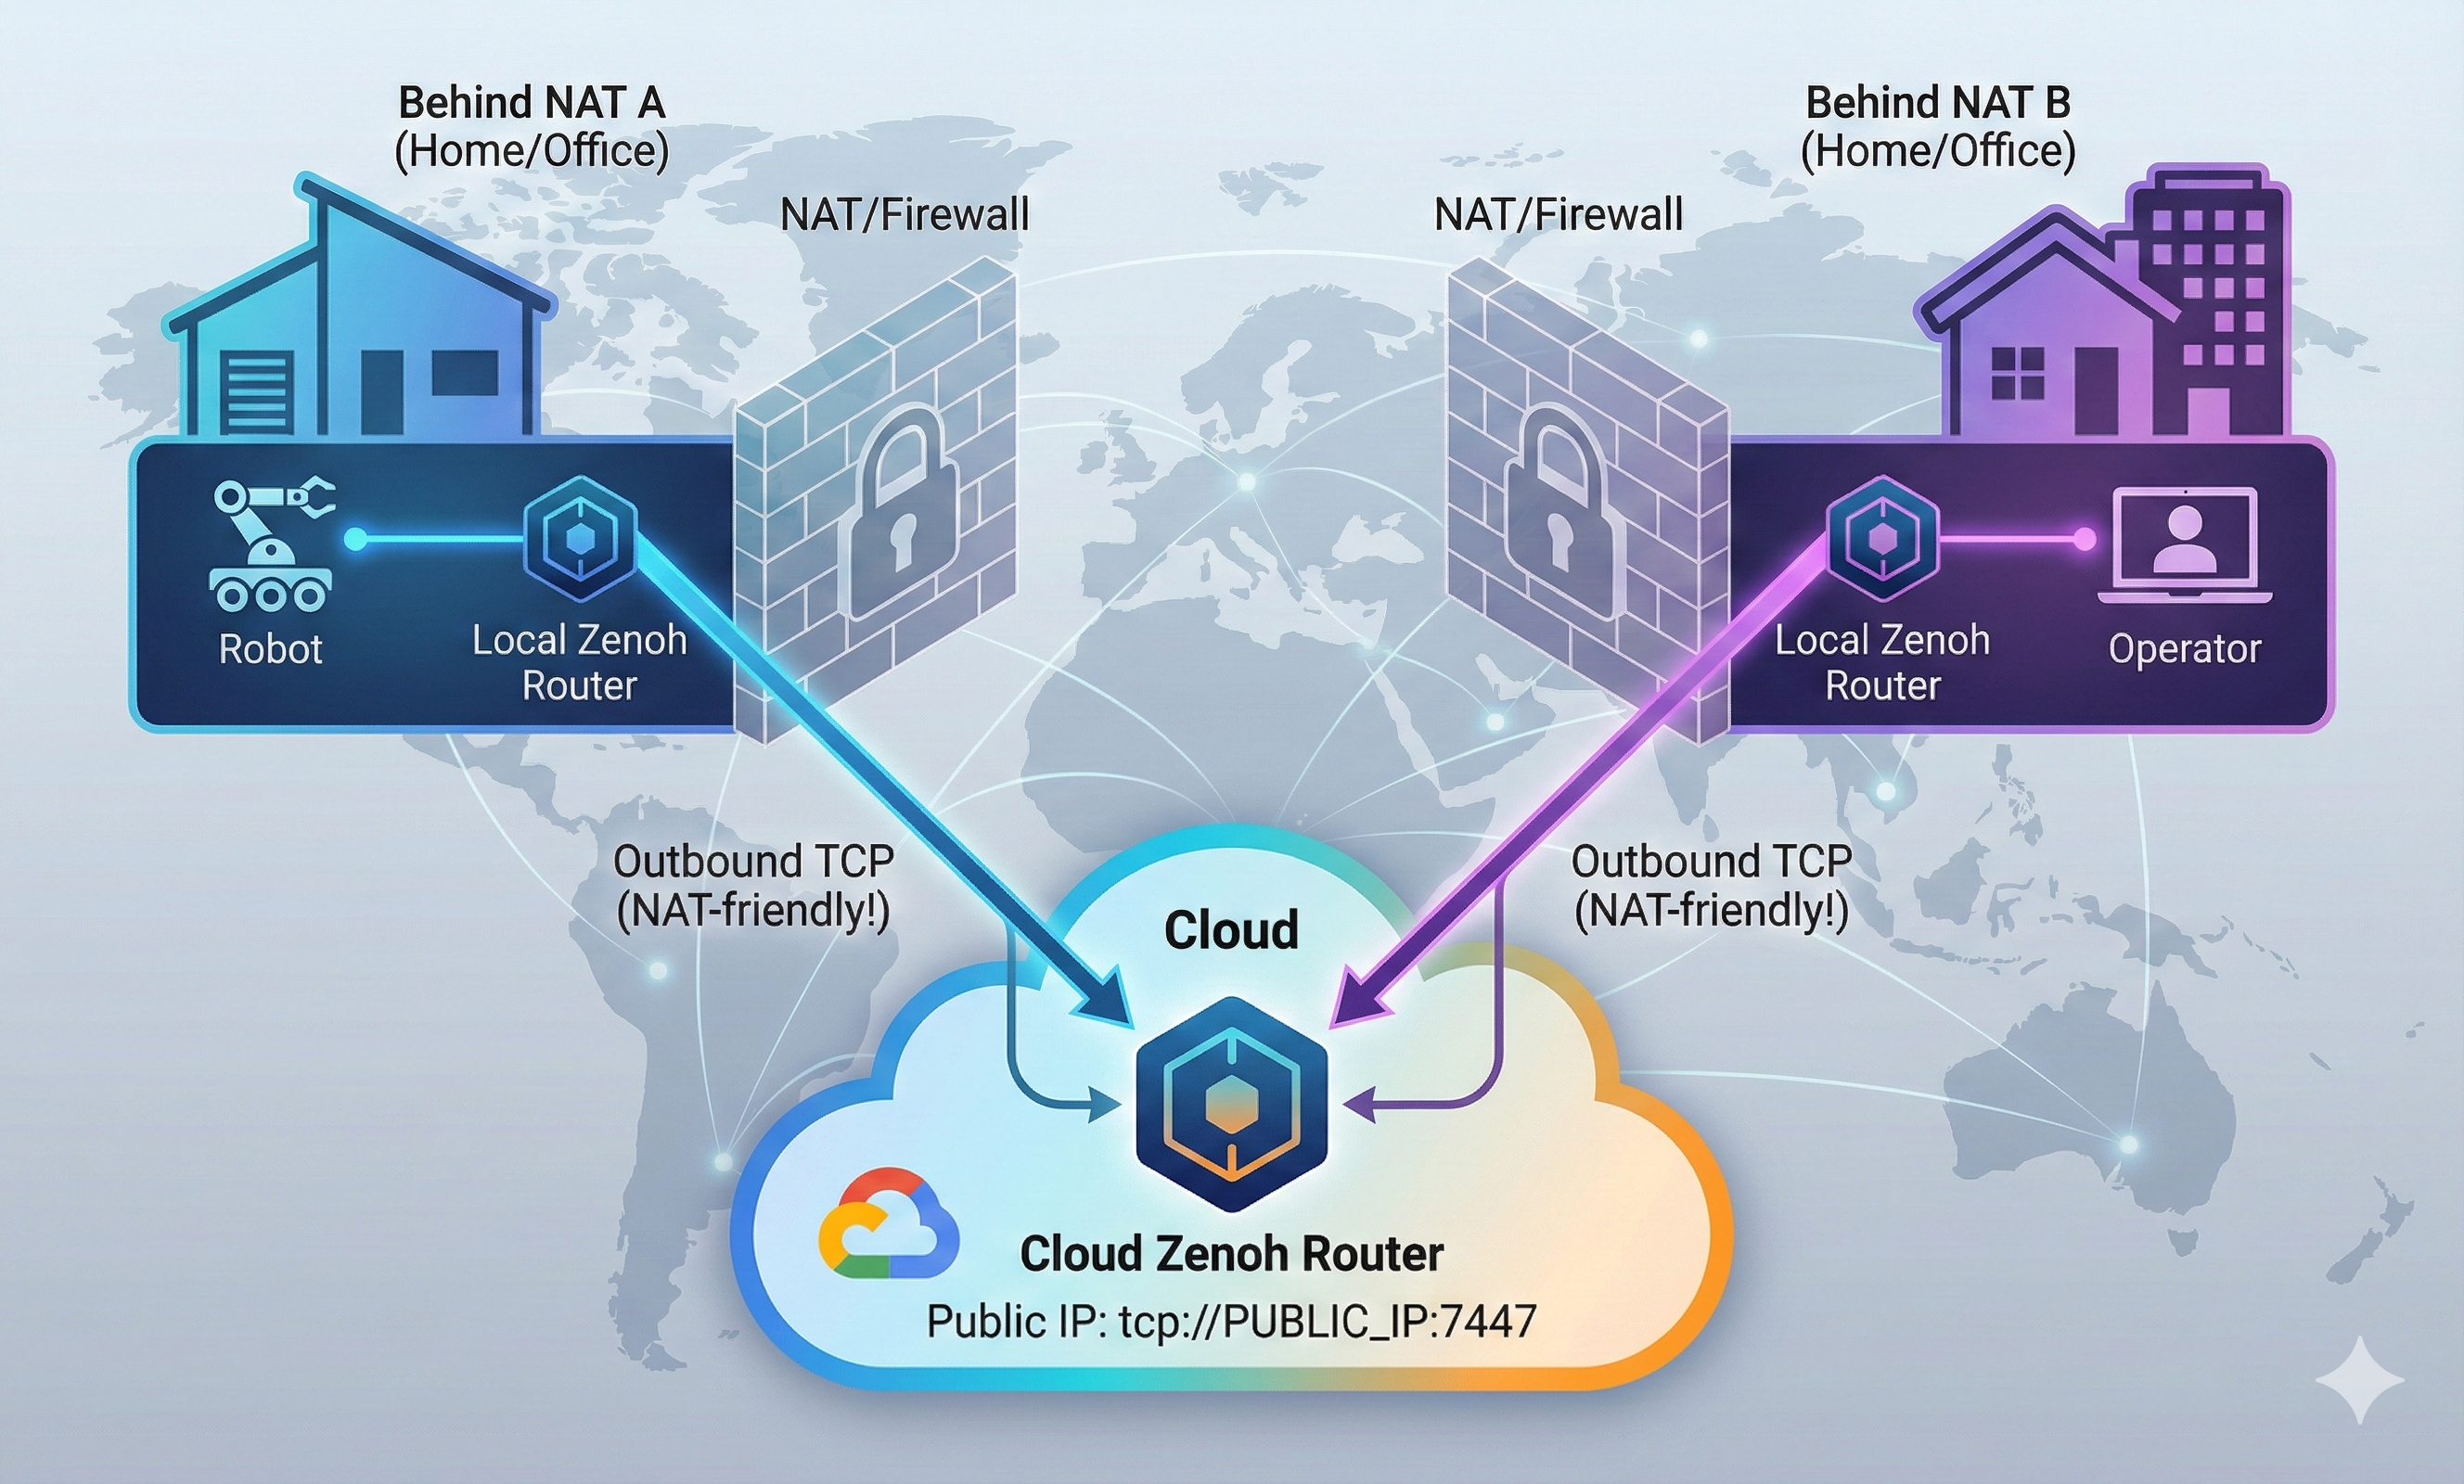
9.2 Key Concepts
┌─────────────────────────────────────────────────────────────────────┐
│                    NAT Traversal via Cloud Router                    │
│                                                                      │
│   ┌───────────────────┐                  ┌───────────────────┐      │
│   │  Behind NAT A     │                  │  Behind NAT B     │      │
│   │  (Home/Office)    │                  │  (Home/Office)    │      │
│   │                   │                  │                   │      │
│   │  ┌─────────┐      │                  │      ┌─────────┐  │      │
│   │  │  Robot  │      │                  │      │Operator │  │      │
│   │  └────┬────┘      │                  │      └────┬────┘  │      │
│   │       │           │                  │           │       │      │
│   │       ▼           │                  │           ▼       │      │
│   │  ┌─────────┐      │                  │      ┌─────────┐  │      │
│   │  │  Local  │      │                  │      │  Local  │  │      │
│   │  │ Router  │      │                  │      │ Router  │  │      │
│   │  └────┬────┘      │                  │      └────┬────┘  │      │
│   └───────│───────────┘                  └───────────│───────┘      │
│           │                                          │              │
│           │ Outbound TCP                Outbound TCP │              │
│           │ (NAT-friendly!)          (NAT-friendly!) │              │
│           │                                          │              │
│           ▼                                          ▼              │
│   ┌─────────────────────────────────────────────────────────────┐   │
│   │                         CLOUD                                │   │
│   │              ┌───────────────────────────┐                   │   │
│   │              │   Cloud Zenoh Router      │                   │   │
│   │              │   tcp://PUBLIC_IP:7447    │                   │   │
│   │              └───────────────────────────┘                   │   │
│   └─────────────────────────────────────────────────────────────┘   │
└─────────────────────────────────────────────────────────────────────┘Unlike DDS which requires port forwarding or VPN, Zenoh routers can establish outbound connections to a cloud router, allowing communication across NATs.
9.3 Running the Exercise
Step 1: Check Default Router Configuration
cat ~/rmw_zenoh/install/rmw_zenoh_cpp/share/rmw_zenoh_cpp/config/DEFAULT_RMW_ZENOH_ROUTER_CONFIG.json5 | head -40Key Configuration Options:
{
  mode: "router",
  connect: {
    // Connect to other routers (for NAT traversal)
    endpoints: []
  },
  listen: {
    // Listen for incoming connections
    endpoints: ["tcp/[::]:7447"]
  }
}
Step 2: Configure for Cloud Router Connection
Create a custom config to connect through a cloud router:
// ~/container_data/ROUTER_CONFIG.json5
{
  mode: "router",
  connect: {
    // Connect to cloud router (OUTBOUND - works through NAT!)
    endpoints: ["tcp/CLOUD_ROUTER_PUBLIC_IP:7447"]
  },
  listen: {
    // Listen locally
    endpoints: ["tcp/0.0.0.0:7447"]
  }
}
Step 3: Namespacing for Topic Conflicts
When multiple robots connect to the same cloud router:
# Robot 1
export ROS_NAMESPACE=/robot1
ros2 run demo_nodes_cpp talker

# Robot 2
export ROS_NAMESPACE=/robot2
ros2 run demo_nodes_cpp talker

# Topics become: /robot1/chatter, /robot2/chatter
9.3.1 Fleet Namespace Configuration
For production fleet management, configure namespace mapping in zenoh_namespace.json5:
9.3.2 Multi-Robot Result
| Robot | Node Name | Namespace | Topic |
|---|---|---|---|
| Go2 #1 | talker | /go2_001 | /go2_001/chatter |
| Go2 #2 | talker | /go2_002 | /go2_002/chatter |
| Go2 #3 | talker | /go2_003 | /go2_003/chatter |
Without namespacing, all robots publishing /odom would collide! With namespaces, the fleet dashboard sees /go2_001/odom, /go2_002/odom, etc. - each robot’s data clearly separated.
9.4 Observations
NAT Traversal Solution:
- Both local routers connect OUTBOUND to cloud router
- No port forwarding needed on either side
- Cloud router acts as rendezvous point
Cloud Router Setup (typically by instructor):
Namespacing Best Practices:
- Use
ROS_NAMESPACEfor each robot - Prevents topic name collisions
- Allows selective routing
- Use
Latency Expectations:
- Local: ~10ms
- Same data center: ~20-50ms
- Cross-region: ~100-200ms
- Acceptable for monitoring, not for control
Use Cases:
- Remote robot monitoring
- Multi-site coordination
- Cloud-based data logging
- Remote troubleshooting
10 Summary: Key Takeaways
10.1 Performance Results (From Our Testing)
| Measurement | Result | Notes |
|---|---|---|
| Point Cloud Latency (SHM) | ~10 ms | 7.37 MB messages |
| Image Latency (SHM) | ~1.8 ms | RGB images |
| Latency Std Dev | ~1.2 ms | Very consistent |
10.2 DDS vs Zenoh Comparison
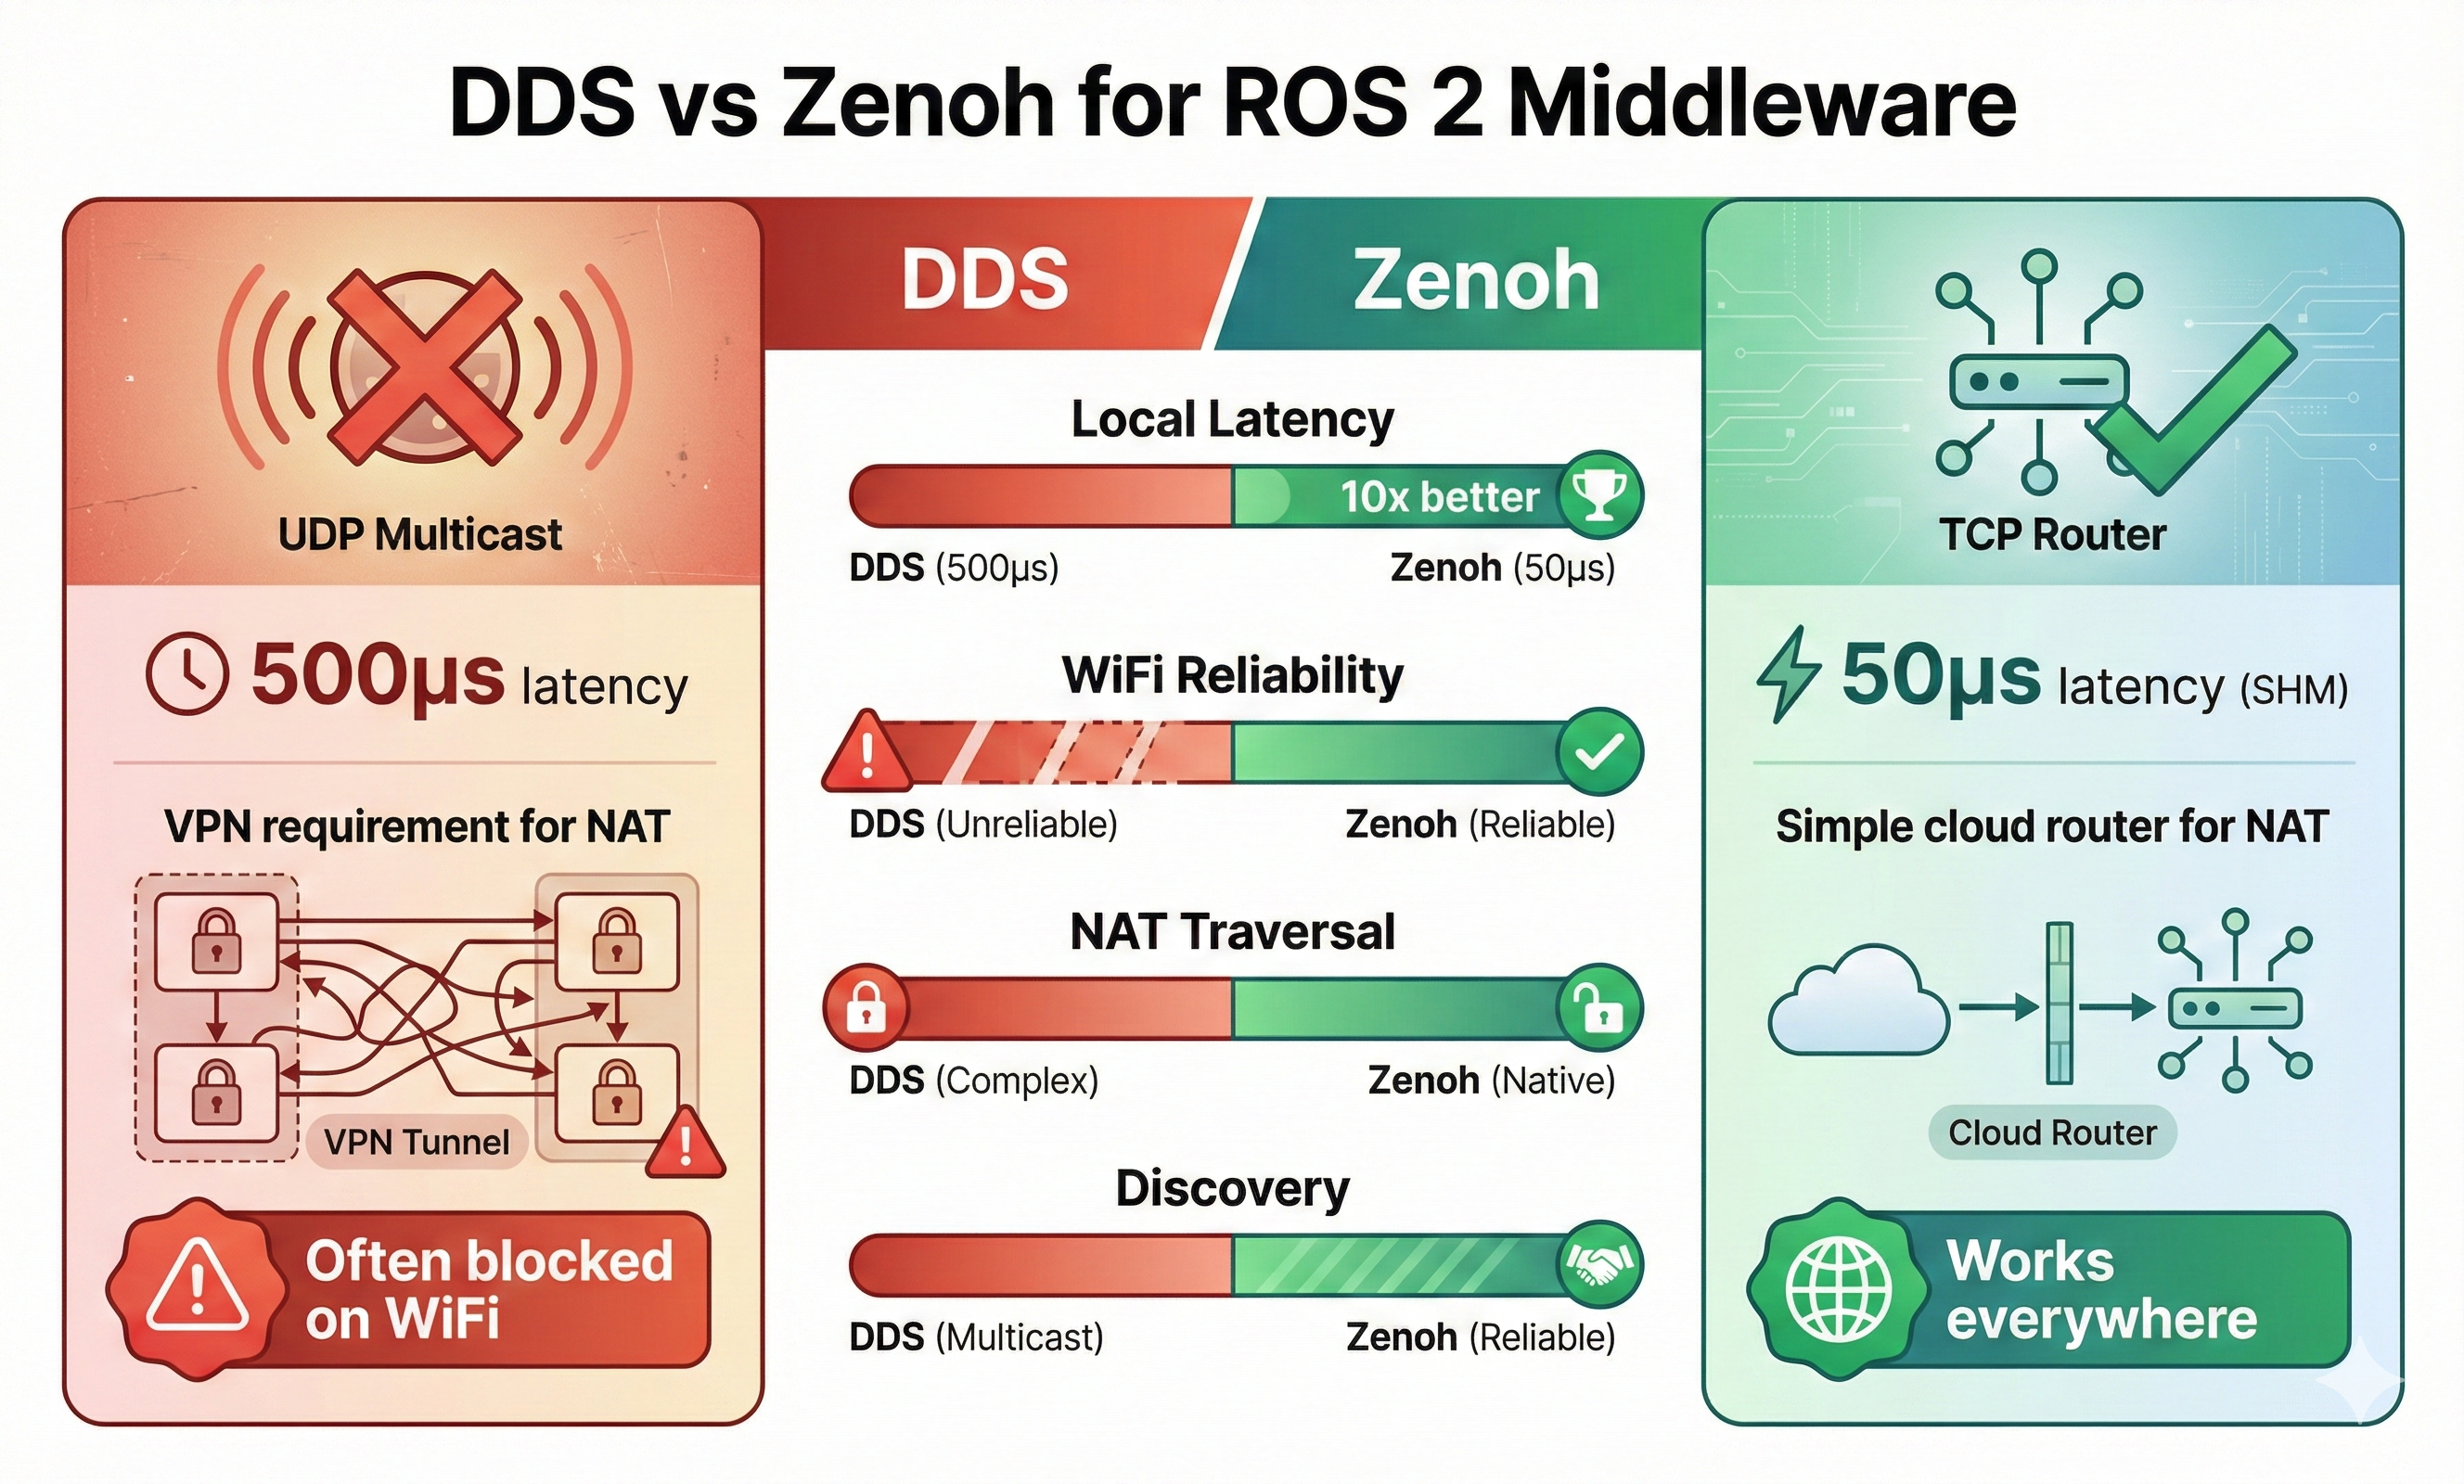
| Scenario | DDS Typical | Zenoh Typical | Improvement |
|---|---|---|---|
| Local latency | 500μs | 50μs (SHM) | 10x |
| WiFi reliability | Poor | Good | Adaptive |
| NAT traversal | Requires VPN | Native | Simpler |
| Discovery | Multicast (blocked) | TCP to router | Reliable |
10.3 Commands Cheat Sheet
# Essential commands for tomorrow's workshop
just --list              # See all available commands
just router              # Start Zenoh router
just rox_simu use_wall_time:=True  # Launch simulation
just rox_nav2            # Start Nav2
just rviz_nav2           # Launch RViz
just teleop              # Keyboard control
just cam_latency points  # Measure latency
just rt_factor           # Monitor simulation performance
just network_limit       # Degrade network (WiFi simulation)
just network_normal      # Restore network
just iftop_lo            # Monitor local traffic
just top                 # Show processes
11 Ready for Tomorrow!
We’ve walked through all 8 exercises and understand what to expect. Tomorrow we’ll:
- Follow along with the instructor
- Ask informed questions based on our exploration
- Compare our observations with the official explanations
- Take notes on anything we missed
See you at Workshop 3! 🚀
This walkthrough was performed the night before ROSCon India 2025 Workshop 3 using the official Zettascale container.